Blog

  • Crunchy Chicken Salad Cucumber Roll Ups

    Crunchy Chicken Salad Cucumber Roll Ups

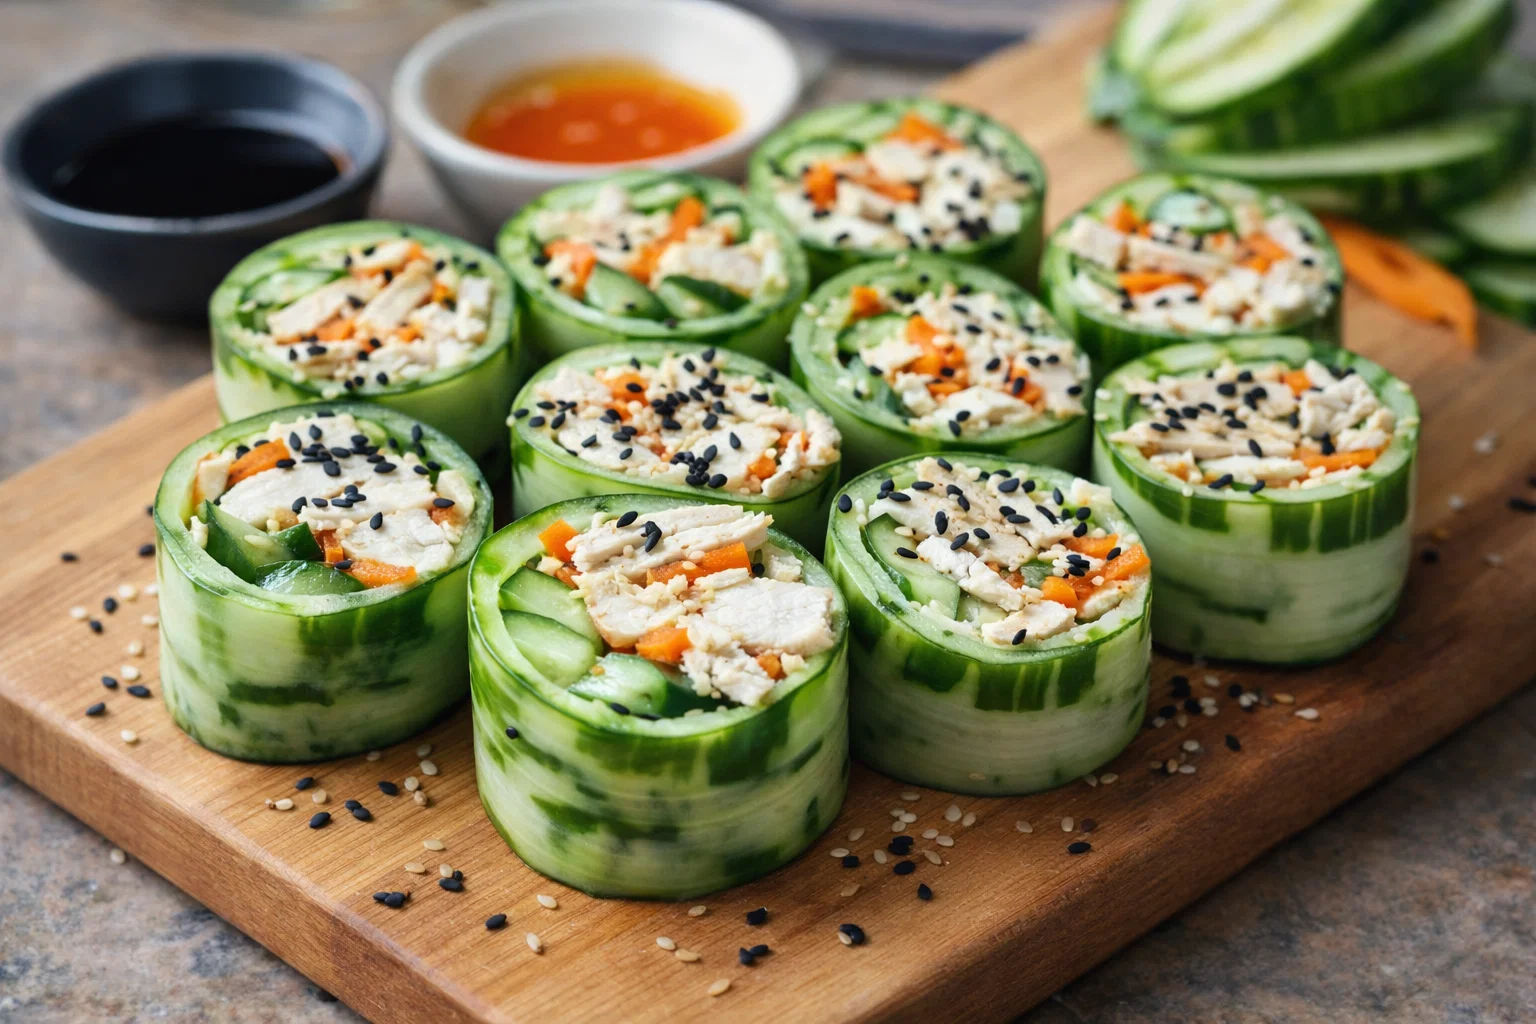
    Crunchy Chicken Salad Cucumber Roll Ups: A Tropical Delight

    Introduction to Crunchy Chicken Salad Cucumber Roll Ups

    Are you someone who loves exploring new chicken recipes that are not only easy to prepare but also packed with nutrients? If so, you’re in for a treat with our Crunchy Chicken Salad Cucumber Roll Ups! This recipe is perfect for anyone looking for a refreshing, light, and nutritious meal or snack that’s surprisingly simple to make.

    These roll-ups combine the delightful crunch of fresh cucumbers with a flavorful chicken salad mixture that can be customized to suit various taste preferences and dietary restrictions. Whether you’re a busy parent, a student cramming for exams, or a working professional on the go, these roll-ups are a fantastic choice. They require minimal cooking, allowing you to whip them up in no time, making them ideal for lunchboxes or quick dinners.

    Moreover, they’re gluten-free and can be made dairy-free or low-calorie without compromising on taste. They also serve as an excellent way to sneak in some extra veggies. By wrapping the chicken salad in cucumber, you not only enjoy a satisfying crunch but also boost hydration and nutrient intake. So, let’s dive into the world of Crunchy Chicken Salad Cucumber Roll-Ups—your next go-to dish for health-conscious eating and culinary delight!

    Benefits and Advantages of Crunchy Chicken Salad Cucumber Roll Ups

    The Crunchy Chicken Salad Cucumber Roll Ups are designed to cater to everyone’s needs, making them a standout in the realm of chicken recipes. Here are some benefits that make this recipe particularly effective:

    1. Quick and Easy Preparation: Life can get hectic, but with this recipe, you’ll spend less time cooking and more enjoying the delicious results. The cucumber serves as an instant vessel for the scrumptious chicken salad, eliminating the need for time-consuming traditional wraps or bread.

    2. Nutrient-Rich and Health Benefits: Cucumbers are low in calories and high in water content, making them a hydrating choice. They provide an excellent source of vitamins K and C while adding a refreshing crunch to your meal. The chicken salad itself can be packed with proteins, healthy fats, and fiber, depending on the ingredients you choose. This combination helps to keep you full and satisfied, without the guilt.

    3. Versatile and Customizable: One of the key attributes of these roll-ups is their versatility. You can mix and match various ingredients to cater to vegetarians, gluten-free diets, and even those watching their calorie intake. This means you can adapt the recipe to suit anyone’s dietary needs.

    4. Perfect for a Variety of Occasions: These roll-ups are stunning when served at parties, picnics, or casual get-togethers. Their vibrant appearance makes them an attractive option on any appetizer table. They also pack beautifully for school lunches, work snacks, or a light dinner option.

    5. Kid-Friendly: If you’re a parent, you know how challenging it can be to get kids interested in healthy foods. The fun shapes and flavors of the Crunchy Chicken Salad Cucumber Roll Ups can entice even the pickiest eaters to enjoy their veggies and lean proteins.

    In summary, the Crunchy Chicken Salad Cucumber Roll Ups are an easy and delicious way to pack in nutrients while satisfying diverse dietary preferences. Whether you’re enjoying these at home or on-the-go, they will prove to be a delightful addition to your chicken recipe collection!

    Ingredients Overview

    Essential Ingredients for Crunchy Chicken Salad Cucumber Roll Ups

    To prepare your Crunchy Chicken Salad Cucumber Roll Ups, you’ll need the following ingredients:

    • 2 large cucumbers (This serves as the wrap; choose firm, fresh cucumbers for maximum crunch.)
    • 2 cups cooked chicken breast (Diced or shredded; you can use rotisserie chicken for convenience.)
    • ½ cup Greek yogurt (A healthier alternative to mayonnaise; you can opt for dairy-free yogurt to cater to dietary needs.)
    • 1 tablespoon Dijon mustard (Adds a sharp flavor that balances well with the creaminess of yogurt.)
    • 1 cup celery (Chopped; contributes to the crunch and is low in calories.)
    • ½ cup red bell pepper (Diced; for a rainbow of colors and added vitamins.)
    • 1 tablespoon fresh parsley or dill (Chopped; for a burst of freshness.)
    • Salt and pepper, to taste

    Diet-conscious Options:

    • For a vegan option, you can substitute chicken with chickpeas or tofu and use vegan yogurt.
    • For a gluten-free version, all ingredients listed are already gluten-free, making these roll-ups suitable for those with gluten sensitivity.

    Dietary Substitutions to Customize Your Crunchy Chicken Salad Cucumber Roll Ups

    1. Chicken Alternatives: For a vegetarian dish, replace the chicken with chickpeas, shredded carrots, or even quinoa. These substitutes maintain the dish’s texture while providing different nutritional benefits.

    2. Yogurt Variants: Feel free to swap Greek yogurt with other alternatives like cottage cheese or a vegan yogurt option if you want a dairy-free recipe.

    3. Nut and Seed Add-Ins: If you want to boost the healthy fats, consider adding chopped almonds or sunflower seeds into the chicken salad mix. Not only does this add nutritional value, but it also enhances the crunch factor.

    4. Low-Calorie Options: If you’re aiming for a lower-calorie version, opt out of the mustard or reduce the portion of yogurt, and load up on more vegetables.

    In this way, the recipe is highly adaptable, enabling you to create a personalized variation that accommodates different dietary requirements while keeping the taste exciting and satisfying.

    How to Prepare the Perfect Crunchy Chicken Salad Cucumber Roll Ups: Step-by-Step Guide

    Let’s get started! Follow these easy steps to create your delightful Crunchy Chicken Salad Cucumber Roll Ups:

    1. Prepare the Base: Begin by washing your cucumbers thoroughly under running water. Pat them dry with a clean towel. Trim both ends off each cucumber and slice them lengthwise into thin strips (approximately ¼ inch thick). Aim for slices that can hold the filling without breaking, adjusting the thickness as necessary.

    2. Mix Ingredients: In a medium mixing bowl, combine the cooked chicken breast, Greek yogurt, Dijon mustard, chopped celery, and red bell pepper. Stir until the mixture is evenly combined. For added flavor, incorporate your choice of fresh herbs like parsley or dill.

    3. Season: Season the chicken salad mixture with salt and pepper as per your taste. Remember, flavoring this mixture is crucial as it will dominate the overall taste of the roll-ups.

    4. Assemble the Roll Ups: Take a cucumber slice and place a spoonful of the chicken salad mixture on one end. Using your fingers, gently roll the cucumber slice around the filling, similar to a burrito. Ensure the filling is secured within the cucumber.

    5. Repeat: Continue the process for the remaining cucumber slices, creating as many roll-ups as desired.

    6. Chill (Optional): If you prefer a cooler dish, place your assembled roll-ups in the refrigerator for about 15 minutes before serving. This allows the flavors to meld and enhances the crunchiness of the cucumbers.

    7. Slice and Serve: Once chilled (or if you prefer them fresh), slice each roll-up into bite-sized pieces for easier serving. Arrange them artfully on a plate and garnish with more fresh herbs if desired.

    8. Enjoy: Dig into your Crunchy Chicken Salad Cucumber Roll Ups! Relish the delightful combination of textures and flavors, perfect for any occasion.

    These steps ensure that your chicken recipes not only taste amazing but also make for a beautiful presentation—ideal for impressing guests or enjoying a simple meal at home.

    Mastering Crunchy Chicken Salad Cucumber Roll Ups: Advanced Tips and Variations

    Getting comfortable with the Crunchy Chicken Salad Cucumber Roll Ups opens the door to numerous variations and enhancements. Here are some advanced tips and ideas:

    1. Alternative Proteins: Beyond chicken and chickpeas, consider using tuna or crab meat for a seafood twist to your roll-ups. This adds a savory flavor that pairs beautifully with the cucumber’s freshness.

    2. Spice It Up: If you enjoy a bit of heat, try adding chopped jalapeños or a sprinkle of cayenne pepper to give your chicken salad a spicy kick. Consider using flavored Greek yogurts like lemon or garlic to further enhance the flavor profiles.

    3. Texture Enhancements: To elevate the crunch, you can throw in chopped nuts or crispy onions into the chicken salad mix. These ingredients will provide contrasting textures in every bite.

    4. Use of Herbs: Experiment with various fresh herbs like cilantro or green onions to shift the flavor profile. They can add an aromatic touch that brightens the dish.

    5. Color Variation: If you’re entertaining, using a variety of bell peppers—green, yellow, and orange—can create a gorgeous spectrum of colors in your roll-ups, making them visually appealing.

    6. Dipping Sauce: For an exciting element, prepare a dipping sauce! A simple mixture of soy sauce and honey or a spicy aioli can serve as a delightful dip for added flavor.

    By implementing these advanced tips and experimenting with variations, you not only master the original recipe but also unlock a myriad of possibilities within the category of chicken recipes!

    How to Store Crunchy Chicken Salad Cucumber Roll Ups: Best Practices

    Storing your Crunchy Chicken Salad Cucumber Roll Ups requires some care to maintain the freshness and crunchy texture. Here are the best practices for storage:

    1. Refrigeration: If you plan to store the roll-ups for later, place them in an airtight container in the refrigerator. They can typically last for about 1-2 days when properly sealed. However, it’s best to consume them within the first day for optimal taste and texture.

    2. Separating Ingredients: If you want to prepare the components in advance, consider storing the chicken salad mixture separately from the cucumber slices. This way, the cucumbers remain crisp and fresh, and you can assemble the roll-ups just before serving.

    3. Freezing: While it’s not recommended to freeze cucumber slices due to their high water content, you can freeze the chicken salad filling. Store it in a freezer-safe container, and when ready to use, simply thaw it in the refrigerator before assembling your roll-ups.

    4. Reheating: If using frozen filling, gently reheat it in the microwave or on the stovetop over low heat. Once heated, you can use fresh cucumbers to wrap the chicken salad, refreshing the dish.

    By adhering to these storage guidelines, you’ll ensure that your delicious roll-ups maintain their delightful taste and crunch, making it easy for you to enjoy this recipe multiple times!

    Nutritional Value of Crunchy Chicken Salad Cucumber Roll Ups

    One of the best aspects of the Crunchy Chicken Salad Cucumber Roll Ups is their remarkable nutritional profile. Here’s a general breakdown of the nutritional value per serving (assuming you get about 8 roll-ups from the recipe):

    • Calories: Approximately 150-200
    • Protein: 20 grams (This varies with the choice of chicken or alternatives)
    • Fat: 6 grams (With Greek yogurt as a healthier fat source)
    • Carbohydrates: 10 grams (Mostly from the cucumbers and veggies)
    • Dietary Fiber: 2-3 grams (Thanks to the added vegetables)
    • Vitamin A: 10% of Daily Value (from bell peppers)
    • Vitamin C: 15% of Daily Value (from cucumbers)
    • Calcium: 5% of Daily Value (from yogurt)

    This dish aligns well with various dietary standards, including Ketogenic or Mediterranean diets, focusing on low-carbohydrate, high-protein meals. By incorporating fresh ingredients and lean protein, these roll-ups help satisfy hunger while nurturing overall health.

    FAQs: Frequently Asked Questions About Crunchy Chicken Salad Cucumber Roll Ups

    Can I make these roll-ups in advance?

    Absolutely! You can prepare the chicken salad mixture a day ahead and store it in the refrigerator. Just slice the cucumbers right before you serve to maintain their crispness.

    Is it necessary to use Greek yogurt in the recipe?

    Greek yogurt adds creaminess and protein to the chicken salad. However, you can substitute it with any yogurt of your preference or even mayonnaise. For a vegan option, use a plant-based yogurt.

    Can I use other vegetables besides cucumbers?

    Certainly! This chicken salad mixture can also be served in lettuce leaves or whole wheat wraps. Just ensure that the vegetables you choose can hold the filling without falling apart.

    How can I make a vegetarian version of this recipe?

    Simply replace the chicken with chickpeas, lentils, or quinoa, and follow the same steps. The remaining ingredients will work beautifully with these alternatives.

    What other seasonings can I add to the chicken salad?

    Enhance the flavor by adding spices such as garlic powder, onion powder, or different herbs like thyme or basil. Feel free to experiment to find your favorite combination!

    The Crunchy Chicken Salad Cucumber Roll Ups can seamlessly fit into any culinary repertoire and are sure to be a favorite for food lovers of all dietary preferences. With simplicity, health benefits, and adaptability, it’s a recipe worth bookmarking! Get ready to enjoy a fresh and flavorful dish that’s perfect for any occasion.

  • Peruvian Chicken with Aji Verde  Cilantro Rice

    Peruvian Chicken with Aji Verde Cilantro Rice

    Peruvian Chicken with Aji Verde & Cilantro Rice: A Tropical Delight

    Introduction to Peruvian Chicken with Aji Verde & Cilantro Rice

    Dive into the vibrant world of Peruvian Chicken with Aji Verde & Cilantro Rice, a striking dish that marries rich flavors with delightful textures. This recipe stands out not just for its deliciousness but also for its simplicity and health benefits, making it a perfect addition to your repertoire of chicken recipes.

    Crafted for busy home cooks and culinary enthusiasts alike, this dish showcases juicy, succulent chicken marinated with earthy spices and served alongside aromatic cilantro rice. The accompanying Aji Verde, a zesty green sauce, elevates the meal with its vibrant flavors. Moreover, this recipe caters to a variety of dietary needs. Whether you’re looking for a low-calorie meal, gluten-free options, or simply a wholesome dinner that can be prepared in under an hour, this dish has it all.

    From newlyweds looking to impress their partner to busy parents juggling dinner prep, Peruvian Chicken with Aji Verde & Cilantro Rice is not just a meal—it’s an experience. Imagine serving this colorful dish at your dinner table, inviting warmth and togetherness. With its heart-healthy ingredients and vibrant presentation, this recipe will inspire your culinary journey and leave your guests asking for seconds.

    Benefits and Advantages of Peruvian Chicken with Aji Verde & Cilantro Rice

    The beauty of Peruvian Chicken with Aji Verde & Cilantro Rice lies in its myriad of benefits. It’s not just another recipe; it’s one that checks all the boxes for a healthy, satisfying meal without much effort.

    Effortless Preparation

    One of the most appealing aspects of this dish is how simple it is to prepare. With minimal ingredients and straightforward methods, even novice cooks can whip up an impressive meal. The marinade can be prepared in advance, and the chicken can even be marinated overnight for enhanced flavor. This makes it an excellent choice for busy weeknights or impromptu gatherings.

    Health Benefits

    Packed with lean protein, complex carbohydrates, and essential vitamins, this dish supports a nutritious diet. Chicken is an excellent source of protein, crucial for muscle repair and overall health. Meanwhile, the cilantro rice provides fiber and aids digestion, making it a balanced meal.

    Customizable for Dietary Needs

    Whether you’re vegan, gluten-sensitive, or calorie-conscious, this recipe can be easily adapted. For a vegan version, substituting chicken with tofu or jackfruit while keeping the marinade creates a delightful alternative. For gluten-free options, ensuring your spices and sauces contain no gluten will keep the dish suitable for all diets.

    An Inviting Presentation

    The vibrant colors of the Aji Verde, the bright green of the cilantro rice, and the golden-brown chicken make for a visually stunning plate. This dish turns an ordinary dinner into a celebratory occasion, suitable for both casual family meals and festive gatherings.

    Ingredients Overview

    Essential Ingredients for Peruvian Chicken with Aji Verde & Cilantro Rice

    Below is a list of all the ingredients you’ll need to create this mouthwatering dish, complete with precise measurements:

    For the Chicken:

    • 4 boneless, skinless chicken breasts – The heart of any chicken recipe, providing lean protein.
    • 1/4 cup olive oil – Adds richness and aids in marination.
    • 1/4 cup fresh lime juice – Brightens the flavors and tenderizes the chicken.
    • 4 cloves garlic, minced – Infuses the dish with aromatic notes.
    • 2 teaspoons ground cumin – Provides warmth and depth.
    • 1 teaspoon paprika – Adds both color and subtle sweetness.
    • Salt and pepper to taste – Enhances all the other flavors.

    For the Aji Verde:

    • 1 cup fresh cilantro – The star ingredient in the sauce.
    • 2 jalapeños, seeds removed – Adds heat and zest.
    • 1/4 cup mayonnaise (or Greek yogurt for a lighter option) – Creates a creamy texture.
    • 2 cloves garlic – For an extra kick.
    • Juice of 1 lime – Balances the spice with acidity.
    • Salt to taste – For flavor enhancement.

    For the Cilantro Rice:

    • 1 cup long-grain rice – The base of the dish.
    • 2 cups water or chicken broth – For cooking the rice and adding flavor.
    • 1/2 cup chopped cilantro – Reinforces the fresh herb flavor.
    • 1 tablespoon lime juice – Enhances the flavor profile.

    Dietary Substitutions to Customize Your Peruvian Chicken with Aji Verde & Cilantro Rice

    1. Vegan Options:
    – Substitute chicken with extra-firm tofu, chickpeas, or jackfruit.
    – Use a vegan mayonnaise alternative for the Aji Verde.

    2. Gluten-Free:
    – Ensure the chicken broth (if used) is gluten-free and opt for gluten-free, low-sodium soy sauce as a marinade alternative.

    3. Low-Calorie:
    – Replace mayonnaise with Greek yogurt in the Aji Verde.
    – Choose skinless chicken thighs instead of breasts for more flavor without high calories.

    By customizing these ingredients, you can make this dish compatible with various dietary preferences while enjoying its original flavors and benefits.

    How to Prepare the Perfect Peruvian Chicken with Aji Verde & Cilantro Rice: Step-by-Step Guide

    Crafting a delicious plate of Peruvian Chicken with Aji Verde & Cilantro Rice has never been easier. Follow these concise steps to prepare a feast that will delight your taste buds:

    1. Prepare the Marinade: In a bowl, combine olive oil, lime juice, minced garlic, cumin, paprika, salt, and pepper. This flavorful mixture will infuse the chicken with a robust taste.

    2. Marinate the Chicken: Place the chicken breasts in a resealable plastic bag or shallow container and pour the marinade over them. Seal and refrigerate for at least 30 minutes or up to overnight for maximum flavor.

    3. Rinse the Rice: In a sieve, rinse the long-grain rice under cold water for a few minutes to remove excess starch. This will help achieve fluffy rice.

    4. Cook the Rice: In a medium saucepan, bring 2 cups of water or chicken broth to a boil. Add the rinsed rice, cover, and reduce to a simmer. Cook for 18-20 minutes or until water is absorbed. Once done, remove from heat and let sit for 5 minutes.

    5. Prepare the Aji Verde: While the rice is cooking, combine cilantro, jalapeños, mayonnaise (or yogurt), garlic, lime juice, and salt in a blender. Blend until smooth and creamy. Adjust seasoning if necessary.

    6. Grill or Bake the Chicken: Preheat your grill or oven to 400°F (200°C). Remove the chicken from the marinade and either grill for about 6-7 minutes per side or bake in a preheated oven for 20-25 minutes, until cooked through and juices run clear.

    7. Fluff the Rice: Once the rice has rested, use a fork to fluff it up. Stir in chopped cilantro and lime juice for added flavor.

    8. Serve: On each plate, spoon a generous serving of cilantro rice, top with grilled chicken, and drizzle the Aji Verde over the top. Enjoy your culinary journey!

    Mastering Peruvian Chicken with Aji Verde & Cilantro Rice: Advanced Tips and Variations

    To elevate your culinary skills even further, consider these advanced tips and variations that can help you master Peruvian chicken recipes:

    Advanced Tips:

    • Let the Chicken Rest: Always allow grilled or baked chicken to rest for at least 5 minutes after cooking. This keeps the meat juicy and flavorful.
    • Perfect Aji Verde Consistency: For a thinner sauce, add a few tablespoons of water or extra lime juice to your Aji Verde while blending.
    • Try Different Proteins: While chicken is the primary protein used, experimenting with shrimp or fish can offer exciting twists.

    Variations:

    • Add Vegetables: Consider adding grilled corn, peppers, or avocado as a colorful and nutritious garnish.
    • Spice Levels: If you prefer a milder flavor, reduce the number of jalapeños or substitute with milder pepper varieties.
    • Serve with Beans: Adding black beans or lentils can provide an extra layer of texture while increasing the meal’s nutritional value.

    These tips and variations can help you adjust the dish to suit your tastes or elevate your culinary experience, providing you with a variety of homemade chicken recipes.

    How to Store Peruvian Chicken with Aji Verde & Cilantro Rice: Best Practices

    After enjoying your delicious meal, proper storage will ensure that your Peruvian chicken recipes remain fresh and flavorful. Here’s how to store your leftovers effectively:

    Refrigeration

    • Allow the chicken and rice to cool completely before transferring them to airtight containers.
    • Store in the refrigerator for up to 3-4 days.
    • Keep Aji Verde in a sealed jar or container for up to a week in the fridge.

    Freezing

    • Chicken can be frozen for up to 3 months. Wrap in plastic wrap and then foil or place in freezer-friendly bags.
    • For rice, refrigerate it first and then freeze in flat portions, which will help it thaw quickly.
    • Aji Verde can also be frozen, although it may slightly change in texture upon thawing.

    Reheating

    • Reheat chicken in a preheated oven to 350°F (175°C) for 10-15 minutes or until heated through.
    • Rice can be microwaved with a splash of water for moisture for about 1-2 minutes.
    • Aji Verde can be served chilled or at room temperature, or gently warmed.

    Following these best practices will ensure your delicious Peruvian chicken meal stays fresh for later enjoyment.

    Nutritional Value of Peruvian Chicken with Aji Verde & Cilantro Rice

    Understanding the nutritional value of Peruvian Chicken with Aji Verde & Cilantro Rice is essential for those watching their diets or looking for healthy meal options. Here’s a breakdown of the nutritional information per serving:

    • Calories: Approximately 450-500 calories
    • Protein: 35-40 grams
    • Fat: 25 grams (depending on the oil and mayonnaise/yogurt used)
    • Carbohydrates: 40 grams
    • Fiber: 3-5 grams
    • Sodium: 600-800 mg (can vary based on salt added)

    This dish provides a balanced meal consisting of lean protein, healthy fats, and carbohydrates. The addition of vegetables and herbs increases vitamin content, making it a wholesome addition to any diet.

    FAQs: Frequently Asked Questions About Peruvian Chicken with Aji Verde & Cilantro Rice

    Can I use chicken thighs instead of breasts?

    Yes, chicken thighs can be used as a substitute for a richer flavor. Adjust cooking times as they may require slightly longer cooking.

    Is the Aji Verde spicy?

    The heat level can be adjusted based on the number of jalapeños used. For a milder sauce, use fewer or deseed the peppers.

    How long does the chicken need to marinate?

    For optimal flavor, marinate the chicken for at least 30 minutes, but preferably overnight.

    Can I make this dish in advance?

    Absolutely! You can prepare the chicken, rice, and Aji Verde a day ahead of time. Just reheat before serving.

    What can I serve alongside this dish?

    A refreshing salad, grilled vegetables, or plantains make excellent side dishes to complement the main meal.

    By answering common questions surrounding Peruvian chicken recipes, we aim to equip you with the knowledge you need for a successful culinary experience.


    In conclusion, Peruvian Chicken with Aji Verde & Cilantro Rice is more than just a delicious meal; it’s a complete culinary experience. Whether you’re feeding a family or cooking for one, this recipe caters to everyone’s needs and preferences, making it a delightful dish worth trying. So gather your ingredients and let the tropical flavors inspire your cooking journey!

  • Spicy Brazilian Coconut Chicken

    Spicy Brazilian Coconut Chicken

    Spicy Brazilian Coconut Chicken: A Tropical Delight

    Introduction to Spicy Brazilian Coconut Chicken

    If you’re searching for a standout recipe that combines bold flavors with simplicity, look no further than Spicy Brazilian Coconut Chicken. This dish not only embodies the vibrant spirit of Brazilian cuisine, but it also meets a variety of dietary needs, making it a well-rounded choice for home cooks and culinary adventurers alike. Whether you’re a busy parent juggling a hectic schedule, a newlywed experimenting in the kitchen, or a food enthusiast longing for new tastes, this recipe is designed with you in mind.

    The use of coconut milk creates a creamy texture that perfectly complements the spices, while the chicken provides a source of lean protein. Furthermore, this dish can easily be tailored to suit gluten-free or low-calorie diets, ensuring that everyone at the table can dig in without a worry. Plus, with culinary influences from the tropics, the vibrant colors and enticing aromas make it a feast for the senses.

    Incorporating this Spicy Brazilian Coconut Chicken into your list of easy chicken recipes will not only elevate your cooking game but also offer a health-conscious meal option that the whole family will love. So, roll up your sleeves and prepare to embark on a flavorful adventure that combines nutrition with authentic Brazilian taste!

    Benefits and Advantages of Spicy Brazilian Coconut Chicken

    Spicy Brazilian Coconut Chicken stands out among various chicken recipes for several compelling reasons. First and foremost, its ease of preparation makes it an ideal choice for cooks of all skill levels. The recipe typically requires minimal chopping and cooking techniques, allowing even novice cooks to succeed. Busy parents and working professionals can whip this dish together in less than an hour, making it a perfect weeknight dinner option.

    Moreover, health-conscious individuals will appreciate the nutritional benefits of this recipe. Chicken is a fantastic source of lean protein, essential for building and repairing tissues, and when paired with coconut milk, you gain additional health advantages. Coconut milk is rich in medium-chain fatty acids (MCFAs), which are beneficial for metabolism and can provide an energy boost. The recipe is easily adaptable to accommodate various dietary restrictions; for instance, by substituting regular chicken with plant-based protein options, it can be transformed into a vegan delight, while still retaining its rich flavors.

    Lastly, Spicy Brazilian Coconut Chicken offers nutritional diversity. With the incorporation of spices like paprika, cumin, and chili flakes, it isn’t just a source of protein; it also provides antioxidants and anti-inflammatory properties. This makes it a standout option in the vast world of chicken recipes. By bringing a little piece of Brazil to your dinner table, you’ll not only savor amazing flavors but also promote wellness with this nutritious dish.

    Ingredients Overview

    Essential Ingredients for Spicy Brazilian Coconut Chicken

    To prepare your Spicy Brazilian Coconut Chicken, gather the following ingredients:

    • 2 lbs chicken thighs or breasts (boneless, skinless): These cuts provide tenderness and moisture once cooked.
    • 1 can (13.5 oz) coconut milk: The primary ingredient that adds creaminess and a rich flavor.
    • 1 medium onion, finely chopped: Adds sweetness and depth to your dish.
    • 3 cloves garlic, minced: Infuses the dish with aromatic flavors.
    • 1 tablespoon fresh ginger, minced: Offers a zesty kick and anti-inflammatory benefits.
    • 1 tablespoon paprika: Contributes a smoky flavor and vibrant color.
    • 1 tablespoon cumin: Deepens the flavor profile with earthy notes.
    • 1 teaspoon chili flakes (adjust to taste): Adds the desired level of spiciness.
    • 1 tablespoon olive oil or coconut oil: For sautéing and healthy fats.
    • Salt and pepper to taste: Enhances the overall taste.
    • Juice of 1 lime: Brightens flavors and adds acidity.
    • Fresh cilantro for garnishing (optional): Offers a fresh herbal note.

    Dietary Options:
    – To make the dish vegan, substitute chicken with chickpeas or tofu and use a vegan coconut milk alternative.
    – For gluten-free options, all ingredients listed are naturally gluten-free.
    – For low-calorie choices, consider using skinless chicken breasts.

    Dietary Substitutions to Customize Your Spicy Brazilian Coconut Chicken

    Customizing the Spicy Brazilian Coconut Chicken is easy with a few substitution suggestions. Here are some ideas according to various dietary preferences:

    • For a Vegetarian Version: Replace chicken with either chickpeas, which are high in protein and fiber, or firm tofu. Cook the tofu until crispy for a satisfying texture.
    • For Gluten Sensitivity: All ingredients are gluten-free, but ensure that any sauces or added flavorings you may use do not contain gluten.
    • Low-Carb Options: Swap out the chicken for eggplant or cauliflower and keep the coconut sauce for a flavorful vegetarian dish.
    • To Reduce Fat Content: Use light coconut milk instead of regular full-fat coconut milk; this will still offer creaminess while reducing calories.

    By incorporating these substitutions, you can create a dish that aligns with your dietary goals while still delivering the vibrant flavors of Brazilian cuisine.

    How to Prepare the Perfect Spicy Brazilian Coconut Chicken: Step-by-Step Guide

    Follow these detailed steps to recreate this delectable Spicy Brazilian Coconut Chicken:

    1. Prepare the Base: Start by heating the olive oil (or coconut oil) in a large skillet over medium heat. Add the chopped onion and sauté until it becomes translucent and soft, about 5 minutes. You can sprinkle a bit of salt to speed up this process.

    2. Add Aromatics: Stir in the minced garlic and ginger, continuing to sauté for another minute until fragrant. The combination of onion, garlic, and ginger creates a flavorful base that enhances the dish.

    3. Season the Chicken: While your base is cooking, season the chicken pieces with salt, pepper, paprika, cumin, and chili flakes. This is the first layer of flavor that will infuse through the meat.

    4. Cook the Chicken: Increase the heat to medium-high and add the seasoned chicken into the pan. Cook for 5-7 minutes on each side, until the chicken is golden brown and cooked through. If using a meat thermometer, ensure the internal temperature reaches 165°F (74°C).

    5. Add Coconut Milk: Once the chicken is nicely browned, pour in the coconut milk. Reduce heat to medium-low and let it simmer for about 15-20 minutes. This allows the chicken to absorb the creamy richness of the coconut milk.

    6. Finish with Lime: After simmering, squeeze the juice of one lime to brighten the flavors, and adjust the seasoning with additional salt and pepper if needed.

    7. Garnish: Serve your Spicy Brazilian Coconut Chicken hot, garnished with freshly chopped cilantro for a touch of freshness and color.

    8. Serve with Accompaniments (Optional): This dish pairs beautifully with steamed jasmine rice, quinoa, or a fresh garden salad.

    This step-by-step guide ensures that every home chef can follow along regardless of their cooking expertise, making it easier to whip up this delicious dish in no time.

    Mastering Spicy Brazilian Coconut Chicken: Advanced Tips and Variations

    To elevate your Spicy Brazilian Coconut Chicken further, here are some advanced tips and creative variations:

    • Add Vegetables: Consider adding bell peppers, zucchini, or spinach during the sautéing phase. This increases the nutritional value and adds more texture and flavor to the dish.
    • Spice Level Adjustment: For those who enjoy heat, try incorporating fresh chopped chili peppers along with chili flakes. A couple of jalapeños or serranos will ramp up the spiciness significantly.
    • Coconut Rice: Serve this chicken on a bed of coconut rice by cooking rice with coconut milk instead of water. This complements the chicken’s flavors wonderfully.
    • Experiment with Proteins: Besides chicken, this recipe works excellently with shrimp or even fish. Adjust cooking times accordingly to ensure the proteins are cooked through.
    • Slow-Cooker Adaptation: For a hands-off approach, you can slow-cook the ingredients. Combine all ingredients in a slow cooker and let it simmer on low for 4-6 hours for tender, flavorful chicken.

    By trying these tips and variations, you can make this dish uniquely yours while enjoying the vibrant taste of Brazilian cuisine.

    How to Store Spicy Brazilian Coconut Chicken: Best Practices

    Storing your Spicy Brazilian Coconut Chicken properly can help maintain its freshness and flavor. Here are the best practices for storage:

    • Refrigeration: Allow the dish to cool to room temperature. Transfer the chicken to an airtight container and store it in the refrigerator. It will remain fresh for 3-4 days.

    • Freezing: For longer storage, you can freeze the chicken. Divide it into meal-sized portions and place them in freezer-safe bags or containers. Ensure to remove as much air as possible to prevent freezer burn. It can be frozen for up to 3 months.

    • Reheating: When ready to enjoy, thaw the frozen chicken overnight in the refrigerator. To reheat, you can warm it on the stove over low heat or in the microwave. Add a splash of coconut milk or water if the sauce thickens too much during storage.

    Storing your Spicy Brazilian Coconut Chicken properly not only preserves its delicious flavors but also enables convenient meal prep for busy days.

    Nutritional Value of Spicy Brazilian Coconut Chicken

    The Spicy Brazilian Coconut Chicken is not only delicious but also packed with essential nutrients. Here’s a breakdown of approximate nutrition information per serving (based on a 4-serving total):

    • Calories: 450 kcal
    • Protein: 30 g
    • Fat: 30 g (from coconut milk and chicken)
    • Carbohydrates: 14 g
    • Fiber: 2 g
    • Sugar: 3 g
    • Sodium: 500 mg (adjust according to added salt)

    This dish provides a balance of macronutrients while being low in carbohydrates, making it a suitable option for those watching their carb intake. Moreover, the use of coconut milk adds healthy fats, contributing to fullness and energy.

    Additionally, the spices included provide antioxidants, supporting your overall health. By incorporating Spicy Brazilian Coconut Chicken into your meal plan, you’re not just treating yourself to exceptional flavor; you’re also fueling your body with nourishing ingredients.

    FAQs: Frequently Asked Questions About Spicy Brazilian Coconut Chicken

    Here are some common questions about Spicy Brazilian Coconut Chicken:

    1. Can I use breast meat instead of thighs?
      Absolutely! Chicken breast works well but keep in mind it may dry out more quickly due to its lower fat content. Adjust cooking times accordingly.

    2. What can I use instead of coconut milk?
      If you are not a fan of coconut milk, try substituting with almond milk or heavy cream. However, this will alter the dish’s creamy texture.

    3. Can I make this recipe ahead of time?
      Yes, this dish holds up well when made in advance. Store it in the refrigerator for up to 4 days or freeze it for longer storage.

    4. What are some good side dishes to serve with this chicken?
      Serve this flavorful chicken alongside steamed rice, quinoa, or a fresh salad. You can also enjoy it with tortilla chips or in a wrap for lunch.

    5. Is this recipe suitable for meal prepping?
      Yes! This recipe is excellent for meal prep. Just follow the storage guidelines mentioned, and it can make for easy lunches or dinners throughout the week.

    In tackling these questions, we hope to empower readers to confidently dive into making this delicious Brazilian dish. Whether it’s your first time cooking chicken recipes or you’re a seasoned chef, Spicy Brazilian Coconut Chicken is sure to impress!

    With its unique flavors, health benefits, and diversity in options, this recipe is a must-try for anyone wanting to add a tropical flair to their culinary repertoire. Enjoy cooking and bon appetit!

  • Chinese Scallion Chicken

    Chinese Scallion Chicken

    Chinese Scallion Chicken: A Tropical Delight

    Introduction to Chinese Scallion Chicken

    Are you searching for delicious and easy chicken recipes that offer a burst of flavor and health benefits? Look no further than Chinese Scallion Chicken! This delightful dish is a simple yet satisfying meal that brings together tender chicken and aromatic scallions, creating a dish that is perfectly suited for busy parents, food enthusiasts, and anyone looking to whip up something special with minimal effort.

    With its quick preparation time and minimal cooking skills required, Chinese Scallion Chicken shines as an approachable dish for home cooks of all levels. Not only is it packed with protein, making it an excellent choice for those following a diet-conscious approach, but it can also be made gluten-free and offers vegetarian options by substituting the chicken with plant-based protein.

    This recipe is more than just quick and healthy—it’s also a crowd-pleaser that can satisfy various dietary preferences. Whether you’re a busy professional, a student on a budget, or a new parent trying to feed a family, this dish can adapt to your needs while being deliciously satisfying. So why not add this vibrant, easy-to-make recipe to your collection of unique chicken dinner ideas? Get ready to dive into a world of flavor that celebrates the fresh taste of scallions combined with tender, juicy chicken!

    Benefits and Advantages of Chinese Scallion Chicken

    Chinese Scallion Chicken isn’t just a flavorful dish; it carries with it numerous benefits that make it a must-try for any kitchen enthusiast. First and foremost, the ease of preparation stands out. This recipe typically requires only a handful of ingredients and takes less than 30 minutes from start to finish. You can serve it as an impressive centerpiece for dinner guests or a quick weeknight meal.

    Beyond its convenience, this dish is also packed with health benefits. Chicken provides a lean source of protein, which is essential for muscle repair and overall body function, while scallions add a fresh burst of flavor along with essential vitamins and minerals. With just a small amount of oil and a simple sauce, you minimize unhealthy fats, making this meal cardiovascular-friendly.

    Moreover, Chinese Scallion Chicken can easily be manipulated based on your dietary restrictions. For those following a gluten-free lifestyle, simply swap in gluten-free soy sauce, and you’re good to go. Vegan and vegetarian diners can enjoy a similar taste experience by substituting chicken with tofu or mushrooms, providing the same satisfying texture without the meat.

    The vibrant flavors of ginger, garlic, and scallions create a harmonious balance that appeals to children and adults alike. Moreover, it pairs wonderfully with rice or noodles and can serve as a versatile base for other ingredients, allowing for creativity in the kitchen. All these factors combine to make Chinese Scallion Chicken not just a dish, but a total meal experience with countless benefits.

    Ingredients Overview

    Essential Ingredients for Chinese Scallion Chicken

    To create your own Chinese Scallion Chicken, gather the following essential ingredients:

    • Chicken Breasts: 500 grams (approximately 1 pound)
    • Benefit: A lean protein source rich in vitamins and low in fat.

    • Scallions (Green Onions): 4-5, chopped

    • Benefit: These add flavor and are packed with antioxidants.

    • Garlic: 3 cloves, minced

    • Benefit: Provides flavor and has health benefits, including anti-inflammatory properties.

    • Ginger: 1 tablespoon, freshly grated

    • Benefit: Known for aiding digestion and providing a zesty kick.

    • Soy Sauce: ¼ cup (gluten-free soy sauce for dietary needs)

    • Benefit: Offers a savory depth of flavor with minimal calories.

    • Cornstarch: 2 tablespoons

    • Benefit: A thickening agent that maintains a silky sauce consistency.

    • Vegetable Oil or Sesame Oil: 2 tablespoons

    • Benefit: Adds flavor; choose healthy oils for cooking.

    • Salt and Pepper: To taste

    • Benefit: Fundamental seasonings to enhance overall taste.

    • Water: As necessary for sauce consistency

    • Benefit: Keeps the dish from becoming too thick or dry.

    This dish is also customizable: Opt for low-sodium soy sauce for further health benefits or aim for organic chicken to enhance nutritional content.

    Dietary Substitutions to Customize Your Chinese Scallion Chicken

    For a Vegan Option

    • Replace chicken with tofu, tempeh, or seitan for a plant-based protein alternative. Marinade them in a similar soy sauce mixture for enhanced flavor.

    Gluten-Free Changes

    • Use gluten-free soy sauce to maintain a similar taste while adhering to gluten-free dietary needs. This simple substitution allows the dish to remain accessible for those with gluten intolerance.

    Low-Calorie Alternatives

    • Consider skinless chicken thighs instead of breasts for a richer flavor. If you’re looking to cut down on calories, using less oil or opting for an alternative cooking method like steaming can be beneficial.

    Spice Variations

    • For a little heat, incorporate sliced chilies or a sprinkle of red pepper flakes during the cooking process. If you prefer a sweeter flavor, add a drizzle of honey or maple syrup to the sauce.

    By making these simple dietary substitutions, everyone can enjoy the delightful flavors of Chinese Scallion Chicken while aligning with their nutritional needs.

    How to Prepare the Perfect Chinese Scallion Chicken: Step-by-Step Guide

    Get ready to create a delicious Chinese Scallion Chicken dish with these simple step-by-step instructions. This recipe is not only beginner-friendly but can also be adapted for various dietary preferences.

    1. Prepare the Chicken:
    2. Begin by trimming excess fat from the chicken breasts and slicing them into thin strips. This helps cook the chicken evenly and more quickly.

    3. Marinate the Chicken:

    4. In a bowl, combine the sliced chicken with 2 tablespoons of soy sauce, 1 tablespoon of cornstarch, and a pinch of salt and pepper. Mix well and let it marinate for 10-15 minutes to infuse flavor.

    5. Cook the Aromatics:

    6. Heat 2 tablespoons of vegetable oil or sesame oil in a large skillet or wok over medium-high heat. Add the minced garlic and grated ginger. Stir-fry for 30 seconds until fragrant.

    7. Add the Chicken:

    8. Carefully add the marinated chicken into the skillet. Cook for about 5-7 minutes, stirring occasionally, until the chicken is golden and cooked through.

    9. Incorporate the Scallions:

    10. Add the chopped scallions to the chicken. Continue to stir-fry for an additional 2 minutes. The scallions should soften slightly but still maintain their vibrant color.

    11. Create the Sauce:

    12. Pour in an additional ¼ cup of soy sauce and a little water if needed. Stir well to combine everything. Allow the mixture to simmer for another 2-3 minutes to thicken.

    13. Adjust Seasoning:

    14. Taste the dish and adjust the seasoning by adding more soy sauce, salt, or pepper according to your preference.

    15. Serve:

    16. Serve your Chinese Scallion Chicken hot over a bowl of steamed rice or noodles, garnished with extra scallions if desired.

    17. Enjoy:

    18. Relish the delightful combination of flavors and enjoy a meal that delights both the palate and the senses.

    This straightforward recipe allows you to enjoy Chinese Scallion Chicken in no time, with the option to customize based on your dietary needs, showing the versatility of these well-loved chicken dinner ideas.

    Mastering Chinese Scallion Chicken: Advanced Tips and Variations

    Now that you’re equipped with the basics, here are some advanced tips and variations to elevate your Chinese Scallion Chicken experience:

    • Add Vegetables: For a more balanced meal, consider adding bell peppers, snow peas, or broccoli to the stir-fry for added color, texture, and nutrients.

    • Experiment with Flavors: Try incorporating hoisin sauce for a sweet and tangy contrast, or a splash of rice vinegar for a bright finish. This infusion of additional ingredients can take the flavor profile to the next level.

    • Use Different Proteins: If you’re feeling adventurous, swap chicken for shrimp, or for a plant-based alternative, try chickpeas or lentils for a protein-packed option that retains the essence of this beloved chicken dish.

    • Garnish Creatively: Top your dish with sesame seeds or chopped cilantro for added texture and a burst of freshness.

    • Meal Prep Ready: This recipe reheats well, making it an excellent choice for meal prep. Prepare a double batch and store in airtight containers for busy weeknights.

    By experimenting with these tips and variations, you can master the dish and customize it to your taste preferences.

    How to Store Chinese Scallion Chicken: Best Practices

    Storing your Chinese Scallion Chicken correctly will ensure you enjoy its delightful flavors over multiple meals without any waste. Here are the best practices for refrigeration, freezing, and reheating:

    Refrigeration

    • Cooling: Allow the chicken to cool to room temperature before storing.
    • Containers: Transfer the chicken to an airtight container or cover it tightly with plastic wrap. Proper sealing is essential to maintain freshness.
    • Shelf Life: Refrigerated, your Chinese Scallion Chicken should last for 3-4 days without compromising flavor and texture.

    Freezing

    • Preparation for Freezing: If you want to extend its shelf life, consider freezing your Chinese Scallion Chicken. Place it in a freezer-safe container or a heavy-duty zip lock bag, removing as much air as possible.
    • Shelf Life: Frozen meals generally last about 2-3 months in the freezer. Label the container with the date for reference.

    Reheating

    • Thawing: The best practice is to thaw frozen chicken overnight in the refrigerator. If in a hurry, you can use the defrost setting on your microwave.
    • Reheating Options: Reheat in a skillet over medium heat, stirring occasionally until warmed through. Alternatively, use the microwave in intervals, stirring halfway for even heating.
    • Taste Test: Always taste a small portion before serving to ensure it still meets your flavor expectations.

    By following these storage tips, you can enjoy your Chinese Scallion Chicken safely and deliciously at any time.

    Nutritional Value of Chinese Scallion Chicken

    Understanding the nutritional value of your meals is essential for making informed eating choices. Here’s a breakdown of the nutritional content per serving of Chinese Scallion Chicken (approximately 200 grams):

    • Calories: 280
    • Protein: 30 grams
    • Carbohydrates: 12 grams
    • Fat: 12 grams
    • Saturated Fat: 2 grams
    • Fiber: 1 gram
    • Sugars: 1 gram
    • Sodium: 650 mg

    Incorporating this dish into your diet provides a balanced mix of macronutrients, positioning it as an excellent choice for those looking to maintain a healthy lifestyle while enjoying bold chicken recipes.

    Adjustments to keep health in check include using less oil, opting for low-sodium soy sauce, or accompanying it with a side of steamed vegetables or quinoa for added fiber and nutrients. Being conscious of ingredient choices allows you to control the nutritional profile while enjoying a delicious meal.

    FAQs: Frequently Asked Questions About Chinese Scallion Chicken

    Here are some common questions about making Chinese Scallion Chicken, along with clear answers to assist both novice and experienced cooks:

    1. Can I use chicken thighs instead of breasts?

    Absolutely! Chicken thighs provide a richer flavor and maintain moisture well; just ensure they are cooked through thoroughly.

    2. What can I substitute for soy sauce?

    For a soy-free alternative, you can use coconut aminos, which provides a similar sweet and salty flavor profile.

    3. Can I make this recipe ahead of time?

    Yes, meal prep enthusiasts can make this dish ahead. Store it correctly in the fridge or freeze portions for later enjoyment, allowing for convenient meals on busy nights.

    4. How spicy is this dish?

    The recipe itself is not inherently spicy. However, feel free to adjust to your liking by adding chili flakes or fresh peppers during the cooking process.

    5. What’s a good side dish to serve with this?

    Pair your Chinese Scallion Chicken with steamed white or brown rice, stir-fried vegetables, or a fresh salad for a well-rounded meal.

    6. Can this dish be frozen?

    Yes! This recipe freezes well. Make sure it’s cooled completely, then store it in a freezer-safe container for up to 3 months.

    By addressing these frequently asked questions, we hope to make your cooking experience smoother and more enjoyable. Dive into this easy recipe, explore its versatility, and savor the delightful flavors and health benefits that Chinese Scallion Chicken has to offer.

    Now that you have all the tools and information needed, it’s time to cook up some delicious Chinese Scallion Chicken and share it with your family and friends! Happy cooking!

  • Sun-Dried Tomato and Spinach Risotto

    Sun-Dried Tomato and Spinach Risotto

    Sun-Dried Tomato and Spinach Risotto: A Tropical Delight

    Introduction to Sun-Dried Tomato and Spinach Risotto

    Welcome to one of the most delightful dinner recipes that you can whip up in no time – Sun-Dried Tomato and Spinach Risotto! This dish is a celebration of rich flavors and nutritious ingredients that can elevate any meal. Risotto is often seen as a sophisticated dish, but the truth is: it’s incredibly easy to prepare. With just a handful of ingredients, including vibrant sun-dried tomatoes and nutrient-packed spinach, you can create a sumptuous, creamy risotto that whets the appetite of even the most discerning palates.

    Whether you’re a busy parent juggling multiple responsibilities, a student on a budget looking for quick meals, or a health-conscious individual who believes in wholesome eating, this recipe fits the bill. It’s simple enough for a novice cook yet impressive enough for dinner parties. The best part? This dish is both vegan and gluten-free, making it a versatile choice for various dietary needs.

    In addition to being a treat for your taste buds, this risotto is also a fantastic source of vitamins and minerals. Spinach is loaded with iron and essential nutrients, while sun-dried tomatoes add depth and a myriad of health benefits. Serving this dish not only satisfies your hunger but also provides wholesome nourishment. So, roll up your sleeves and learn how to prepare this delicious Sun-Dried Tomato and Spinach Risotto – a must-try for anyone who loves making healthy dinner recipes at home!

    Benefits and Advantages of Sun-Dried Tomato and Spinach Risotto

    The allure of Sun-Dried Tomato and Spinach Risotto goes beyond its picturesque presentation and robust flavor. There are several benefits that this dish offers, making it an excellent addition to your cooking repertoire.

    Ease of Preparation

    One of the standout features of this risotto is its straightforward preparation method. Unlike traditional risottos, which can be time-consuming, this version simplifies the cooking process without sacrificing taste. Dinner recipes that require minimal effort make weeknight cooking much more manageable for busy individuals or families. You can prepare this risotto in under 30 minutes! Additionally, it does not require any fancy equipment; a good pot and a wooden spoon are all you need to craft this dish.

    Health Benefits

    Health-conscious individuals will appreciate that this dish is loaded with health benefits. Spinach serves as a powerhouse of nutrients, notably vitamins A, C, and K, while also being high in fiber. Sun-dried tomatoes contribute antioxidants, which support heart health and the immune system. This risotto is naturally low in calories, especially if you manage your portion sizes, making it suitable for those mindful of their caloric intake.

    Versatile and Customizable

    Furthermore, this risotto can adapt to various dietary preferences. With a few ingredient swaps, you can make it suitable for vegan, gluten-free, or low-carb diets. For example, using vegetable broth instead of chicken broth enables a vegan dish without compromising taste. The recipe allows creativity, as you can add other vegetables, proteins, or spices to personal taste.

    Suitable for Any Occasion

    Whether it’s a relaxed family dinner, a dinner party with friends, or a meal prep option for the week, Sun-Dried Tomato and Spinach Risotto is a delightful dish that can fit various occasions. It is equally loved by kids and adults, making it the perfect choice for families.

    In summary, Sun-Dried Tomato and Spinach Risotto is a simple yet delicious dish that stands out due to its ease of preparation, health benefits, and versatility. It also allows home cooks to explore new flavors while accommodating various dietary needs—all of which make it a fantastic choice among blossoming dinner recipes.

    Ingredients Overview

    Essential Ingredients for Sun-Dried Tomato and Spinach Risotto

    Say goodbye to complicated recipes! Here’s everything you’ll need for a delightful Sun-Dried Tomato and Spinach Risotto:

    • 1 cup Arborio rice: The star of any risotto; its high starch content gives the dish its creamy texture.
    • 4 cups vegetable broth (or chicken broth): For cooking the rice; make sure it’s warm for better absorption.
    • 1 cup sun-dried tomatoes (packed in oil): Adds rich flavor and color; chopped into small pieces.
    • 2 cups fresh spinach: Nutrient-rich and adds a beautiful hue.
    • 1 medium onion: Finely diced; it builds the base flavor of the risotto.
    • 3 cloves garlic: Minced; a must-have for aromatic flavor.
    • 2 tablespoons olive oil: Provides a healthy fat and flavor enhancement.
    • ½ cup nutritional yeast (optional): For a cheesy flavor without dairy, making it perfect for vegans.
    • Salt and pepper to taste: Essential for seasoning your dish.

    The above ingredients make a solid base for the risotto, focusing on wholesome, plant-based components. Most of them are pantry staples, making it easy to whip up this dish whenever cravings hit!

    Dietary Substitutions to Customize Your Sun-Dried Tomato and Spinach Risotto

    No two kitchens are alike, and often, ingredient availability can differ significantly. Here are some suggested substitutions to cater to varying dietary needs:

    • Rice Alternatives: If you’re gluten-free, Arborio rice is a safe choice. Alternatively, you could use quinoa or couscous for a different texture.
    • Broth Options: For a nutrient boost, consider using mushroom broth to introduce an umami flavor, particularly appealing to those who follow vegetarian or vegan diets.
    • Sun-Dried Tomatoes: For a fresh take, use roasted tomatoes if sun-dried aren’t available. You could also use fresh cherry tomatoes, but add them later in the cooking process to prevent them from disintegrating.
    • Cheese Alternatives: Omit nutritional yeast for a creamier texture or experiment with vegan cheese if you are looking for a dairy-free option.
    • Protein Additions: To make it a heartier meal, consider adding chickpeas or edamame, or if you enjoy chicken, stir cooked chicken pieces in towards the end.

    With these substitutions, this risotto can accommodate a wider audience with ease. The goal is for you to enjoy the cooking process without the stress of fitting into specific dietary guidelines.

    How to Prepare the Perfect Sun-Dried Tomato and Spinach Risotto: Step-by-Step Guide

    Now that we have covered everything from benefits to ingredients, it’s time to get cooking! Follow this straightforward, step-by-step guide to prepare Sun-Dried Tomato and Spinach Risotto.

    1. Prepare the Base: In a large skillet or pot, heat 2 tablespoons of olive oil over medium heat. Add the finely diced onion and cook until it becomes translucent, about 3-4 minutes. Stir in the minced garlic and sauté for an additional 1-2 minutes until fragrant.

    2. Toast the Rice: Add 1 cup of Arborio rice to the pan. Stir well to combine and toast the rice for about 2 minutes. You’ll notice that the edges of the rice start to look translucent, indicating it’s time to add the broth.

    3. Add the Broth Gradually: Pour in 1 cup of warm vegetable broth, stirring continuously. This technique releases the rice’s starch and develops that creamy texture. Once the broth has mostly evaporated, add another cup, repeating the process until you’ve used 3 cups in total (this should take about 15-20 minutes).

    4. Incorporate Sun-Dried Tomatoes: When the rice is nearly al dente, around the 15 to 20-minute mark, fold in 1 cup of chopped sun-dried tomatoes. Continue to stir gently until well incorporated.

    5. Introduce Spinach: Add 2 cups of fresh spinach to the risotto. As it wilts, mix it thoroughly into the rice. Season with salt and pepper to taste.

    6. Finish Creaminess: Once the rice is perfectly cooked and creamy (it should have a slight bite), stir in ½ cup of nutritional yeast or your choice of cheese. This step enriches the flavor and creaminess.

    7. Let it Rest: Turn off the heat and cover the pot for a couple of minutes. This resting time helps to meld all the flavors together.

    8. Serve It Up: Spoon the risotto into bowls. You can garnish it with extra sun-dried tomatoes, a sprinkle of nutritional yeast, or some freshly cracked black pepper.

    Congratulations! You have just created an exquisite Sun-Dried Tomato and Spinach Risotto that is impressive enough for guests yet simple enough for a weeknight meal.

    This risotto suits a variety of dietary needs, and you can customize it to fit your preferences easily. Now, let’s look at some advanced tips and variations to take your dish to the next level.

    Mastering Sun-Dried Tomato and Spinach Risotto: Advanced Tips and Variations

    Tips for Success

    • Quality Ingredients Matter: Use quality sun-dried tomatoes and organic spinach for the best flavor. Fresh, high-quality ingredients can significantly elevate your dish.
    • Consistent Stirring: Be attentive while stirring the rice; consistency keeps the texture creamy. Use a wooden spoon for the best results.
    • Broth Temperature: Always ensure your broth is warm before adding it to the rice; cold broth can shock the grains and alter the cooking process.
    • Taste as You Go: Start seasoning gradually. You can always add more salt or spices later, but you can’t take them out once they’re in!

    Flavor Variations

    • Add lemon zest: Brighten up the risotto by adding a teaspoon of lemon zest along with the nutritional yeast for a refreshing twist.
    • Spice it Up: For those who like a spicy kick, consider adding crushed red pepper flakes or diced jalapeños.
    • Mushroom Medley: Sauté some mushrooms with the onions and garlic for an earthy flavor that pairs beautifully with the sun-dried tomatoes.
    • Nutty Flavor: Toasted pine nuts or slivered almonds sprinkled on top add texture and a nutty flavor that complements the dish nicely.

    Regardless of how you choose to master this risotto, the key is in the love and care you put into it. Each variation can turn a simple dish into something memorable.

    How to Store Sun-Dried Tomato and Spinach Risotto: Best Practices

    To ensure the longevity of your freshly made Sun-Dried Tomato and Spinach Risotto, it’s essential to store it correctly. Following best practices will help maintain its flavor and texture even after storage.

    Refrigeration

    • Cool Before Storing: Allow the risotto to cool to room temperature before placing it in the fridge to avoid condensation and sogginess.
    • Airtight Container: Transfer the risotto into an airtight container. Stored this way, it can last for up to 3-4 days in the refrigerator.

    Freezing

    If you’ve made a large batch, you might want to freeze some for later use:
    Individual Portions: Consider freezing the risotto in smaller, portion-sized containers. This makes it easy to defrost only what you need.
    Label and Date: Mark the containers with the date they were prepared to track freshness. Properly stored, the risotto can last for up to 3 months in the freezer.

    Reheating

    • Microwave Method: Reheat individual portions in the microwave. Add a splash of broth or water to keep it moist while heating.
    • Stovetop Method: For larger portions, reheating on the stovetop works best. Stir in a bit of broth or water, heating over low heat until warmed through, stirring often to maintain creaminess.

    Following these storage tips will help you enjoy your Sun-Dried Tomato and Spinach Risotto long after it’s been prepared, enhancing its viability as one of your favorite dinner recipes.

    Nutritional Value of Sun-Dried Tomato and Spinach Risotto

    Understanding the nutritional value of your meals is essential, especially when trying to maintain a balanced diet. Below is the estimated nutritional breakdown of Sun-Dried Tomato and Spinach Risotto per serving (assuming 4 servings):

    • Calories: 320
    • Total Fat: 10g
    • Saturated Fat: 1.5g
    • Carbohydrates: 52g
    • Fiber: 4g
    • Protein: 7g
    • Sugars: 2g
    • Sodium: 600mg

    Health Benefits Overview

    • Low in Calories: Ideal for those on calorie-restricted diets.
    • Rich in Fiber: Supports digestive health and contributes to feeling full.
    • Vitamins and Minerals: Packed with micronutrients from spinach and sun-dried tomatoes.
    • Plant-Based Goodness: Vegetarian and vegan-friendly, great for lowering the intake of animal products.

    Given its hearty yet healthy components, this dish not only nurtures your body but also delights your taste buds! It stands out as a healthy option among dinner recipes, ensuring flavor and nutrition go hand in hand.

    FAQs: Frequently Asked Questions About Sun-Dried Tomato and Spinach Risotto

    1. Can I make this risotto without Arborio rice?

      • Yes, but Arborio rice is recommended for its unique starch properties that create the creamy texture essential in risotto. If not available, use Carnaroli or Vialone Nano rice as alternatives, or opt for quinoa for a different take.
    2. What can I substitute for sun-dried tomatoes?

      • Fresh cherry tomatoes or roasted red peppers can work in a pinch. For best results, consider adding them later in the cooking process to avoid them breaking down completely.
    3. Is this risotto gluten-free?

      • Absolutely! As long as you use vegetable or chicken broth that does not contain gluten, this dish can be enjoyed by those with gluten sensitivities.
    4. How can I make this recipe creamy without dairy?

      • Nutritional yeast allows for a cheesy flavor while being completely dairy-free. Adding little splashes of non-dairy milk while stirring will also enhance creaminess.
    5. Can I make risotto ahead of time?

      • You can prepare the risotto in advance but keep in mind that it may thicken upon cooling. It’s best enjoyed fresh. However, you can easily reheat it per our storage guidelines above.

    In summary, this Sun-Dried Tomato and Spinach Risotto is a delicious and healthy option among dinner recipes that cater to various dietary needs and preferences. With rich flavors, easy preparation, and storage options, it’s bound to become a staple in your cooking. Enjoy the experience of creating this delightful dish, and watch it become a beloved favorite in your household!

  • Best Baked Zaatar Chicken Thighs with Tahini

    Best Baked Zaatar Chicken Thighs with Tahini

    Best Baked Za’atar Chicken Thighs with Tahini: A Tropical Delight

    Introduction to Best Baked Za’atar Chicken Thighs with Tahini

    If you’re looking for a quick, delicious, and healthy meal that can transport your taste buds to the Middle East, look no further than these Best Baked Za’atar Chicken Thighs with Tahini. This aromatic dish combines the vibrant flavors of za’atar—a Middle Eastern spice blend—with succulent chicken thighs, resulting in a culinary experience that is both satisfying and nourishing.

    One of the fantastic benefits of this recipe is its simplicity. With just a few ingredients and easy steps, even the busiest home cooks, working professionals, and students can whip it up in no time. Health-conscious individuals will appreciate that chicken thighs are not only budget-friendly but also a great source of protein and essential nutrients. Plus, with the option to serve it with a side of tahini, you’re adding a delicious, creamy texture that enhances the dish’s flavor without unnecessary fats.

    Whether you’re a busy parent juggling meal prep or a newlywed looking to impress your partner, this dish meets diverse dietary needs—it’s gluten-free and can be easily customized for vegan families. As we dive deeper into this recipe, you’ll discover how to create a healthy dinner that’s packed with flavor but not with effort.

    Benefits and Advantages of Best Baked Za’atar Chicken Thighs with Tahini

    The Ease of Preparation

    One of the standout features of Best Baked Za’atar Chicken Thighs with Tahini is how easy it is to prepare. Since chicken thighs are tender and flavorful on their own, they require minimal effort to transform into a gourmet meal. You can simply marinate, bake, and serve without much fuss or complicated techniques—perfect for home cooks of all experiences.

    Health Benefits

    Chicken thighs are well-known for their juiciness, but they also pack in a nutrient-rich punch. Rich in vitamins B6 and B12, these flavorful cuts provide energy while supporting overall brain function and immune health. Furthermore, the inclusion of tahini not only adds creaminess to the dish but also presents nutritional benefits. Tahini is full of healthy fats, protein, and important minerals like calcium, iron, and magnesium.

    Versatility and Adaptability

    Best of all, this recipe showcases incredible versatility. You can serve these za’atar chicken thighs with various side dishes like leafy greens, roasted vegetables, or whole grain rice to cater to different dietary preferences. For those who follow a gluten-free diet, simply pair the dish with quinoa or salad. The recipe can also be adapted for vegan diets by substituting the chicken with marinated mushrooms or tofu, retaining the aromatic flavors of za’atar.

    Overall, this dish stands out not only because of its delightful taste but also due to its health benefits, ease of preparation, and the multitude of ways it can be enjoyed.

    Ingredients Overview

    Essential Ingredients for Best Baked Za’atar Chicken Thighs with Tahini

    To create this delightful meal, you will need the following ingredients:

    1. Chicken Thighs (bone-in, skin-on) – 4 pieces
      Contains rich flavor and moisture; can also substitute with skinless thighs for a healthier option.

    2. Za’atar Spice Blend – 2 tablespoons
      A fragrant mix of sumac, thyme, and sesame seeds that gives the dish its unique flavor.

    3. Olive Oil – 2 tablespoons
      Adds healthy fats and helps crisp the skin while flavoring the chicken.

    4. Garlic – 4 cloves, minced
      Provides aroma and depth to the dish.

    5. Salt and Pepper – to taste
      Essential for enhancing all flavors.

    6. Tahini – 1/4 cup (for serving)
      A creamy sesame paste that complements the za’atar beautifully.

    7. Lemon Juice – Juice from 1 lemon
      Adds brightness to the dish and balances the flavors.

    Dietary Substitutions to Customize Your Best Baked Za’atar Chicken Thighs with Tahini

    • For Vegan Option: Replace the chicken thighs with firm tofu or jackfruit marinated in za’atar and olive oil.
    • For Gluten-Free Version: Ensure that your za’atar blend doesn’t contain any gluten traces. Serve with gluten-free grains like quinoa or brown rice.
    • Low-Calorie Adjustment: Use skinless chicken thighs or breasts to reduce fat content, or bake the dish without oil for a lighter version.
    • Add Spice: If you prefer a spicier flavor, feel free to add chili flakes or a pinch of cayenne pepper to the za’atar mixture.

    These substitutions not only accommodate dietary restrictions but also allow you to experiment with new flavors, making every meal unique.

    How to Prepare the Perfect Best Baked Za’atar Chicken Thighs with Tahini: Step-by-Step Guide

    Step 1: Prepare the Base

    Start by preheating your oven to 375°F (190°C). While it’s warming up, rinse your chicken thighs under cold water and pat them dry using paper towels. Dry chicken is crucial for achieving a crisp skin during baking.

    Step 2: Marinate the Chicken

    In a medium mixing bowl, combine 2 tablespoons za’atar spice blend, 2 tablespoons olive oil, 4 cloves minced garlic, salt, and pepper. Place the chicken thighs in the bowl and thoroughly coat them with the marinade. Ensure that each piece is well-covered for the best flavor. Allow the chicken to marinate for at least 30 minutes; however, you can also prepare it the night before for richer flavor.

    Step 3: Prepare Baking Dish

    While the chicken is marinating, prepare a baking dish by lightly greasing it with olive oil or non-stick spray. This prevents sticking and promotes even cooking.

    Step 4: Arrange for Baking

    Once marinated, lay the chicken thighs in the prepared baking dish, skin-side up. Make sure there’s space between each piece to allow even cooking and crisping.

    Step 5: Bake in the Oven

    Place the baking dish in the preheated oven and bake for approximately 45-55 minutes or until the chicken reaches an internal temperature of 165°F (75°C). Halfway through cooking, consider basting the chicken with the juices that collect in the dish to enhance moisture and flavor.

    Step 6: Prepare Tahini Sauce

    While the chicken is baking, prepare your tahini sauce. In a small bowl, mix 1/4 cup tahini with juice from one lemon, water (adjust for desired consistency), and a pinch of salt. Whisk until creamy. This tangy sauce will complement your chicken beautifully.

    Step 7: Serve

    Once the chicken thighs are beautifully golden and fully cooked, remove them from the oven. Let them rest for about 5 minutes before serving. Drizzle with tahini sauce and garnish with additional lemon wedges and a sprinkle of za’atar for an extra flavor boost. Serve alongside your favorite side dishes and enjoy!

    Mastering Best Baked Za’atar Chicken Thighs with Tahini: Advanced Tips and Variations

    To elevate your cooking experience with Best Baked Za’atar Chicken Thighs with Tahini, consider these advanced tips:

    • Marination Time: For optimal flavor, let the chicken marinate for a minimum of 1 hour or overnight in the fridge. This will intensify the taste of the za’atar.

    • Crispy Skin: For those desiring extra crispy skin, broil the chicken for the last 3-5 minutes of cooking. Just keep a close eye to prevent burning.

    • Vegetable Roasting: Place seasonal vegetables such as bell peppers, carrots, or zucchini in the baking dish alongside the chicken. Toss in a little olive oil and za’atar for a complete meal.

    • Additional Spices: Experiment by adding spices like cumin or coriander to customize the flavor profile.

    • Serving Ideas: Serve your za’atar chicken thighs over a bed of fluffy couscous or alongside flatbreads for a traditional touch.

    Each of these tips is designed to make the dish even more appealing and enjoyable, ensuring that whether it’s a weekly family dinner or a special occasion, your dish turns out perfectly.

    How to Store Best Baked Za’atar Chicken Thighs with Tahini: Best Practices

    To ensure that your Best Baked Za’atar Chicken Thighs with Tahini remain fresh and flavorful, proper storage is essential.

    Refrigeration

    Allow the chicken to cool to room temperature before storing it. Place the pieces in an airtight container and refrigerate for up to 3-4 days. To retain flavor and moisture, consider adding a little marinade or tahini before sealing.

    Freezing

    If you wish to store the chicken for an extended period, simply wrap each thigh in plastic wrap, then seal it in a freezer-safe bag. It will remain fresh for up to three months. Remember to label the package with the date for quick reference.

    Reheating

    To reheat your baked chicken, preheat the oven to 350°F (175°C). Place the thighs on a baking sheet and warm them for about 15 minutes. Alternatively, the chicken can be reheated in the microwave for a quicker option but may lose some crispiness.

    Regardless of how you choose to store your leftovers, enjoying them later can still provide a delightful meal.

    Nutritional Value of Best Baked Za’atar Chicken Thighs with Tahini

    Understanding the nutritional benefits enhances the appeal of these Best Baked Za’atar Chicken Thighs with Tahini. Here’s a general breakdown per serving (1 thigh with tahini sauce):

    • Calories: 385
    • Protein: 27g
    • Fat: 27g (of which 5g are saturated fats)
    • Carbohydrates: 6g
    • Fiber: 1g
    • Sugar: 0g
    • Iron: 15% of the Daily Value
    • Vitamin B6: 20% of the Daily Value
    • Calcium: 4% of the Daily Value

    The chicken thighs are an excellent source of protein, supporting muscle health and recovery. Meanwhile, tahini provides beneficial fats and essential minerals, making this dish nourishing and satisfying—perfect for anyone seeking a balanced diet.

    FAQs: Frequently Asked Questions About Best Baked Za’atar Chicken Thighs with Tahini

    Q1: Can I use chicken breasts instead of chicken thighs?

    Yes, you can use chicken breasts, but cooking times may vary. Chicken breasts typically require less time—approximately 25-30 minutes—so keep an eye on them to prevent drying out.

    Q2: How spicy is this dish?

    The level of spiciness is generally mild since the za’atar mix does not contain spicy ingredients. If you prefer a spicier dish, consider adding chili flakes or serving with a spicy dipping sauce.

    Q3: Can I marinate the chicken overnight?

    Absolutely! Marinating the chicken overnight in the refrigerator will enhance the flavors of the za’atar and garlic.

    Q4: Is this recipe suitable for meal prep?

    Yes, Best Baked Za’atar Chicken Thighs with Tahini is excellent for meal prep. You can store cooked chicken thighs in the refrigerator and pair them with various side dishes during the week.

    Q5: What can I substitute for tahini?

    If you don’t have tahini, you can substitute it with almond butter or sunflower seed paste. However, note that this will change the flavor slightly.

    These FAQs ensure that readers feel confident about making the dish while considering their unique culinary needs.

    By following this detailed guide, you’ll not only master the art of crafting Best Baked Za’atar Chicken Thighs with Tahini, but you’ll also gain admiration from family and friends, impressing them with your culinary skills while delighting their taste buds. Enjoy this tropical yet straightforward dish for any occasion!

  • Hello world!

    Welcome to WordPress. This is your first post. Edit or delete it, then start writing!