Blog

  • Spinach Stuffed Chicken

    Spinach Stuffed Chicken

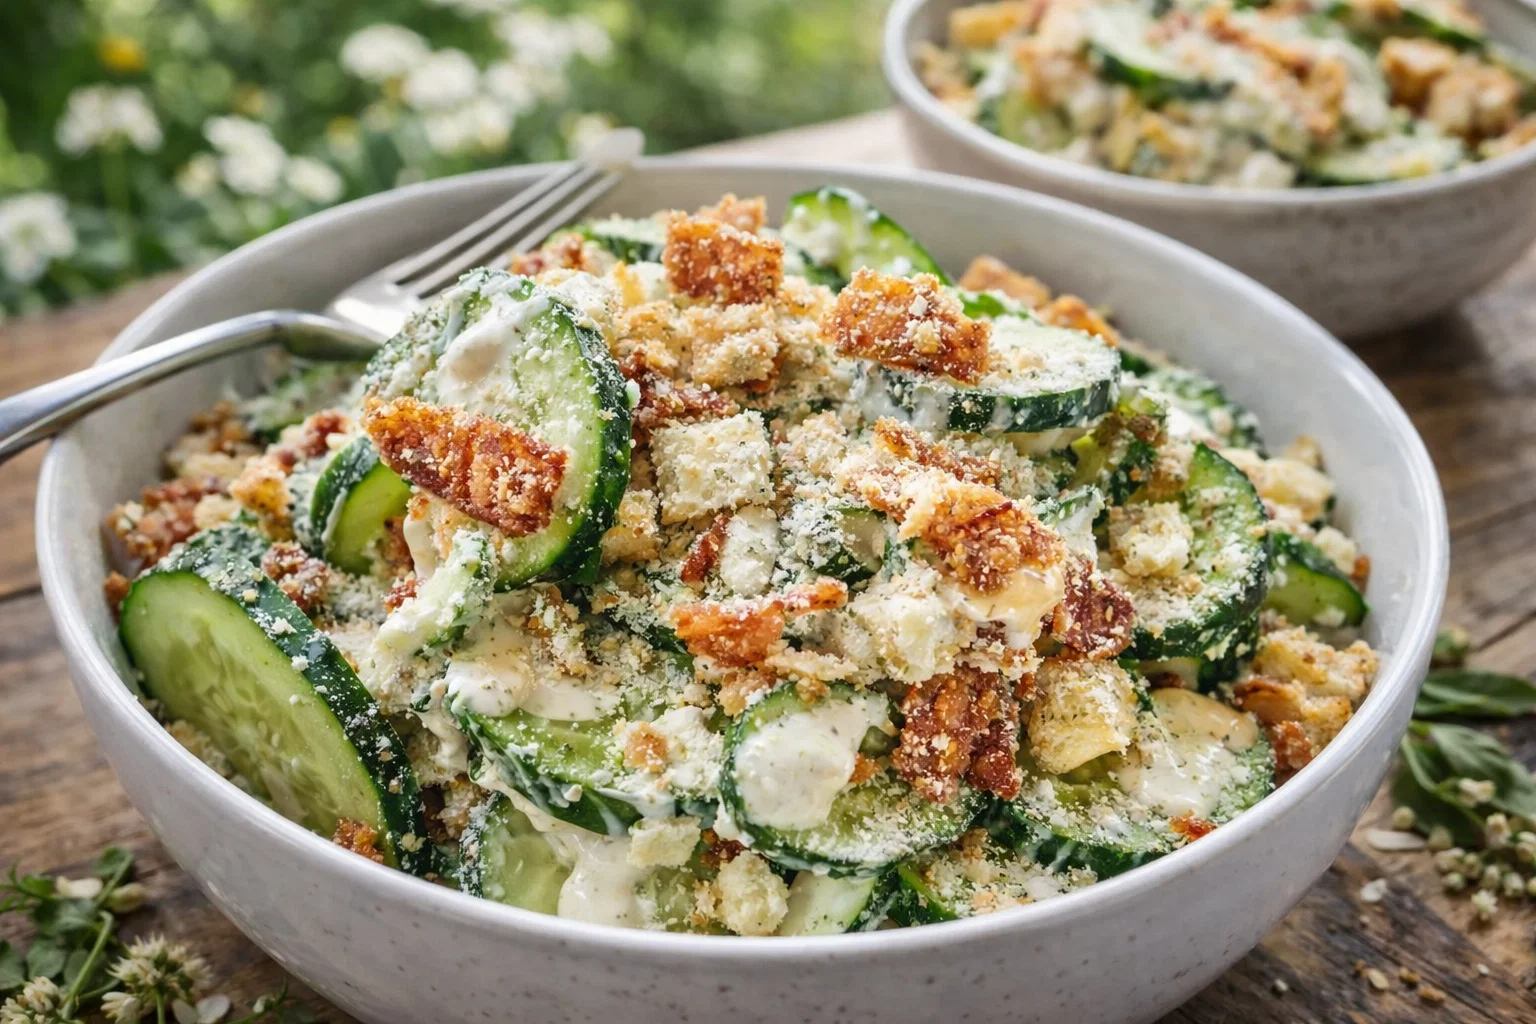
    Spinach Stuffed Chicken: A Tropical Delight

    Introduction to Spinach Stuffed Chicken

    Are you searching for an exciting new recipe to elevate your weeknight dinner? Look no further than this Spinach Stuffed Chicken! A delightful dish that combines tender chicken breast with a creamy, flavorful spinach and cheese filling, this recipe is brimming with health benefits and culinary inspiration. As part of the vast world of chicken recipes, this dish stands out for its simplicity and adaptability, making it an excellent choice for busy parents, students, and food enthusiasts alike.

    One of the key advantages of spinach stuffed chicken is its versatility. It works beautifully as a comforting family meal or as an elegant dish for special occasions. Not only is it satisfying, but the combination of spinach and cheese also provides essential nutrients, making it a health-conscious option. Spinach is rich in vitamins A, C, and K, offering powerful antioxidants that promote overall well-being. With its vibrant flavors and minimal prep time, this dish is perfect for anyone striving to maintain a balanced diet without sacrificing taste.

    Whether you are a newlywed looking to impress your partner with your culinary skills or a working professional pressed for time, spinach stuffed chicken is the ideal solution. With its gluten-free and low-calorie variations, it caters to a range of dietary needs while being delicious and filling. Join us as we dive deeper into this fantastic recipe and discover just how easy it is to make this tropical delight!

    Benefits and Advantages of Spinach Stuffed Chicken

    This spinach stuffed chicken dish isn’t just another entry in the world of chicken recipes. It’s a culinary gem that brings a wealth of benefits to the table. First and foremost, this recipe is incredibly simple to prepare, making it suitable for cooks of all skill levels. In just a few steps, you can craft a dish that feels gourmet, delighting both family and friends.

    Ease of Preparation

    One of the biggest hurdles home cooks face is finding recipes that are both quick and impressive. Spinach stuffed chicken fits this criteria perfectly! In less than an hour, you can go from raw ingredients to a breathtaking plate. The steps are straightforward, minimizing the stress often associated with cooking dinner after a long day.

    Health Benefits

    When it comes to health, spinach is a star player. This leafy green is low in calories yet high in essential vitamins and minerals. Coupled with lean chicken breast, you’re getting a wholesome meal packed with protein and nutrients. This recipe allows for various low-calorie substitutions, ensuring that you can enjoy a satisfying dish without compromising your health goals.

    Unique Flavor and Appeal

    What truly sets spinach stuffed chicken apart is its unique taste profile. The creamy filling blends rich flavors with fresh spinach, and when baked, the chicken becomes juicy and flavorful. This harmony of tastes ensures you experience an exciting fusion in every bite, encouraging even the pickiest eaters to appreciate its deliciousness.

    Versatile and Customizable

    Additionally, this dish is highly versatile. You can easily substitute different cheeses, switch up herbs or spices, or even incorporate other vegetables into the filling. This flexibility allows you to tailor the recipe to meet your personal tastes or dietary restrictions. Whether you’re pursuing vegetarian options or need gluten-free adaptations, spinach stuffed chicken can be customized to meet all your culinary needs.

    In summary, if you’re looking for a recipe that marries simplicity, health benefits, incredible flavor, and versatility, spinach stuffed chicken will surely impress any home cook eager to showcase their skills in the kitchen.

    Ingredients Overview

    Essential Ingredients for Spinach Stuffed Chicken

    To achieve the deliciousness of spinach stuffed chicken, you’ll need a few key ingredients. Below, we break down what you’ll require, along with specific measurements to ensure perfect execution. Each ingredient plays a crucial role in contributing to the dish’s flavors and nutrition:

    • Chicken Breasts (4 pieces, about 6 ounces each): The foundation of the dish, chicken breast is lean and packed with protein. Opt for organic or free-range if possible.

    • Fresh Spinach (4 cups, chopped): Offers valuable nutrients while adding an earthy flavor. Fresh leaves are preferred, but you can use frozen spinach; just make sure to thaw and drain it well.

    • Cream Cheese (8 ounces, softened): This provides creaminess to the filling. For a healthier option, low-fat cream cheese can be used.

    • Feta Cheese (1 cup, crumbled): Gives a tangy flavor and pairs well with spinach. Alternatively, you may substitute with ricotta for a milder taste or nutritional yeast for a dairy-free, vegan option.

    • Garlic (2 cloves, minced): Adds aromatic flavor. Feel free to increase or decrease the amount according to your taste.

    • Olive Oil (2 tablespoons): Perfect for sautéing spinach and garlic. Extra virgin olive oil provides additional health benefits.

    • Salt and Pepper to taste: Essential seasonings to enhance all other flavors.

    • Paprika (1 teaspoon): A lovely spice to add depth; this is optional but recommended for color and flavor.

    • Parmesan Cheese (¼ cup, grated): For topping the chicken before baking, giving a crispy, golden finish.

    This list shapes the wonderful world of spinach stuffed chicken and highlights its nourishing potential. It’s tailored to not just meet taste preferences but also dietary needs, ensuring everyone gets a chance to enjoy this delicious dish.

    Dietary Substitutions to Customize Your Spinach Stuffed Chicken

    Making this recipe fit your dietary requirements is easy! Here are suggestions for substitutions and alternatives that cater to different needs:

    • Gluten-Free: Ensure that the chicken is coated with a gluten-free breadcrumb topping, or skip the topping altogether for a low-carb version.

    • Dairy-Free/Vegan: Replace cream cheese with vegan cream cheese and omit feta. Nutritional yeast can offer a cheesy flavor without the dairy. Additionally, consider using firm tofu blended with spices and herbs for a satisfying filling.

    • Low-Calorie: Opt for low-fat cream cheese or Greek yogurt in place of full-fat cream cheese. Using less cheese overall can also lower calories while keeping it tasty.

    • Add more veggies: Consider adding finely diced bell peppers or mushrooms to the filling for extra flavor and nutrients.

    • Herbs and spices: Customize this dish by including herbs such as basil, parsley, or thyme in the filling. Spices like cayenne pepper can also add a hint of heat if desired.

    This flexibility allows anyone, from busy parents to health-conscious individuals, to create a version of spinach stuffed chicken that perfectly aligns with their lifestyle.

    How to Prepare the Perfect Spinach Stuffed Chicken: Step-by-Step Guide

    Now that we’ve covered the ingredients, it’s time to dive into the how-to of this exciting dish! Follow these clear, actionable steps to prepare a remarkable spinach stuffed chicken that will impress anyone at your dinner table.

    1. Prepare the Base:
    2. Preheat your oven to 375°F (190°C). This ensures a perfectly cooked chicken with a golden crust.

    3. Cook the Spinach Mixture:

    4. In a large non-stick skillet, heat the olive oil over medium heat.
    5. Once hot, add minced garlic and sauté for about 30 seconds, until fragrant.
    6. Add chopped spinach to the skillet and cook until wilted (about 3-4 minutes). Stir occasionally.

    7. Mix Ingredients:

    8. In a mixing bowl, combine the sautéed spinach and garlic with cream cheese, feta cheese, salt, pepper, and paprika.
    9. Stir until everything is well combined and the mixture is creamy. This is your delicious stuffing!

    10. Prepare Chicken Breasts:

    11. Pat the chicken breasts dry with paper towels. This helps to achieve a better sear.
    12. Use a sharp knife to carefully slice a pocket into each chicken breast, ensuring not to cut all the way through.
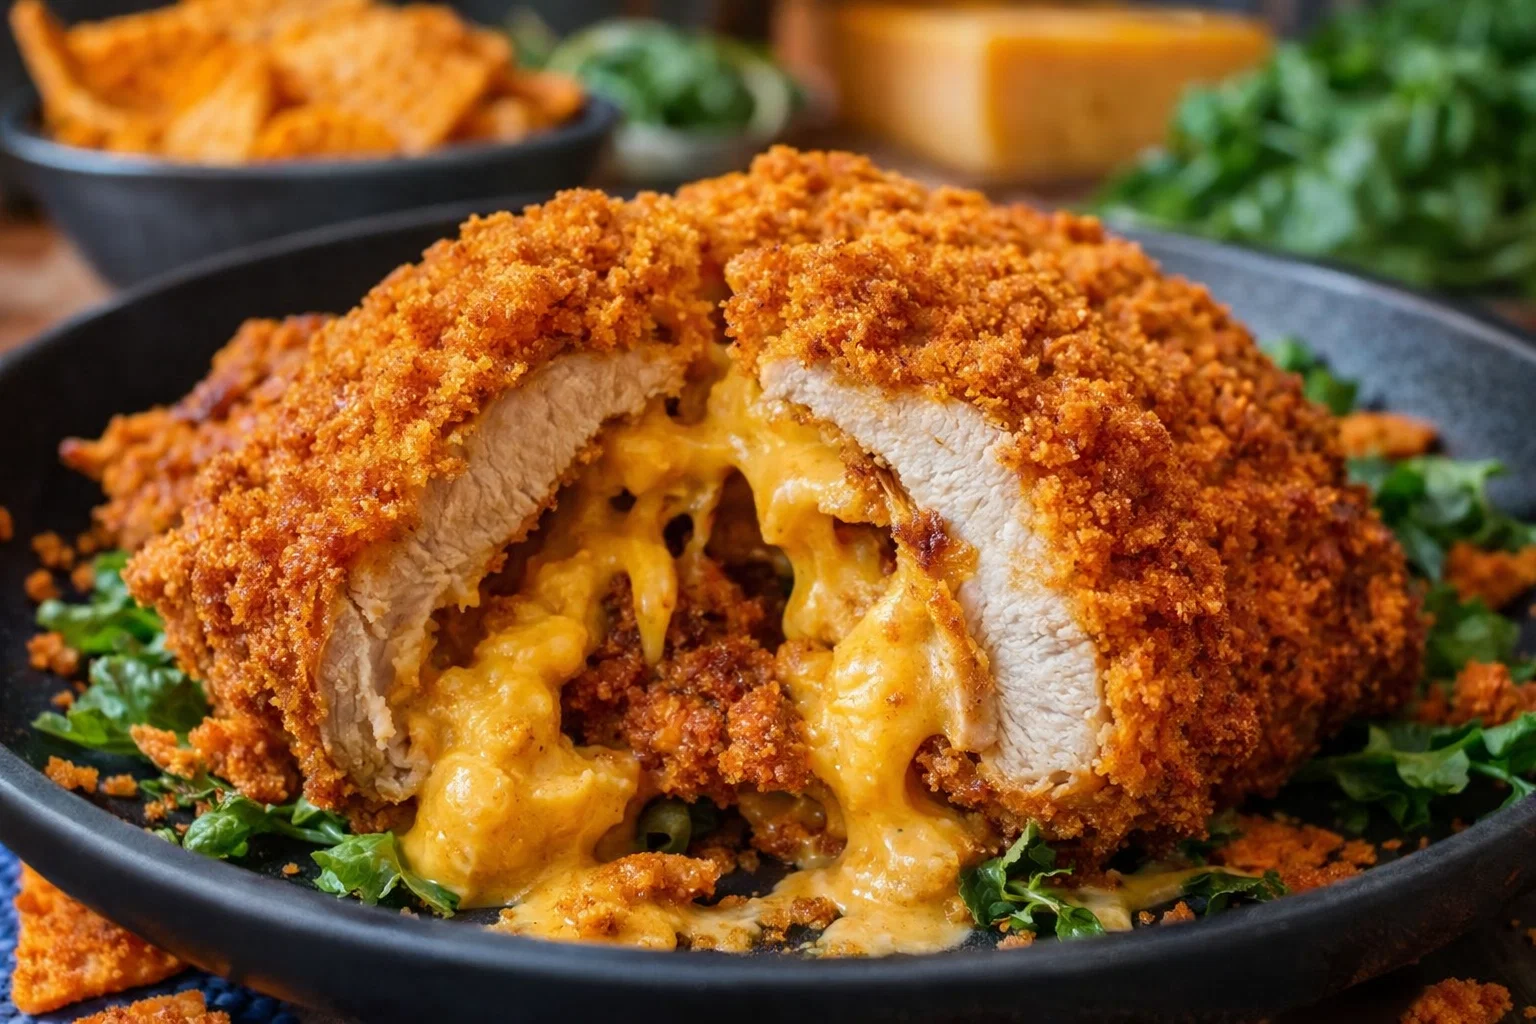
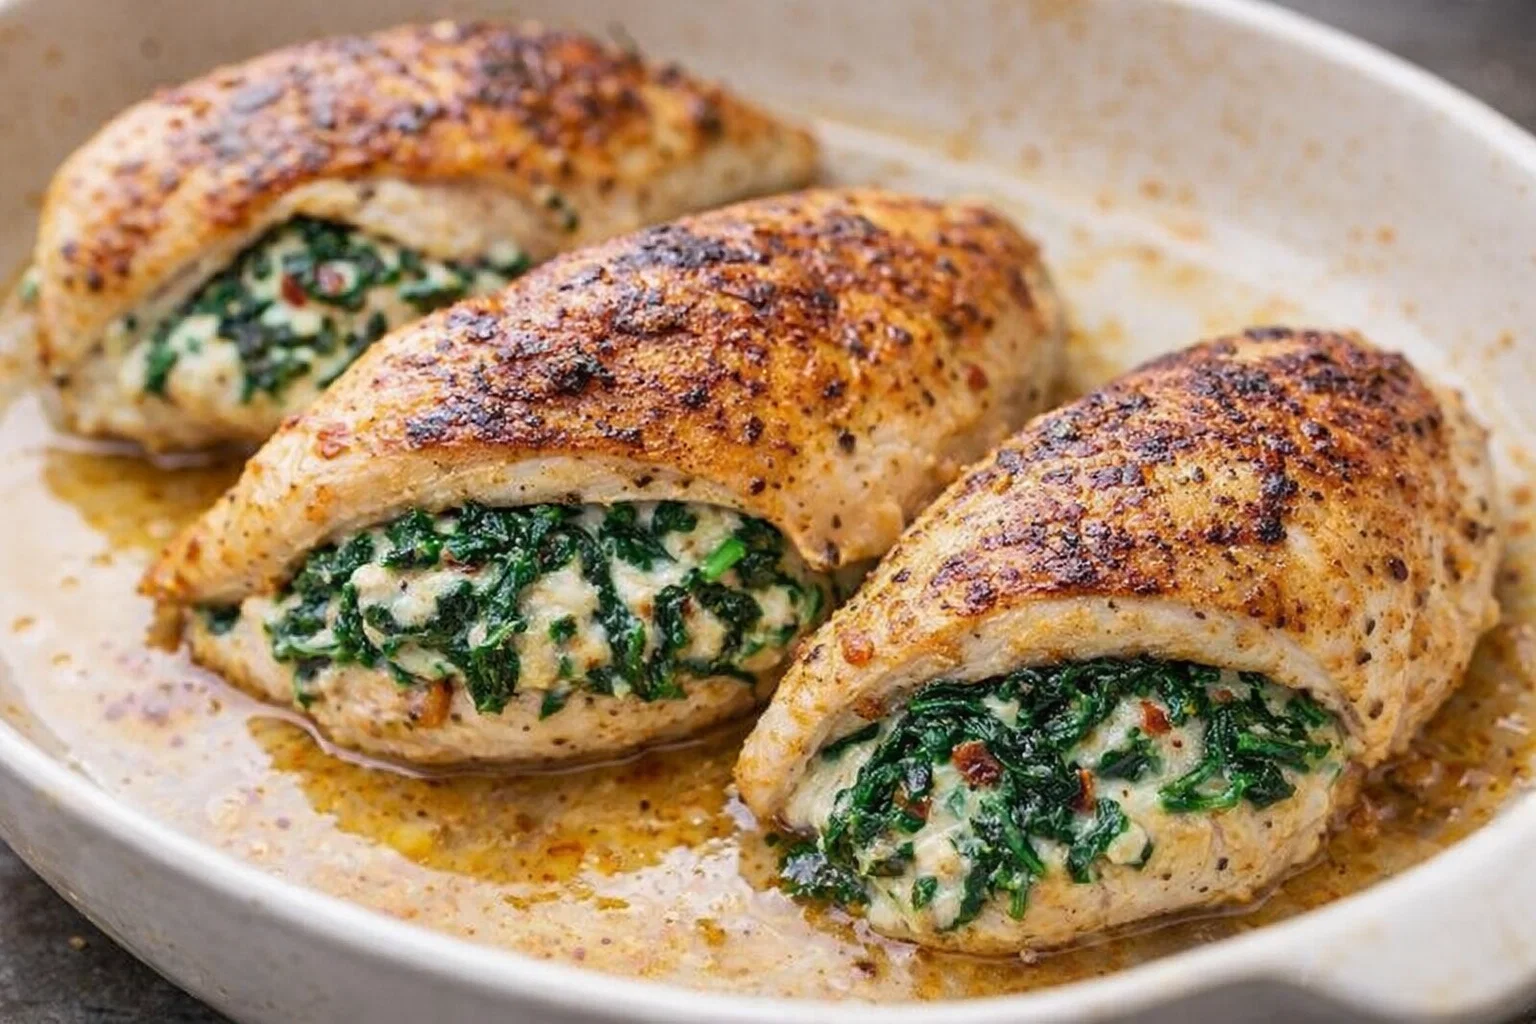
    13. Stuff the Chicken:

    14. Take a generous portion of the spinach and cheese mixture and carefully stuff it into each chicken breast, securing it with toothpicks if necessary.
    15. Season the outside with a pinch of salt and additional pepper for flavor.

    16. Sear the Chicken:

    17. Heat a little more olive oil in the same skillet over medium-high heat.
    18. Sear each stuffed chicken breast for about 4-5 minutes on each side until golden brown. This locking in of flavor is crucial!

    19. Bake the Chicken:

    20. Transfer the chicken breasts to a baking dish.
    21. Sprinkle parmesan cheese on top for a crispy finish.
    22. Bake in the preheated oven for 20-25 minutes or until the chicken is cooked through and reaches an internal temperature of 165°F (75°C).

    23. Rest and Serve:

    24. Remove the dish from the oven and let the chicken rest for a few minutes. This allows the juices to redistribute for optimal flavor.
    25. Slice and serve warm, optionally garnished with fresh herbs such as parsley.

    With these steps, your spinach stuffed chicken will become a favorite in your collection of chicken recipes, perfect for any occasion!

    Mastering Spinach Stuffed Chicken: Advanced Tips and Variations

    To truly master this spinach stuffed chicken, consider the following practical tips and exciting variations. These tricks will ensure your dish is not only delicious but also tailored to your specific palate:

    • Use Fresh Ingredients: Aim for fresh spinach and quality cheeses for the best flavor. While frozen ingredients can work, they often lose texture, affecting the quality of the filling.

    • Marinate for Flavor: For an extra flavor boost, try marinating the chicken breasts in lemon juice, olive oil, garlic, and herbs for at least 30 minutes prior to stuffing and baking. This results in a juicy chicken filled with flavor.

    • Experiment with Flavors: Don’t hesitate to experiment! Try adding sun-dried tomatoes, artichokes, or pine nuts to the filling for a Mediterranean twist.

    • Grilled Option: Instead of baking, consider grilling the stuffed chicken. This adds a smoky flavor that pairs beautifully with the creamy filling.

    • Pairing Suggestions: Serve your spinach stuffed chicken with side dishes like roasted vegetables, quinoa salad, or mashed potatoes to create a wonderfully balanced meal.

    By integrating these advanced tips and variations, you’ll elevate your cooking to new heights, delighting friends and family with your culinary expertise!

    How to Store Spinach Stuffed Chicken: Best Practices

    Proper storage of spinach stuffed chicken is essential for maintaining flavor and freshness. If you have leftovers or want to prepare the dish ahead of time, follow these best practices:

    Refrigeration

    • After Cooking: Allow the chicken to cool to room temperature.
    • Wrap Leftovers: Store any uneaten portions in an airtight container. It can safely stay in the fridge for up to 3-4 days.

    Freezing

    • Before Cooking: If you’d like to prep in advance, you can freeze the stuffed chicken before baking. Ensure each piece is tightly wrapped in plastic wrap, then place it in a freezer-safe bag. It can be frozen for up to 3 months.
    • After Cooking: Similarly, cooked spinach stuffed chicken can be frozen. Store it in an airtight container or freezer-safe bag; this can last for about 2-3 months in the freezer.

    Reheating

    • Oven: The best method to reheat the chicken is to use an oven. Preheat your oven to 350°F (175°C), place the chicken in an oven-safe dish, cover with foil to prevent drying, and heat until warmed through (about 15-20 minutes).

    • Microwave: For a quicker method, you can use the microwave. Heat on medium power, covered, for about 2-3 minutes or until heated evenly, though this method may lead to loss of texture.

    By following these storing and reheating tips, you’ll ensure your spinach stuffed chicken remains delicious, making it a dish you’ll want to enjoy again and again!

    Nutritional Value of Spinach Stuffed Chicken

    Understanding the nutritional components of spinach stuffed chicken adds to its appeal as a wholesome meal option. Below are the nutritional breakdown and benefits correlated with each serving, as well as some general figures based on commonly used ingredients.

    Nutritional Information (per serving, based on 4 servings)

    • Calories: Approximately 350-400 calories (depending on the cheese and chicken cut used).
    • Protein: About 35 grams, making it an excellent source of lean protein.
    • Fat: Approximately 18 grams (healthy fats from olive oil and cheeses; opt for low-fat alternatives to reduce this).
    • Carbohydrates: Roughly 6 grams, making it low in carbs.
    • Fiber: Contains about 2 grams, primarily from spinach, contributing to digestive health.
    • Vitamins and minerals: Packed with vitamins A, C, and K, along with iron and calcium from spinach and cheese.

    This nutritional density demonstrates that spinach stuffed chicken is not just flavorful but also a balanced meal worth considering for those conscious of their dietary intake.

    FAQs: Frequently Asked Questions About Spinach Stuffed Chicken

    1. Can I make spinach stuffed chicken ahead of time?

    Absolutely! You can prepare it ahead of time by stuffing the chicken and refrigerating it until you’re ready to cook. It can also be frozen if you plan to make it in bulk.

    2. What can I substitute for cream cheese?

    You can use low-fat cream cheese, Greek yogurt, or vegan cream cheese alternatives. Additionally, pureed cottage cheese or cashew cream can provide a similar texture.

    3. How do I prevent the filling from leaking out?

    To prevent the filling from leaking out during cooking, make sure to tightly seal the chicken pockets with toothpicks and avoid overstuffing them.

    4. Is spinach stuffed chicken suitable for meal prep?

    Yes! Spinach stuffed chicken stores well in the fridge and freezes nicely, making it a great choice for meal prep. Simply reheat as needed for delicious, hassle-free meals.

    5. Can this recipe be made gluten-free?

    Yes, by ensuring that you skip any breadcrumb topping or use gluten-free breadcrumbs, this recipe can easily be modified for gluten sensitivities!

    Spinach stuffed chicken is a versatile and delicious option among various chicken recipes, perfect for any occasion. Whether you wish to prepare it for a family dinner or meal prep for the week, this dish represents the epitome of satisfying and healthful cooking. Bon appétit!

  • Chinese Style Mango Chicken Stir Fry

    Chinese Style Mango Chicken Stir Fry

    Chinese Style Mango Chicken Stir Fry: A Tropical Delight

    Introduction to Chinese Style Mango Chicken Stir Fry

    Are you in search of an easy and flavorful dish to elevate your culinary experiences? Look no further than this Chinese Style Mango Chicken Stir Fry! This tropical delight marries tender chicken and sweet mango in a vibrant, quick-cooking meal that’s perfect for busy weekdays or leisurely weekends.

    Not only does this dish tantalize your taste buds, but it also offers numerous health benefits due to its fresh ingredients. With lean protein from chicken and the vibrant, fruity goodness of mango, you’re not just cooking a meal; you’re creating a nutritious feast. The use of fresh vegetables adds crunch and color, ensuring that every bite is as delightful to the eyes as it is to the palate.

    What makes this recipe a standout among chicken recipes is its versatility, catering to a variety of dietary needs, including gluten-free and low-calorie options. Whether you’re a busy parent looking to whip up something quick for your family, a student needing a simple yet nutritious meal, or a health-conscious individual wanting to satisfy your cravings without guilt, this stir fry is a fantastic choice. It’s deliciously simple, yet stunning enough to impress your guests, making it ideal for a romantic dinner or a friendly gathering.

    Benefits and Advantages of Chinese Style Mango Chicken Stir Fry

    Ease of Preparation

    One of the primary advantages of the Chinese Style Mango Chicken Stir Fry is its simplicity. The recipe is designed to be prepared in just under 30 minutes, making it an excellent choice for busy weeknights when time is of the essence. The straightforward steps allow even novice cooks to impress their family and friends without spending endless hours in the kitchen. Shorter cooking time means the nutrients of the ingredients are preserved, ensuring a healthy dish that doesn’t skimp on flavor.

    Health Benefits

    In addition to being quick and easy, this dish is also packed with health benefits. Chicken breast is a lean source of protein, essential for building and repairing tissues. Meanwhile, mangoes are rich in vitamins A, C, and E, antioxidants that are vital for maintaining a healthy immune system and skin. The addition of colorful vegetables—including bell peppers, broccoli, and snap peas—provides an array of nutrients and fiber, contributing to overall well-being and digestive health.

    Versatile and Customizable

    This recipe stands out among chicken recipes for its versatility. Not only can you tailor it to your dietary preferences, but you can also switch up the ingredients based on what you have on hand. Need a vegetarian option? Simply omit the chicken and replace it with tofu or tempeh. Looking for a gluten-free meal? Swap out soy sauce for tamari or coconut aminos. Feeling gourmet? Experiment with additional spices or garnishes to make it your own. This stir fry can morph to fit any occasion or preference, making it a staple in your culinary repertoire.

    Ingredients Overview

    Essential Ingredients for Chinese Style Mango Chicken Stir Fry

    Here’s a detailed list of the key ingredients for this vibrant dish, along with their roles and benefits:

    • Chicken Breast (1 pound): A lean protein that cooks quickly and remains juicy. It can be substituted with tofu for a vegetarian version.
    • Mango (1 large): Provides natural sweetness and is high in vitamins and antioxidants. Can be replaced with peach or pineapple if mango isn’t available.
    • Bell Peppers (1 each of red, yellow, and green): Adds crunch, flavor, and a burst of color. They are rich in vitamins C and A.
    • Broccoli (1 cup, chopped): A nutrient powerhouse, supplying fiber and vitamin K.
    • Snap Peas (1 cup): Offers a fresh taste and crisp texture, rich in vitamins A and C.
    • Soy Sauce (1/4 cup, low-sodium recommended): Adds umami depth. Use tamari for a gluten-free version.
    • Garlic (2 cloves, minced): Packs flavor and has anti-inflammatory properties.
    • Ginger (1 tablespoon, fresh, minced or grated): Adds warmth and aids digestion.
    • Olive Oil or Sesame Oil (2 tablespoons): Used for sautéing; provides healthy fats.
    • Cornstarch (1 tablespoon): Helps thicken the sauce; can be substituted with arrowroot powder for a gluten-free option.
    • Scallions (2, sliced for garnish): Adds a fresh, oniony flavor.

    Dietary Substitutions to Customize Your Chinese Style Mango Chicken Stir Fry

    This recipe allows for various substitutions depending on dietary preferences and ingredient availability:

    • Protein: Instead of chicken, use shrimp, beef, or a plant-based protein like tofu or tempeh.
    • Vegetables: Feel free to replace bell peppers and snap peas with your favorites—zucchini, carrots, or even asparagus could work beautifully.
    • Sweetener: If you prefer a sweeter sauce, add a teaspoon of honey or agave syrup. You can skip this if mangoes provide enough sweetness for your taste.
    • Spice Level: For heat lovers, add a pinch of red pepper flakes or a dash of chili sauce while cooking.

    How to Prepare the Perfect Chinese Style Mango Chicken Stir Fry: Step-by-Step Guide

    Cooking the perfect Chinese Style Mango Chicken Stir Fry is easier than you might think! Follow these detailed steps to create this tantalizing dish loaded with tropical flavor.

    1. Prepare Your Ingredients: Start by washing and cutting the chicken breast into bite-sized pieces. Then, peel and dice the mango, and chop the bell peppers and broccoli into manageable pieces. Slice the scallions for garnish and mince the garlic and ginger finely.

    2. Marinate the Chicken: In a bowl, toss the chicken pieces with 2 tablespoons of soy sauce and 1 tablespoon of cornstarch. Let it marinate for about 10 minutes while you prepare the rest of the ingredients. This step boosts flavor and ensures a great texture later on.

    3. Heat the Oil: In a large skillet or wok, heat 2 tablespoons of olive oil over medium-high heat. If you prefer a nutty flavor, sesame oil can be used.

    4. Cook the Chicken: Once the oil is hot, add the marinated chicken to the skillet. Sauté for about 5-7 minutes, or until the chicken is golden brown and cooked through. Ensure it is regularly stirred to avoid sticking.

    5. Add Aromatics: Reduce the heat to medium and add the minced garlic and ginger. Stir-fry for another minute until fragrant. This step brings an incredible depth of flavor to your stir fry.

    6. Incorporate Vegetables: Add the chopped bell peppers, broccoli, and snap peas to the skillet. Stir well and sauté for about 2-3 minutes until the vegetables are tender-crisp. This quick cooking method helps retain the veggies’ nutrients.

    7. Mix in the Mango: Gently fold the diced mango into the stir fry. Allow it to heat through for another 2 minutes. The heat will slightly soften the mango, making it even more delicious.

    8. Thicken Sauce: Drizzle in the remaining soy sauce (adjust according to taste) and stir to coat everything evenly. If you prefer a thicker sauce, you can add a bit more cornstarch mixed with water at this stage.

    9. Final Touches: Taste for seasoning and adjust as needed. Remove from heat and garnish with sliced scallions for a pop of freshness.

    10. Serve: Serve the mango chicken stir fry hot over a bed of steamed rice, quinoa, or noodles.

    This dish is not only delicious but also adaptable. You can easily change the proteins or veggies to match personal preferences or dietary needs.

    Mastering Chinese Style Mango Chicken Stir Fry: Advanced Tips and Variations

    Once you’ve mastered the basics of this delicious mango chicken stir fry, here are advanced tips and variations to elevate your culinary creation:

    Advanced Cooking Techniques

    • Stir-Fry in Batches: If you are cooking for a crowd, consider stir-frying the chicken in smaller batches to avoid overcrowding the skillet. This helps ensure even cooking.
    • Tempering Spice: For a more aromatic base, consider adding spices like star anise or Chinese five-spice to the oil before adding the chicken. This step will infuse the dish with a wonderful flavor.

    Variations to Try

    • Tropical Twist: Add pineapple or diced kiwi for an extra fruity flavor that brings the dish to another level.
    • Noodles vs. Rice: Replace rice with noodles to create a delicious noodle stir-fry. Buckwheat noodles or rice noodles work particularly well.
    • Vegetarian Delight: Make a veggie-packed version using eggplant, zucchini, and cauliflower. Include tofu for protein, or skip it for a lighter dish.

    How to Store Chinese Style Mango Chicken Stir Fry: Best Practices

    After preparing this delightful dish, you may want to make extra servings for later! Here’s how to store Chinese Style Mango Chicken Stir Fry effectively:

    Refrigeration

    Refrigerate the Stir Fry: Allow the leftovers to cool to room temperature before transferring the stir fry to airtight containers. You can refrigerate for up to 3-4 days. When reheating, use a microwave or stovetop, adding a splash of water to prevent drying.

    Freezing Instructions

    Freeze for Longevity: For longer storage, place the cooled stir fry in freezer-safe containers or bags. It can be stored for up to three months.

    Reheating from Frozen: Thaw in the refrigerator overnight and reheat on the stove or microwave until heated through. Alternatively, you can directly reheat from frozen, although this may add additional cooking time.

    Nutritional Value of Chinese Style Mango Chicken Stir Fry

    Understanding the nutritional content of your meals can empower your cooking choices. Here’s a breakdown of the nutritional value per serving for the Chinese Style Mango Chicken Stir Fry:

    • Calories: Approximately 380 calories
    • Protein: About 30g
    • Fat: 12g (mostly healthy fats from the olive oil)
    • Carbohydrates: 40g
    • Fiber: 5g
    • Sugar: 8g
    • Sodium: Variable, depending on soy sauce used

    This breakdown ensures you understand the balance in the dish. With rich protein from chicken and healthy carbs from vegetables, it offers a fulfilling and nourishing option suitable for various diet plans.

    FAQs: Frequently Asked Questions About Chinese Style Mango Chicken Stir Fry

    1. Can I make this recipe vegan?

    Absolutely! You can easily transform this dish into a vegan delight by substituting chicken with tofu or tempeh. Use plant-based alternatives for ostensible flavors, like mushroom soy sauce to retain the umami effect.

    2. What type of soy sauce should I use?

    For a gluten-free option, tamari is a great alternative to traditional soy sauce. A low-sodium soy sauce is advisable for health-conscious cooks trying to manage their sodium intake.

    3. How do I know when the chicken is cooked perfectly?

    The chicken is done when it reaches an internal temperature of 165°F (75°C) and juices run clear. Avoid overcooking to keep it juicy and tender.

    4. Can I add more vegetables to this stir fry?

    Absolutely! This dish welcomes customization. Feel free to add in other veggies such as carrots, zucchini, or bok choy for added color and nutrition.

    5. What can I serve with this dish?

    Chinese Style Mango Chicken Stir Fry pairs beautifully with steamed jasmine rice, fried rice, or rice noodles. For a low-carb option, serve over a bed of greens or cauliflower rice.

    This article serves not just as a recipe; it is your guide to enjoying a tropical culinary experience at home, filled with vibrant flavors and health benefits. So gather your ingredients and embark on the delightful journey of crafting this Chinese Style Mango Chicken Stir Fry!

  • Crispy Cheesy Garlic Potatoes

    Crispy Cheesy Garlic Potatoes

    Crispy Cheesy Garlic Potatoes: A Tropical Delight

    Introduction to Crispy Cheesy Garlic Potatoes

    Welcome to a culinary adventure where taste meets simplicity! Crispy Cheesy Garlic Potatoes stand as a testament to how effortlessly one can whip up a delightful dish perfect for dinner recipes. These golden delights are more than just a side dish; they embody comfort food at its finest. The combination of crispy texture, cheesy goodness, and robust garlic flavor creates a trio of heavenly sensations that will tantalize your taste buds.

    Whether you’re a busy parent, a student mastering the art of cooking, or an enthusiastic food lover, this recipe offers both ease of preparation and nutritional benefits. With customizable options like vegan, gluten-free, and healthy low-calorie alternatives, these Crispy Cheesy Garlic Potatoes cater to a variety of dietary needs, ensuring everyone at the table can savor them.

    Moreover, the beauty of this dish lies in its versatility; it pairs perfectly with meats or can stand alone as a satisfying vegetarian meal. Imagine serving these crispy gems during family dinners, potlucks, or casual gatherings with friends. Not only will they be a hit, but they will also elevate your dinner experience with minimal effort. So, if you’re looking to impress your guests or simply wish to enjoy some comfort food, keep reading to uncover the secrets of creating crispy cheesy garlic potatoes.

    Benefits and Advantages of Crispy Cheesy Garlic Potatoes

    When it comes to dinner recipes, few dishes resonate with comfort as much as crispy cheesy garlic potatoes. Packed with undeniable benefits, this dish shines for several reasons.

    Easy Preparation

    One of the most significant advantages of making Crispy Cheesy Garlic Potatoes is their straightforward preparation process. For those embarking on their cooking journey or busy home chefs juggling numerous responsibilities, this recipe stands as an ideal choice. With minimal cooking skills required, transforming simple potatoes into a gourmet dish is achievable with just a few ingredients and quick steps.

    Health Benefits

    Beyond their rich flavors, crispy cheesy garlic potatoes can easily be made healthier without sacrificing taste. By opting for fresh potatoes, loaded with essential nutrients, you enrich your meal with vitamins and minerals. Additionally, using moderately lower-fat cheese or alternative cheeses can still give you the creamy texture without overindulging in calories. Garlic, the star of the show, brings its own set of health benefits, including boosting immunity and possessing antimicrobial properties, making it a wholesome addition to your diet.

    Adaptable Dish

    In a world saturated with varied dietary preferences, this dish’s versatility ensures that it meets the needs of everyone. Whether your friends are vegans, gluten-intolerant, or adhering to low-carb diets, crispy cheesy garlic potatoes can be easily tailored. With simple substitutions like nutritional yeast for a cheesy flavor without dairy or serving them with a side of veggies to balance the meal, adapting the recipe is straightforward.

    Flavor Explosion

    The combination of garlic, cheese, and crispy potatoes creates a flavor profile that appeals to a wide range of palates. The satisfying crunch followed by a melty, cheesy interior makes the experience memorable. This dish is perfect for serving at gatherings or making any ordinary weeknight feel special.

    With these benefits in mind, it’s clear that Crispy Cheesy Garlic Potatoes deserve a place in your collection of go-to dinner recipes. They combine ease, health, and flavor, making them a hit at any meal!

    Ingredients Overview

    Essential Ingredients for Crispy Cheesy Garlic Potatoes

    To create the perfect Crispy Cheesy Garlic Potatoes, gather the following essential ingredients:

    • 2 lb (about 900g) Yukon Gold Potatoes
    • Provides a creamy texture, ideal for baking.

    • 1 cup (100g) shredded cheese (cheddar, mozzarella, or vegan alternative)

    • Adds the cheesy flavor, bringing joy to cheese lovers and providing a rich mouthfeel.

    • 4 cloves garlic, minced

    • Elevates the dish with savory hints and numerous health benefits.

    • 3 tablespoons olive oil

    • Helps with crispiness and enhances the overall flavor profile.

    • 1 teaspoon onion powder

    • Complements garlic to round out the savory base.

    • Salt and black pepper, to taste

    • Essential for enhancing all the flavors in the dish.

    • Fresh parsley, chopped (optional for garnish)

    • Adds a pop of color and freshness.

    Dietary Options:
    Vegan: Substitute cheese with nutritional yeast or a cashew-based cheese.
    Gluten-Free: This recipe is naturally gluten-free; just ensure that all pre-packaged ingredients are certified gluten-free.
    Low-Calorie Option: Opt for less oil and reduce cheese quantity for a lighter version while keeping the flavor intact.

    Dietary Substitutions to Customize Your Crispy Cheesy Garlic Potatoes

    While the classic version is undeniably delicious, feel free to improvise with these substitutions to cater to various dietary preferences:

    • Potatoes: While Yukon Gold is the best choice for creaminess, you can swap them with red potatoes or sweet potatoes for a different taste and texture.
    • Cheese Alternatives: For lactose-intolerant or vegan guests, use almond, coconut, or soy cheese. Nutritional yeast is an excellent cheese substitute, offering a nutty flavor and is high in B vitamins.
    • Oil Alternatives: Instead of olive oil, avocado oil or coconut oil can be used for frying and baking, each bringing unique flavors to the dish.
    • Garlic Powder: If you don’t have fresh garlic on hand, garlic powder can work as a fine alternative in smaller quantities.
    • Spices: Mix it up with spices like paprika, cayenne, or even Italian seasoning for added depth.

    By embracing these substitutions, your Crispy Cheesy Garlic Potatoes can easily cater to different dietary needs while still being a standout dish in your repertoire of dinner recipes.

    How to Prepare the Perfect Crispy Cheesy Garlic Potatoes: Step-by-Step Guide

    Now that you’ve gathered your ingredients, it’s time to transform your kitchen into a culinary hotspot. Follow this detailed step-by-step guide to craft the perfect crispy cheesy garlic potatoes.

    1. Prepare the Base: Begin by preheating your oven to 425°F (220°C). Meanwhile, thoroughly wash and peel the Yukon Gold potatoes. Cut them into even-sized cubes to ensure uniform cooking.

    2. Parboil the Potatoes: In a large pot, fill it with water and a pinch of salt. Bring the water to a boil, then add the potato cubes. Allow them to cook for about 5-7 minutes or until they are slightly tender but not fully cooked. Drain the potatoes and let them cool for a few minutes.

    3. Season the Potatoes: In a large mixing bowl, add the parboiled potatoes and drizzle with olive oil. Sprinkle in minced garlic, onion powder, salt, and pepper. Ensure the potatoes are well-coated in oil and seasonings for maximum flavor.

    4. Add the Cheese: Gently fold in ¾ of the shredded cheese into the potato mixture, reserving the remaining cheese for topping. This will melt throughout the potatoes, distributing the cheesy flavor.

    5. Bake the Potatoes: Spread the seasoned potato mixture onto a large baking sheet lined with parchment paper. Spread them out in a single layer for even cooking. Bake for 25-30 minutes, or until golden brown and crispy on the edges. Stir halfway through to ensure they bake evenly.

    6. Finish with More Cheese: Once the potatoes are beautifully crispy, remove them from the oven. Evenly sprinkle the remaining cheese over the top and return the baking sheet to the oven. Bake for an additional 5 minutes, or until the cheese has melted and is bubbling.

    7. Garnish and Serve: Remove the tray from the oven, and let the potatoes cool slightly. Garnish with freshly chopped parsley for a burst of color and freshness. Serve hot and enjoy your masterpiece!

    Tips for Customization:

    • Add Protein: For a heartier meal, mix in some cooked diced chicken or crumbled bacon during the last few minutes of baking.
    • Vegetable Medley: Incorporate other vegetables like bell peppers, zucchini, or broccoli for added nutrients and flavor.
    • Herb Infusions: Finishing with fresh herbs like thyme or rosemary can elevate this dish further, adding aromatic notes.

    By following these steps carefully, you’ll be capable of serving up a delectable dish that’s sure to impress. It seamlessly fits into the category of easy, yet elegant dinner recipes.

    Mastering Crispy Cheesy Garlic Potatoes: Advanced Tips and Variations

    While the above recipe for crispy cheesy garlic potatoes is superb, mastering it involves making some thoughtful adjustments and exploring variations that elevate the dish even further.

    Tips for Success:

    • Pre-soaking Potatoes: For extra crispiness, soak the cut potatoes in cold water for 30 minutes before boiling. This helps to remove excess starch, leading to a crispier bake.
    • Utilize Fresh Herbs: Add fresh chives or thyme to the potato mixture before baking for an aromatic touch.
    • Double the Batch: If serving a crowd, feel free to double the recipe. Simply use two sheets for baking to ensure proper air circulation for crispiness.

    Variations to Explore:

    • Spicy Version: Add red pepper flakes or diced jalapeños to the garlic mixture for a spicy kick.
    • Herbed Version: Infuse the oil with herbs such as rosemary or thyme before coating the potatoes.
    • Creamy Garlic Sauce: Stir in a small amount of sour cream or yogurt post-baking for a creamy contrast against the crispy potatoes.

    These advanced tips and variations are an extraordinary way to personalize your crispy cheesy garlic potatoes. They serve to enhance not only the flavor but also the overall dining experience, making hearty and satisfying dinner recipes that everyone will love.

    How to Store Crispy Cheesy Garlic Potatoes: Best Practices

    To extend the life of your delicious crispy cheesy garlic potatoes, proper storage techniques are essential. Here’s how to do it most effectively:

    Refrigeration

    Place any leftovers in an airtight container and store them in the refrigerator. They will remain fresh for up to 3-5 days. It’s best to keep the crispy potatoes separate from other dishes to maintain their texture.

    Freezing

    If you want to store them for a more extended period, freezing is an option. Allow the cooked potatoes to cool completely before pouring them into freezer-safe bags or containers. They can be stored in the freezer for up to 2-3 months. Be sure to label them with the date to monitor freshness.

    Reheating

    To reheat refrigerated or frozen crispy cheesy garlic potatoes:
    1. If frozen, let them thaw in the refrigerator overnight.
    2. Preheat your oven to 375°F (190°C).
    3. Spread the potatoes on a baking sheet lined with parchment paper. Bake for about 15-20 minutes, or until heated through and re-crisped.
    4. Alternatively, for a quicker method, a microwave can work, but the texture may not be as crispy.

    With these best practices in mind, your crispy cheesy garlic potatoes will be ready to be enjoyed even after you’ve made them. They are indeed perfect dinner recipes for meal prep, making them an efficient choice for busy weeks.

    Nutritional Value of Crispy Cheesy Garlic Potatoes

    Getting to know the nutritional composition of your meals is vital for maintaining a balanced diet. Here’s a rough breakdown of the nutritional value of Crispy Cheesy Garlic Potatoes per serving:

    • Calories: Approximately 250-300 calories
    • Total Fat: 12-15g
    • Saturated Fat: 5-7g (depends on cheese used)
    • Carbohydrates: 35-40g
    • Dietary Fiber: 3g
    • Sugars: 1-2g
    • Protein: 6-8g
    • Sodium: 200-300mg (varies depending on added salt)

    Health Benefits:
    Potatoes: Full of potassium, vitamin C, and B vitamins, they offer energy and essential nutrients.
    Garlic: High in antioxidants and linked to various health benefits, including improved heart health.
    Cheese: A source of calcium and protein while contributing to the overall deliciousness of the dish.

    Incorporating crispy cheesy garlic potatoes can align with various meal plans, ensuring that they can fit into numerous nutritional profiles while still being one of those satisfying dinner recipes that everyone loves.

    FAQs: Frequently Asked Questions About Crispy Cheesy Garlic Potatoes

    1. Can I make Crispy Cheesy Garlic Potatoes ahead of time?

    Absolutely! You can prepare the potatoes and store them in the refrigerator for a day before baking. When ready to serve, simply bake them as directed.

    2. What type of cheese is best for this recipe?

    Cheddar and mozzarella are both popular choices, but feel free to experiment with your favorites. Vegan cheese options also work remarkably well for a dairy-free twist.

    3. Can I use different kinds of potatoes?

    Yes, while Yukon Gold is preferred for creaminess, you can use red potatoes or sweet potatoes. Ensure to adjust cooking times if using different varieties.

    4. How do I ensure my potatoes stay crispy after cooking?

    To maintain the crispiness, ensure they are spaced out while baking, and consider soaking them in water before boiling to release excess starch.

    5. Is this recipe suitable for meal prep?

    Definitely! They are great for meal prep and can be made in big batches and stored for later use, making them a fantastic option for busy individuals or families.

    With these FAQs, it’s clear you have everything you need to embark on your culinary journey with crispy cheesy garlic potatoes—a delightful dish that fits all occasions and satisfies a variety of palates. So don your apron and get cooking! These crispy, cheesy, and garlicky delights are just a few steps away from your dining table. Happy cooking!

  • Herbed Pearl Couscous and Salmon

    Herbed Pearl Couscous and Salmon

    Herbed Pearl Couscous and Salmon: A Tropical Delight

    Introduction to Herbed Pearl Couscous and Salmon

    Are you ready to embark on a culinary journey that promises simplicity and health without sacrificing flavor? Enter Herbed Pearl Couscous and Salmon—an exquisite dish that blends aromatic herbs, succulent salmon, and delightful pearl couscous. This dish addresses the needs of busy parents, students, and professionals alike, making it a perfect choice for those who value nutritious, quick-to-prepare meals.

    In this delightful recipe, salmon recipes take center stage, showcasing this nutrient-rich fish that is celebrated for its high omega-3 fatty acids. Coupled with the unique texture of pearl couscous and vibrant herbs, this dish is a treasure chest of flavors. You won’t just find happiness in your belly; your body will thank you for its protein, vitamins, and minerals.

    Whether you’re a health-conscious individual seeking low-calorie options or a newlywed looking to impress your partner, you’ll find that this dish is adaptable to various dietary preferences, including gluten-free and even vegan alternatives. Come, let’s explore how to create a tropical delight that will bring joy to your table.

    Benefits and Advantages of Herbed Pearl Couscous and Salmon

    Crafting the perfect meal often revolves around simplicity and healthiness. This recipe for Herbed Pearl Couscous and Salmon embodies those attributes, making it a go-to choice for everyone from food enthusiasts to traveling gourmets.

    Ease of Preparation

    One of the most striking advantages of this dish is how quickly you can whip it up, even on busy weeknights. With minimal cooking techniques involved—just boiling, sautéing, and seasoning—you’ll find that even novice cooks can master this recipe effortlessly. The steps flow logically, allowing for a seamless experience that encourages experimentation.

    Health Benefits

    Salmon is not just delicious; it comes loaded with health benefits—rich in omega-3 fatty acids that are great for heart health and cognitive function. On the other hand, pearl couscous provides a great source of carbohydrates, giving you the energy boost needed for your day. Packed with important vitamins and minerals, this dish empowers both your body and mind.

    Versatility

    Yet another appealing aspect of this recipe is its versatility. You can easily modify it for various dietary needs. For instance, you can replace salmon with other proteins like chicken or tofu, making it suitable for pescatarians, vegetarians, and even vegans if you use vegetable stock for cooking the couscous.

    Furthermore, you can add seasonal vegetables or herbs to the mix to create your unique spin, thus allowing room for creativity while ensuring that you’re adhering to your dietary restrictions or preferences.

    Ingredients Overview

    Essential Ingredients for Herbed Pearl Couscous and Salmon

    To create your own Herbed Pearl Couscous and Salmon, gather the following ingredients:

    • 1 cup of pearl couscous
    • 2 cups of vegetable or chicken broth (for vegan, stick with vegetable broth)
    • 2 fillets of salmon (skin-on recommended for added flavor)
    • 2 tablespoons of olive oil
    • 1 tablespoon of lemon juice
    • 1 teaspoon of garlic powder
    • 1 teaspoon of dried dill (or fresh dill, if available)
    • Salt and pepper to taste
    • Fresh parsley or cilantro, chopped (for garnish)

    This simple ingredient list highlights the dish’s inherent simplicity, allowing even busy parents or working professionals to whip it up without a hassle.

    Dietary Substitutions to Customize Your Herbed Pearl Couscous and Salmon

    1. Vegan Option: Substitute salmon with marinated tofu or chickpeas. Cook these alternatives similarly to how you’d prepare the salmon.

    2. Gluten-Free Option: Pearl couscous traditionally contains gluten. Substitute with quinoa or gluten-free couscous for a similar texture and flavor.

    3. Low-Calorie Option: Use less oil or opt for a cooking spray. Additionally, using steamed vegetables instead of couscous can add volume without adding excess calories.

    4. Flavor Variations: You can alter the herbs—try basil, thyme, or even a splash of pesto to bring different flavor profiles to the dish.

    By customising the ingredients, you can make this dish truly yours, meeting any dietary requirements while keeping it delicious.

    How to Prepare the Perfect Herbed Pearl Couscous and Salmon: Step-by-Step Guide

    Now that you have your ingredients, let’s delve into the step-by-step guide to preparing this delightful dish which stands out among the vast world of salmon recipes.

    1. Prepare the Base: In a medium saucepan, bring 2 cups of vegetable or chicken broth to a boil. Once boiling, add 1 cup of pearl couscous and reduce the heat to low. Cover and simmer for about 8-10 minutes, or until the couscous is tender and the liquid has been absorbed.

    2. Cook the Salmon: While the couscous is cooking, season the 2 salmon fillets with olive oil, garlic powder, salt, and pepper. In a large skillet over medium heat, heat a drizzle of olive oil. Once hot, add the salmon, skin side down. Cook for around 6-7 minutes or until the skin is crispy, then flip and cook for an additional 2-3 minutes.

    3. Mix Ingredients: After the couscous has finished cooking, remove it from the heat. Fluff it with a fork and stir in the lemon juice, dill, and chopped parsley (or cilantro). Adjust seasoning to taste.

    4. Plate the Dish: Serve a generous scoop of the herbed couscous onto each plate. Lay the cooked salmon on top, skin-side up, allowing the flavors to meld.

    5. Garnish: Lastly, sprinkle additional fresh herbs on top and serve with lemon wedges on the side for an extra zing.

    By implementing these steps, whether you’re a newlywed eager to impress your partner or a busy student looking for a nutritious meal option, you’ll be delighted by how accessible and satisfying this dish is.

    Mastering Herbed Pearl Couscous and Salmon: Advanced Tips and Variations

    Once you’ve perfected the basic recipe, consider these advanced tips to elevate your dish further:

    • Herb Infusion: For an extra layer of flavor, consider infusing your olive oil with fresh herbs beforehand. This simple step can add a depth of flavor that enhances your final dish.

    • Add Vegetables: Don’t shy away from introducing vegetables into the mix. Sautéed asparagus, cherry tomatoes, or spinach can visually enhance the dish while adding nutritional value.

    • Citrus Twist: If you’re a fan of citrus, you can zest some lemon or orange over the finished plate, elevating the freshness dramatically.

    • Nutty Crunch: Toasted pine nuts or slivered almonds can introduce an appealing crunch while bringing healthy fats to the table.

    • Spice It Up: If you’re feeling adventurous, try adding a pinch of red pepper flakes for some heat or substitute herbs with spicy ones like harissa for a Middle Eastern twist.

    These variations and tips will not only keep your culinary experience exciting but will also ensure your guests are always intrigued by the flavors you serve.

    How to Store Herbed Pearl Couscous and Salmon: Best Practices

    Storing your Herbed Pearl Couscous and Salmon properly ensures that you can enjoy leftovers without compromising quality.

    1. Refrigeration: Once the dish has cooled, place it in airtight containers. It can be stored in the fridge for up to 3 days. Be sure to separate the salmon and couscous if possible to maintain texture.

    2. Freezing: If you want to enjoy this dish at a later time, you can freeze the cooked components. However, it’s best to skip freezing the salmon if you plan to reheat it, as it can change the texture upon thawing. Place the couscous in a freezer-safe bag for up to three months.

    3. Reheating: To reheat, microwave for a quick meal or allow it to thaw in the fridge overnight, then warm on the stovetop with a splash of additional broth to bring back moisture.

    Using these techniques, you can maintain the freshness of your salmon recipes without sacrificing quality.

    Nutritional Value of Herbed Pearl Couscous and Salmon

    Understanding the nutritional value of your dishes can help you make informed choices about your meals. The Herbed Pearl Couscous and Salmon dish boasts the following nutrition metrics (based on one serving, approximately 200 grams of the final dish):

    • Calories: 450 kcal
    • Protein: 30 g
    • Fat: 20 g (with healthy fats predominantly from salmon)
    • Carbohydrates: 40 g (primarily from pearl couscous)
    • Fiber: 2 g
    • Sodium: 400 mg

    With balanced macronutrients, this dish will help keep your energy up throughout the day, making it a perfect choice for anyone from working professionals to seniors. You can easily tweak the portions to meet your personal dietary needs, be it for weight management or overall health enhancement.

    FAQs: Frequently Asked Questions About Herbed Pearl Couscous and Salmon

    1. Can I substitute salmon with another fish?

    Yes! You can use other fish such as trout, tilapia, or even chicken breast if you’re looking to diversify your protein. Adjust cooking times accordingly for different proteins.

    2. Is this dish suitable for meal prep?

    Absolutely! This dish stores well, and you can prepare it in advance to enjoy throughout the week. Just ensure that they’re stored according to storage best practices.

    3. How can I make the dish spicier?

    If you prefer spice, consider adding some cayenne pepper, crushed red pepper flakes, or even some jalapeños sautéed with your vegetables before combining them with the couscous.

    4. Is it gluten-free?

    Pearl couscous typically contains gluten; however, you can substitute it with quinoa or gluten-free pasta to cater to gluten-intolerant individuals.

    5. Can I bake the salmon instead of pan-cooking it?

    Certainly! Baking the salmon at 375°F (190°C) for about 12-15 minutes will yield a tender and flaked texture. Adjust the cooking times based on the thickness of the fillets.

    By addressing these frequently asked questions, you equip the home cook or enthusiast with the knowledge to adapt the Herbed Pearl Couscous and Salmon dish to their needs, ensuring a delightful and satisfying dining experience.

    Conclusion

    With its easy preparation, robust flavors, and health benefits, Herbed Pearl Couscous and Salmon is truly a dish for everyone. Whether you’re appeasing a family, seeking quick meal solutions, or pursuing healthy lifestyle choices, this recipe shines. Remember, enhance your expertise with various substitutions or advanced techniques and keep the joys of cooking alive in your kitchen! Now, go ahead and embrace these salmon recipes that celebrate both nutrition and satisfaction on your plate. Enjoy your journey in the kitchen!

  • Easy Cream Cheese Doritos Chicken

    Easy Cream Cheese Doritos Chicken

    Easy Cream Cheese Doritos Chicken: A Tropical Delight

    Introduction to Easy Cream Cheese Doritos Chicken

    If you’re on the hunt for quick and delicious chicken recipes, you’ve landed in the right place! Easy Cream Cheese Doritos Chicken combines the creamy richness of cream cheese with the unmistakable crunch of Doritos for a dish that’s both comforting and satisfying. This recipe stands out not only for its unique flavor but also for its incredible simplicity, making it an excellent choice for busy evenings or weeknight family dinners.

    In just a few steps, you can create a meal that pleases even the pickiest eaters while also offering you a convenient way to whip up something memorable. Best of all, it offers a fantastic balance of taste and nutrition. This dish can easily be tailored to fit various dietary requirements, including gluten-free or low-calorie options. Whether you’re a busy parent juggling homework and work, a college student seeking a quick meal, or anyone in between, this Easy Cream Cheese Doritos Chicken makes cooking less of a chore and more of a joy.

    Allow the flavors to transport you, combining the richness of chicken with the delightful crunch and subtle cheesiness of Doritos. As you prepare this dish, you will discover why it has become a favorite in many households, adding a tropical twist to traditional chicken recipes that will leave your family and guests eagerly asking for seconds.

    Benefits and Advantages of Easy Cream Cheese Doritos Chicken

    When it comes to crafting the ultimate comfort food, Easy Cream Cheese Doritos Chicken hits all the right notes. Here’s why you should consider making this dish:

    1. Simplicity at Its Best: This recipe is not just easy; it’s remarkably uncomplicated. With minimal ingredients and straightforward steps, even those with little cooking experience can achieve delicious results. The preparation allows you to spend less time in the kitchen and more time enjoying your meal.

    2. Health Benefits: Chicken is a lean protein source packed with essential nutrients, including B vitamins, iron, and zinc. When paired with cream cheese, which provides healthy fats, this dish offers a balanced nutritional profile. In addition, using lighter cream cheese options can greatly reduce the overall calorie count.

    3. Versatile Dietary Needs: One of the major advantages of this chicken recipe is its flexibility. You can easily modify it to cater to various dietary preferences. Whether you’re vegan, gluten-sensitive, or simply looking to cut down on calories, plenty of substitutions will help you achieve a similar and satisfying outcome.

    4. Family-Friendly Appeal: With the crunchy Doritos topping, this dish appeals to kids and adults alike. It’s an excellent way to introduce new flavors while keeping familiar textures loved by the family. The dish has all the makings of a family staple, ensuring that everyone leaves the table happy.

    5. Time-Saving: In a world where everyone seems to be busy, this recipe comes to the rescue. Prep time takes just minutes, and you can have a hearty meal on the table in under an hour. Perfect for busy weeknights or unexpected guests, this chicken recipe is a true lifesaver.

    6. Delicious Leftovers: If you manage to have any leftovers (which is quite unlikely!), they can be refrigerated or even frozen for later enjoyment. Dishes that taste even better the second time around are a bonus in any cook’s repertoire.

    Overall, Easy Cream Cheese Doritos Chicken is a must-try recipe that promises to deliver flavor, ease of preparation, and flexibility for varying dietary needs—all the while becoming a cherished addition to your collection of chicken recipes.

    Ingredients Overview

    Essential Ingredients for Easy Cream Cheese Doritos Chicken

    Here’s what you will need to create a batch of Easy Cream Cheese Doritos Chicken:

    • 4 Chicken Breasts (boneless and skinless) – This lean protein is the primary ingredient, providing essential nutrients while serving as the base of the dish.
    • 8 oz Cream Cheese (softened) – Choose regular, low-fat, or vegan cream cheese as per your dietary requirements. This will ensure the chicken remains moist and flavorful.
    • 1 cup Doritos (crushed) – Use your favorite flavor (Nacho Cheese is popular). This topping will provide a fantastic crunch and a burst of flavor that distinguishes this dish.
    • 1/2 cup Shredded Cheese (such as cheddar or mozzarella) – Optional, for added creaminess and cheesy goodness. (Vegan cheese can be used for dairy-free options.)
    • 1 teaspoon Garlic Powder – This adds depth and richness to the dish, enhancing the overall flavor.
    • 1 teaspoon Onion Powder – Another layer of taste that complements the chicken wonderfully.
    • Salt and Pepper to taste – Essential seasonings that elevate all the other flavors.
    • 1 tablespoon Olive Oil – For coating the chicken which helps in preventing sticking if baking.

    Notes for Dietary Considerations:

    • Gluten-Free: Choose gluten-free Doritos to accommodate those with gluten sensitivities.
    • Low-Calorie: Opt for reduced-fat cream cheese and measure your Doritos carefully to keep the calorie count down.
    • Vegan Friendly: Substitute chicken with firm tofu or tempeh and use vegan cream cheese and cheese alternatives.

    Dietary Substitutions to Customize Your Easy Cream Cheese Doritos Chicken

    This recipe is wonderfully adaptable to cater to various dietary preferences. Here are some suggested substitutions.

    • Chicken: Replace chicken breasts with turkey or tofu for a leaner option. If opting for tofu, use extra-firm tofu for the best results.
    • Cream Cheese: Use a dairy-free alternative for those who are lactose intolerant or vegan. Cashew cream or silken tofu blended until smooth can also provide a creamy consistency.
    • Doritos: While original Doritos are a favorite, consider using other tortilla chips for different flavors or even making your own baked chips to control the ingredients.
    • Cheese: If you want a lower-fat option, use a mix of cream cheese and Greek yogurt. Also, vegan cheese options are becoming increasingly diverse and delicious.
    • Spices: Customize flavors with smoked paprika, cayenne pepper, or your favorite herbs to elevate the dish even further.

    By following these suggestions, you can effortlessly adapt the Easy Cream Cheese Doritos Chicken to suit your personal taste preferences and dietary restrictions, ensuring a dish that everyone can enjoy.

    How to Prepare the Perfect Easy Cream Cheese Doritos Chicken: Step-by-Step Guide

    Now that you have all your ingredients ready, let’s dive into the simple steps to prepare your Easy Cream Cheese Doritos Chicken:

    1. Prepare the Oven: Preheat your oven to 375°F (190°C). This ensures that your chicken cooks evenly and gets that perfect golden-brown crust.

    2. Prep the Chicken: Using a meat mallet or rolling pin, gently pound the chicken breasts to ensure they cook evenly. Season the breasts with salt, pepper, garlic powder, and onion powder. This step infuses flavor right into the chicken.

    3. Mix the Cream Cheese: In a mixing bowl, combine the softened cream cheese with any remaining garlic and onion powder for flavor enhancement. If desired, fold in half of the shredded cheese. This mixture will coat the chicken and keep it moist while adding flavor.

    4. Coat the Chicken: Take the seasoned chicken breasts and generously spread the cream cheese mixture on top. Ensure that each piece is well-covered, allowing the flavors to combine during baking.

    5. Crush the Doritos: In a ziplock bag or food processor, crush the Doritos into chunky crumbs. You want a mix of coarse pieces for texture that adheres well to the chicken.

    6. Dredge in Doritos: Gently press each coated chicken breast into the crushed Doritos, ensuring an even coating. This will create that signature crunchy topping that makes this dish so delicious.

    7. Arrange on a Baking Sheet: Place the coated chicken breasts on a baking sheet lined with parchment paper or a silicone baking mat to prevent sticking. Drizzle the olive oil over the tops of the chicken for a hint of crispness while baking.

    8. Bake to Perfection: Insert the baking sheet into your preheated oven and bake for approximately 25-30 minutes or until the internal temperature reaches 165°F (75°C). The Doritos coating should turn golden and crisp.

    9. Add Additional Cheese (Optional): For that ooey-gooey texture, remove the baking sheet about 10 minutes before the dish is done, and sprinkle the remaining shredded cheese on top. Return to the oven until the cheese melts and becomes bubbly.

    10. Serve and Enjoy: Once baked to perfection, remove the chicken from the oven, allow it to sit for a few minutes, and then slice into your desired portions. Serve warm with dipping sauces, healthy sides, or atop a fresh salad for a complete meal.

    Your Easy Cream Cheese Doritos Chicken is now ready to be enjoyed! Its extravagant blend of flavors and textures will surely impress everyone at the table.

    Mastering Easy Cream Cheese Doritos Chicken: Advanced Tips and Variations

    While the base recipe is already fantastic, you can take your Easy Cream Cheese Doritos Chicken to new heights with these advanced tips and variations:

    • Add Fresh Herbs: Consider adding fresh herbs like parsley or chives into the cream cheese mixture for a refreshing touch. This flavors up the dish while adding appealing colors.

    • Spice it Up: If you crave some heat, add diced jalapeños, crushed red pepper flakes, or sriracha sauce into the cream cheese mixture. This spicy twist will elevate the flavor profile dramatically.

    • Make it a Casserole: For a twist, layer cooked rice or any grain as the base in a baking dish, follow with your chicken preparation, and top with extra Doritos and cheese. Bake until bubbly for a comforting casserole dish.

    • Experiment with Flavors: Use flavored Doritos (like Cool Ranch) or other brands to change the flavor profile of the dish without altering its essence.

    • Meal Prep: This dish is perfect for meal prep! Prepare multiple chicken breasts at once, bake them, and store them in individual containers for easy grab-and-go meals during the week.

    By incorporating these tips, you can customize your Easy Cream Cheese Doritos Chicken to reflect your personal tastes, turning it into a family favorite that you can enjoy time and time again.

    How to Store Easy Cream Cheese Doritos Chicken: Best Practices

    Properly storing your Easy Cream Cheese Doritos Chicken ensures that the flavors remain intact and that it stays safe to eat.

    • Refrigerator: After your chicken has cooled completely, transfer the remaining portions into an airtight container and refrigerate. The chicken can be safely stored in the refrigerator for up to 3-4 days.

    • Freezer: If you wish to store leftovers for a longer period, consider freezing the chicken. Wrap individual pieces in plastic wrap and place them in a freezer-safe container or a ziplock bag. They can be frozen for up to 2-3 months.

    • Reheating: When ready to enjoy the leftovers, you can either reheat the chicken in the microwave for 2-3 minutes or place it in the oven at 350°F (175°C) for about 15-20 minutes, making sure it reaches an internal temperature of 165°F (75°C). Adding a splash of chicken broth or water while reheating in the oven can help retain moistness.

    By following these best practices for storage, you can enjoy your Easy Cream Cheese Doritos Chicken while minimizing waste and maximizing flavor.

    Nutritional Value of Easy Cream Cheese Doritos Chicken

    When it comes to chicken recipes, understanding the nutritional content of your dish is essential, especially for diet-conscious individuals. Here’s a general breakdown of the nutritional values per serving of Easy Cream Cheese Doritos Chicken, assuming the recipe serves four:

    • Calories: Approximately 400-500 calories
    • Total Fat: 25g
    • Saturated Fat: 10g
    • Trans Fat: 0g
    • Cholesterol: 100mg
    • Sodium: 800mg
    • Total Carbohydrates: 30g
    • Dietary Fiber: 2g
    • Sugars: 2g
    • Protein: 35g

    Adjustments for Health:

    • Opt for low-fat or vegan cream cheese to reduce fat content.
    • Choose baked chips or homemade alternatives for a healthier crunch.
    • Include a side of vegetables or greens to increase fiber and nutrient intake.

    Monitor portion sizes, as this dish can be calorie-dense depending on the ingredients you choose. These adjustments will help you maintain a balanced diet while still enjoying this delicious recipe.

    FAQs: Frequently Asked Questions About Easy Cream Cheese Doritos Chicken

    Can I use frozen chicken for this recipe?

    Yes, you can use frozen chicken breasts. Just ensure they are fully defrosted before cooking for even baking.

    What can I use instead of Doritos if I want to avoid processed foods?

    You can use homemade tortilla chips or even toasted breadcrumbs seasoned with your chosen spices for a healthier alternative.

    Is this recipe suitable for meal prepping?

    Absolutely! Easy Cream Cheese Doritos Chicken stores well in the fridge and can be frozen, making it an excellent option for meal prepping.

    Can I add vegetables to this recipe?

    Certainly! Chopped spinach, diced bell peppers, or even corn can be incorporated into the cream cheese mixture or served alongside the chicken for added nutrition.

    How can I make this dish spicier?

    For those who enjoy heat, feel free to add diced jalapeños or hot sauce into the cream cheese mixture for a spicy kick!

    What is the best way to reheat leftovers?

    The best way to reheat leftovers is in the oven for a few minutes to maintain crispness, but they can also be microwaved if you’re in a hurry.

    By addressing these common questions, you can ensure a smoother cooking process and enhance your overall enjoyment of Easy Cream Cheese Doritos Chicken. Ready to make it at home? Gather your ingredients and start cooking today! Enjoy your culinary adventure!

  • Honey BBQ Chicken Rice

    Honey BBQ Chicken Rice

    Honey BBQ Chicken Rice: A Tropical Delight

    Introduction to Honey BBQ Chicken Rice

    Honey BBQ Chicken Rice is more than just a meal; it’s a delightful experience that captures the essence of tropical flavors right on your plate. This recipe stands out for its simplistic charm and nutritional benefits, making it a fantastic option for a diverse audience, including busy parents, students, cooking enthusiasts, and dietary-conscious individuals. Within this dish, tender chicken pieces are enveloped in a delectable honey barbecue glaze, perfectly complemented by fluffy rice. Whether you’re an experienced chef or a novice in the kitchen, this recipe offers both ease of preparation and a rich taste that will tantalize your taste buds.

    One of the most appealing aspects of this dish is its adaptability to various dietary needs. With simple ingredient swaps, it can easily cater to vegan or gluten-free lifestyles. The balance of protein, carbs, and essential nutrients ensures that it is both satisfying and health-focused, making it a stellar option for anyone looking to whip up quick yet nutritious chicken recipes. Whether you’re enjoying a family dinner or a simple lunch, you’ll find that Honey BBQ Chicken Rice quickly becomes a favorite in your culinary repertoire.

    Benefits and Advantages of Honey BBQ Chicken Rice

    In the bustling world we live in, finding quick, nutritious meals that don’t compromise on flavor can be a challenge. Honey BBQ Chicken Rice excels in this area. The preparation process is straightforward, usually taking under an hour from start to finish. This makes it an excellent choice for those hectic weeknights when you just don’t have the time to spend hours in the kitchen. Additionally, it’s an ideal recipe that caters to the tastes of children and adults alike; its sweet and savory combination is universally appealing, ensuring that even the pickiest eaters will enjoy a satisfying meal.

    Health-wise, this recipe offers substantial benefits. Chicken is a lean source of protein, essential for muscle repair and overall health. The inclusion of brown rice adds fiber, which aids digestion and promotes a healthy lifestyle. Moreover, honey provides a natural sweetness and is often lower in calories compared to refined sugars, all while delivering vital antioxidants.

    What sets this dish apart from other chicken recipes is its versatility. You can easily tweak the flavors to include spicier ingredients or add vegetables to increase nutritional value. You can even portion it for meal prep, allowing for quick, grab-and-go lunches throughout the week. The convenience of preparing a dish that can please various dietary preferences, such as vegan, gluten-free, or low-calorie options, makes Honey BBQ Chicken Rice an attractive choice for anyone—regardless of their culinary experience or culinary needs.

    Ingredients Overview

    Essential Ingredients for Honey BBQ Chicken Rice

    To prepare Honey BBQ Chicken Rice, gather the following essential ingredients:

    • Boneless Chicken Breast (about 1 lb): Provides a lean protein source. Can substitute with tofu for a vegan option.
    • Brown Rice (1 cup): A healthier alternative to white rice, this provides fiber and nutrients. For gluten-free diet, ensure rice is certified gluten-free.
    • Honey (1/2 cup): Adds natural sweetness and aids in creating a sticky glaze. Maple syrup can be a good vegan alternative.
    • BBQ Sauce (1/2 cup): Choose a low-sugar or homemade BBQ sauce for a healthier option. Vegan BBQ sauce is available for dairy-free preferences.
    • Olive Oil (2 tbsp): Used for cooking the chicken; it adds healthy fats. Avocado oil can also be a wonderful substitute.
    • Garlic Powder (1 tsp): Enhances flavor without calorie load.
    • Onion Powder (1 tsp): Adds depth to the flavor without overwhelming sweetness.
    • Salt and Pepper (to taste): Essential for balancing flavors.
    • Chopped Green Onions (for garnish): Adds a freshness to the dish.

    These ingredients not only ensure a flavorful dish but also cater to health-conscious individuals who don’t want to sacrifice taste for nutrition.

    Dietary Substitutions to Customize Your Honey BBQ Chicken Rice

    This recipe is incredibly versatile, and there are several substitutions you can make depending on dietary restrictions or preferences:

    • Vegan Substitutes: Replace chicken with firm tofu or tempeh. Use maple syrup or agave nectar instead of honey and opt for a vegan-friendly BBQ sauce. Brown rice can be replaced with quinoa or cauliflower rice for a low-carb option.
    • Gluten-Free Options: Verify all sauces are gluten-free. You might consider brown rice or quinoa as a grain alternative.
    • Low-calorie alternatives: Use skinless chicken breasts, or lean turkey breast, and opt for a sugar-free BBQ sauce. Reducing the amount of honey can also lower the calorie count.
    • Vegetable Boost: Add bell peppers, broccoli, or snap peas during cooking to enhance the nutritional value and bring extra flavor.

    By employing these substitutions, you can adjust this comforting recipe to meet any dietary need, allowing everyone to enjoy the deliciousness of Honey BBQ Chicken Rice.

    How to Prepare the Perfect Honey BBQ Chicken Rice: Step-by-Step Guide

    Step 1: Prepare the Base

    Begin by rinsing 1 cup of brown rice under cold water until the water runs clear. This helps to remove any excess starch. Next, cook the rice according to brand instructions—in general, combine the rinsed rice with 2 cups of water in a pot, bring to a boil, then reduce heat to low, cover, and let it simmer for about 40-45 minutes until tender.

    Step 2: Marinate the Chicken

    While the rice is cooking, take 1 lb of boneless chicken breasts and slice them into bite-sized pieces for even cooking. In a medium bowl, mix 1/2 cup honey and 1/2 cup BBQ sauce together. Add the chicken pieces into the bowl and coat them evenly. Allow them to marinate for at least 15-20 minutes. This marination will deepen the flavors and ensure tender chicken.

    Step 3: Cook the Chicken

    Heat 2 tablespoons of olive oil in a large skillet over medium-high heat. Once the oil is hot, carefully add the marinated chicken pieces to the skillet, making sure to reserve any remaining marinade. Sauté the chicken pieces for about 5-7 minutes or until they are golden brown and cooked through, stirring occasionally to ensure even cooking.

    Tip: For those needing a quicker meal prep, you could also cook the chicken in an air fryer or instant pot, adjusting the cooking time accordingly.

    Step 4: Combine and Glaze

    Once the chicken is fully cooked, add the reserved marinade to the skillet and let it simmer for an additional 3-5 minutes. This step allows the BBQ sauce to thicken and cling beautifully to the chicken, creating a mouthwatering glaze.

    Step 5: Serve

    Fluff the cooked brown rice with a fork and serve it as the base on plates. Top generously with the glazed Honey BBQ chicken. For an added touch, garnish with freshly chopped green onions.

    Step 6: Enjoy

    Take a moment to appreciate your culinary creation! This meal is best enjoyed warm, but it also makes for great leftovers that can be easily reheated.

    This method of preparing Honey BBQ Chicken Rice balances time efficiency with satisfying full flavors, reinforcing its place as a favorite among diverse chicken recipes.

    Mastering Honey BBQ Chicken Rice: Advanced Tips and Variations

    To elevate your Honey BBQ Chicken Rice experience, consider these advanced tips and variations:

    1. Experiment with Flavors: Try adding minced ginger or smoked paprika to the marinade for a different flavor profile. This addition will enhance the smokiness and warmth of the dish.

    2. Add Vegetables: For a one-pan meal, consider throwing in chopped veggies such as bell peppers, zucchini, or corn during the last few minutes of chicken cooking time. This not only enhances the nutritional content but also adds color to your dish.

    3. Use Different Grains: Swap out brown rice for other grains like farro, quinoa, or even cauliflower rice to keep the dish exciting and adaptable to various culinary desires.

    4. Freezer Meal: If you want to prep this dish in advance, consider marinating the chicken and freezing it with the sauce. When you’re ready to cook, simply thaw and follow cooking steps. It can be a fantastic time-saver during busy weeks.

    5. Spice it Up: For those who prefer more heat, add chili flakes or even Sriracha sauce into the BBQ mixture for a creative twist.

    By implementing these tips and variations, you can keep your Honey BBQ Chicken Rice exciting, appealing, and in tune with your taste buds’ whims!

    How to Store Honey BBQ Chicken Rice: Best Practices

    Knowing how to store your Honey BBQ Chicken Rice can extend its freshness and help you enjoy leftovers safely. Here are the best practices:

    1. Refrigeration: If you have leftovers, allow the dish to cool completely. Store it in an airtight container in the refrigerator for up to three days. Make sure to separate the chicken and rice if possible to maintain texture.

    2. Freezing: This dish freezes wonderfully! Portion it out into freezer-safe containers, and it can last up to three months. Thaw overnight in the refrigerator when you’re ready to enjoy it again.

    3. Reheating: When it’s time to eat, reheat the chicken and rice separately in the microwave or over the stove on low heat. Add a splash of water if the rice seems a bit dry during reheating.

    Following these best practices ensures you can enjoy your Honey BBQ Chicken Rice even after the initial cooking session, making it a fantastic meal for meal prep enthusiasts.

    Nutritional Value of Honey BBQ Chicken Rice

    Nutritional value is essential for any recipe, especially for those juggling health-related goals. While specific values can depend on the portion size and exact ingredients used, here’s a general breakdown for one serving of Honey BBQ Chicken Rice made with boneless chicken breast and brown rice:

    • Calories: Approximately 400-450
    • Protein: 30 grams (lean source from chicken)
    • Fat: 10 grams (from olive oil and possible BBQ sauce)
    • Carbohydrates: 55 grams (from brown rice)
    • Fiber: 5 grams (from brown rice and added vegetables, if used)
    • Sugars: 12 grams (mostly from honey)

    These values make Honey BBQ Chicken Rice not just a sumptuous meal but also balanced in essential nutrients. Letting you indulge without the guilt allows readers to align their culinary practices with healthier living goals.

    FAQs: Frequently Asked Questions About Honey BBQ Chicken Rice

    1. Can I make this recipe with chicken thighs instead of breasts?

    Yes, chicken thighs can certainly be used, making the dish juicier and richer in flavor. Just adjust the cooking time as thighs may take a bit longer.

    2. How can I make this recipe vegetarian?

    To make Honey BBQ Chicken Rice vegetarian, simply replace the chicken with firm tofu or tempeh, and use a vegan BBQ sauce.

    3. What can I use instead of honey for a vegan dish?

    Maple syrup or agave nectar makes a great substitute for honey in the marinade while keeping the dish deliciously sweet.

    4. Can I prepare Honey BBQ Chicken Rice in advance?

    Absolutely! You can marinate the chicken and store it in the fridge for a day or freeze it. Just make sure to fully cook it after thawing.

    5. How can I increase the spice level?

    For those who crave heat, include chili powder, cayenne pepper, or a dash of hot sauce into your marinade to give your dish some extra kick.

    This Honey BBQ Chicken Rice recipe captures the flavor and ease that every home cook desires. With a few simple steps, healthy ingredients, and versatile adaptations, it promises to become a staple in your collection of chicken recipes. Enjoy cooking!

  • Cacio E Pepe Chicken

    Cacio E Pepe Chicken

    Cacio E Pepe Chicken: A Tropical Delight

    Introduction to Cacio E Pepe Chicken

    Welcome to a culinary journey through the soulful flavors of Italy with a delightful twist – Cacio E Pepe Chicken. This dish effortlessly combines the classic essence of Cacio E Pepe, a Roman pasta favorite, with succulent chicken, making it one of the most appealing chicken recipes for any night of the week. As we all juggle busy lifestyles, this recipe not only saves time in the kitchen but also brings together health and taste without sacrificing flavor.

    Cacio E Pepe Chicken is perfect for everyone, from home cooks and busy parents to students on the go and diet-conscious individuals seeking a nutritious meal. With simple ingredients like chicken breasts and a few pantry staples, this recipe can be yours in just under 30 minutes. Besides being a winner in terms of convenience, it also offers a blend of protein, healthy fats, and essential nutrients, ensuring you enjoy a wholesome dish that supports your culinary adventures.

    Moreover, this recipe effortlessly aligns with various dietary preferences, making it gluten-free and easy to customize. Whether you’re a newlywed trying to impress your partner with your cooking skills or a traveler looking for comforting, familiar tastes, Cacio E Pepe Chicken is the ultimate answer to your culinary needs.

    Benefits and Advantages of Cacio E Pepe Chicken

    Cacio E Pepe Chicken isn’t just another dish; it represents a harmony of flavors that meets the demands of modern cooking. Here’s why this recipe stands out among other chicken recipes:

    1. Ease of Preparation

    Preparing Cacio E Pepe Chicken is a breeze, making it a perfect choice for busy schedules. With under ten easily accessible ingredients, even beginners can whip up this dish effortlessly while feeling like gourmet chefs.

    2. Health Benefits

    Combining protein-rich chicken with the goodness of olive oil, Pecorino Romano cheese, and a touch of black pepper, this dish promotes health without harsh dietary restrictions. The use of olive oil provides heart-healthy fats, while the cheese and pepper contribute essential nutrients and flavors.

    3. Versatile and Customizable

    This chicken recipe shines in its adaptability. Whether you’re looking for a vegetarian alternative, seeking to replace the chicken with tofu, or adjusting portion sizes for a family meal, this dish covers it all. Additionally, it can be made gluten-free by using gluten-free pasta or skipping it entirely, making it suitable for a variety of dietary needs.

    4. Flavor Explosion

    The vibrant flavors of Cacio E Pepe Chicken—rich, creamy, and savory—delight your taste buds, turning a simple weeknight dinner into a memorable culinary experience. The expertly combined ingredients create a comforting yet sophisticated dish that can impress guests or satisfy a craving for a hearty meal.

    5. Time-Saving

    In today’s fast-paced world, this recipe stands out due to its quick preparation and cooking time. With the whole meal ready in under half an hour, it helps you maintain a busy lifestyle while ensuring you and your family enjoy vibrant, delicious meals regularly.

    In summary, Cacio E Pepe Chicken offers a unique blend of simplicity, health, versatility, and flavor, making it a must-try addition to your collection of chicken recipes.

    Ingredients Overview

    Essential Ingredients for Cacio E Pepe Chicken

    Before diving into your cooking adventure, let’s gather everything you need for Cacio E Pepe Chicken. Here’s a detailed list of ingredients to bring this dish to life:

    1. Chicken Breasts (2 pieces, boneless and skinless)
    2. Rich in protein, chicken breasts offer the main source of nutrients in this recipe.

    3. Pecorino Romano Cheese (1 cup, grated)

    4. This hard, Italian cheese adds creaminess and umami flavor. For a vegan substitute, you can use nutritional yeast.

    5. Extra Virgin Olive Oil (3 tablespoons)

    6. A great source of healthy fats, olive oil is essential for sautéing and adds flavor.

    7. Black Pepper (to taste)

    8. Essential for that classic Cacio E Pepe taste. Freshly ground pepper is preferable.

    9. Salt (to taste)

    10. Enhances the dish’s flavors; use sparingly, as Pecorino can be salty.

    11. Chicken Broth (1/2 cup, low-sodium)

    12. Adding moisture and depth to the flavors, low-sodium broth is a healthier choice.

    13. Garlic (2 cloves, minced)

    14. Brings aromatic flavor, enhancing the entire dish.

    15. Lemon (1, zested and juiced)

    16. Provides brightness and acidity; lemon zest adds a fresh note.

    Dietary Substitutions to Customize Your Cacio E Pepe Chicken

    1. For Gluten-Free Options
    2. Replace pasta with gluten-free spaghetti or zoodles (zucchini noodles) for a lower-carb option. Using gluten-free breadcrumbs can also help if you’d like to create a crispy topping.

    3. For Lower Calorie Needs

    4. Opt for skinless chicken thighs for tenderness with fewer calories or reduce cheese for a lighter dish. Plant-based chicken alternatives like chickpeas or lentils can be substitutes for varying protein sources.

    5. Dairy-Free Alternatives

    6. Use cashew cream or coconut milk mixed with nutritional yeast to achieve creaminess without dairy.

    7. Vegetarian Version

    8. Swap chicken for thick-cut mushrooms or eggplant, which can absorb flavors well while providing a hearty bite.

    9. Spicy Variation

    10. For a kick, add crushed red pepper flakes to the dish while cooking.

    These substitutions ensure that your Cacio E Pepe Chicken fits a range of dietary needs while providing the same delightful experience.

    How to Prepare the Perfect Cacio E Pepe Chicken: Step-by-Step Guide

    Creating Cacio E Pepe Chicken is straightforward. Let’s dive into this step-by-step guide that makes cooking enjoyable:

    1. Prepare the Base:
    2. Begin by seasoning the chicken breasts lightly with salt and freshly ground black pepper on both sides. Set aside.

    3. Cook the Chicken:

    4. In a large skillet, heat the extra virgin olive oil over medium-high heat. Once hot, add the seasoned chicken breasts. Sear on both sides for about 5-6 minutes, or until golden brown and cooked through. Use a meat thermometer to ensure they reach an internal temperature of 165°F (75°C). Remove the chicken from the skillet and set aside on a plate.

    5. Sauté Garlic:

    6. In the same skillet, lower the heat to medium and add minced garlic. Sauté for about 1-2 minutes, stirring frequently, until fragrant and lightly golden. Be cautious not to burn it, as burnt garlic can turn bitter.

    7. Add Broth and Cheesiness:

    8. Pour in the chicken broth and bring it to a gentle simmer. Scrape any browned bits from the skillet to infuse the broth with flavor. Ensure it simmers for about 3-5 minutes.

    9. Create Sauce:

    10. Stir in the grated Pecorino Romano cheese gradually until melted and creamy. If the sauce is too thick, add more broth or a splash of water until you reach your desired consistency.

    11. Incorporate Chicken:

    12. Once the sauce is creamy, return the cooked chicken to the skillet, spooning the sauce over to ensure it’s well coated. Cook on low for an additional 2-3 minutes.

    13. Finish with Lemon:

    14. Add the zest and juice of the lemon, stirring to combine. This will add brightness. You can also sprinkle extra black pepper to taste.

    15. Serve:

    16. Remove from heat and serve Cacio E Pepe Chicken atop a bed of your choice of pasta, zucchini noodles, or alongside a fresh salad.

    Optional Step:

    1. Garnish:
    2. For an added touch, sprinkle with extra Pecorino and fresh herbs, such as parsley or basil, before serving.

    This simple step-by-step approach guarantees delicious results while allowing for easy modifications that suit your dietary preferences.

    Mastering Cacio E Pepe Chicken: Advanced Tips and Variations

    Elevate your Cacio E Pepe Chicken experience with these advanced tips and variations:

    1. Experiment with Pasta:
    2. While chicken is the star, consider adding traditionally cooked pasta to the dish. Toss your favorite pasta (like spaghetti, fettuccine, or whole-grain choices) right at the end, incorporating it with the chicken for a hearty meal.

    3. Using Other Proteins:

    4. Swap out chicken for shrimp or scallops for a seafood twist, both of which pair beautifully with the rich and creamy cheese sauce.

    5. Smoky Flavor Add-In:

    6. Introduce smoked paprika for a subtle smoky flavor profile, adding a modern twist to this traditional dish.

    7. Add Vegetables:

    8. Incorporate in-season vegetables like spinach, peas, or asparagus, sautéing them alongside the garlic for added color and nutrition.

    9. Make it a Bake:

    10. Transfer everything (post-step 8) to a baking dish, sprinkle with extra cheese, and bake at 375°F (190°C) until bubbly and golden, approximately 15-20 minutes, for a delightful cheese crust.

    Experimenting with Cacio E Pepe Chicken allows you to create a variety of dishes using the same base recipe. Each twist adds a unique flavor experience while staying true to the original concept.

    How to Store Cacio E Pepe Chicken: Best Practices

    To keep your Cacio E Pepe Chicken fresh for later enjoyment, follow these best storage practices:

    Refrigeration:

    • Place any leftover Cacio E Pepe Chicken in an airtight container and store it in the refrigerator. It can stay fresh for up to 3-4 days.

    Freezing:

    • To freeze, first allow the chicken to cool completely. Then, wrap individual portions tightly in plastic wrap followed by aluminum foil, or simply use a freezer-safe airtight container. Cacio E Pepe Chicken can maintain quality for about 2-3 months in the freezer.

    Reheating:

    • When you’re ready to enjoy your leftover dish, thaw the chicken in the refrigerator for several hours or overnight.
    • Reheat it gently in a skillet over low heat, adding a splash of chicken broth or water to retain moisture, ensuring it doesn’t dry out. Alternatively, you can microwave it for a quick option, covered, to steam without losing the sauce’s richness.

    With these storage techniques, you can enjoy the comforting flavors of Cacio E Pepe Chicken again without sacrificing quality or taste.

    Nutritional Value of Cacio E Pepe Chicken

    Cacio E Pepe Chicken not only delights your palate but also nourishes your body. Here’s a breakdown of the nutritional profile for one serving (considering two servings from the recipe described):

    • Calories: 450-500
    • Protein: 40g
    • Carbohydrates: 6g (if served without pasta)
    • Fat: 30g
    • Saturated Fat: 10g
    • Cholesterol: 120mg
    • Sodium: 800mg
    • Fiber: 0g (with dietary fiber increase if vegetables or whole-grain pasta are added)

    Nutritional Benefits:

    • High Protein Source: Perfect for those looking to build muscle or stay satiated throughout the day.
    • Source of Healthy Fats: Providing dozes of monounsaturated fats for heart health.
    • Calcium and Phosphorus: Essential for bone health, thanks to the cheese.

    Understanding the nutritional value of Cacio E Pepe Chicken allows you to enjoy it guilt-free, tailored to suit your dietary goals.

    FAQs: Frequently Asked Questions About Cacio E Pepe Chicken

    1. Can I make this recipe ahead of time?
    2. Yes! You can prepare the Cacio E Pepe Chicken ahead of time, refrigerate, and simply reheat when you’re ready to serve.

    3. Can I use other types of cheese?

    4. Absolutely! While Pecorino Romano is traditional, Parmesan or Grana Padano can work well too. For a dairy-free version, nutritional yeast is a great substitute.

    5. Is it suitable for freezing?

    6. Yes, Cacio E Pepe Chicken can be frozen and reheated later. Follow the proper storage methods to maintain its deliciousness.

    7. Can I make this recipe vegetarian?

    8. Yes! Substitute the chicken with hearty vegetables like mushrooms or cauliflower, and follow the same cooking procedure.

    9. How spicy can I make it?

    10. If you enjoy heat, consider adding crushed red pepper flakes or a dash of your favorite hot sauce to the dish for that extra kick!

    11. What should I serve with Cacio E Pepe Chicken?

    12. Serve it alongside a fresh garden salad, garlic bread, or your favorite pasta to round out the meal.

    By addressing common questions, we hope to assist you in your cooking journey and inspire confidence in preparing this beautiful dish.

    Cacio E Pepe Chicken is a versatile, delicious meal that fits into any dietary preference and makes for a delightful addition to your repertoire of chicken recipes. Enjoy every moment of creating and savoring this sophisticated dish!

  • Easy One-Pot Italian Sausage Orzo Dinner

    Easy One-Pot Italian Sausage Orzo Dinner

    Easy One-Pot Italian Sausage Orzo Dinner: A Tropical Delight

    Introduction to Easy One-Pot Italian Sausage Orzo Dinner

    Looking for easy dinner recipes that combine taste, health, and simplicity? Look no further than this Easy One-Pot Italian Sausage Orzo Dinner! This vibrant dish offers a delightful mix of flavors and textures, perfectly balanced with succulent Italian sausage, tender orzo pasta, and a colorful array of veggies. What sets this recipe apart is its one-pot preparation, making cleanup a breeze—ideal for busy weeknights or simple family meals.

    Imagine serving a dish that not only pleases the palate but is also a source of wholesome ingredients. Packed with protein and vitamins, this meal caters to various dietary needs, including options for vegetarians and health-conscious individuals. It’s versatile, too; you can easily modify it to suit your preferences or what’s available in your pantry.

    With its quick cooking time and minimal prep, this Easy One-Pot Italian Sausage Orzo Dinner can become a staple in your recipe rotation. Whether you’re a busy parent trying to squeeze dinner into a hectic schedule or a student locating ways to eat well on a budget, this recipe promises satisfaction without compromise. It’s a delectable Mediterranean-inspired dish that’s sure to impress guests, making it perfect for newlyweds and seasoned hosts alike. Let’s dive into the details to see why this recipe is not just a meal, but a culinary experience you’ll want to recreate.

    Benefits and Advantages of Easy One-Pot Italian Sausage Orzo Dinner

    The Easy One-Pot Italian Sausage Orzo Dinner is not just about convenience; it offers numerous benefits that elevate it as one of the best easy dinner recipes.

    1. Simplicity of Preparation

    This dish shines in its straightforward cooking process. With just one pot to manage, you’ll save time and effort in both the cooking and cleaning phases. No need for multiple pans and utensils; everything comes together harmoniously in one vessel. From sautéing the sausage to simmering the orzo, step-by-step, this recipe ensures you focus on enjoying the cooking experience rather than dreading the cleanup.

    2. Health Benefits

    The combination of Italian sausage and orzo provides a balanced meal rich in protein and complex carbohydrates. Plus, the inclusion of fresh veggies like spinach, bell peppers, and tomatoes means you’re also packing in essential vitamins and minerals—great for boosting your health. For those looking to reduce caloric intake, options for lean turkey sausage or even plant-based alternatives can satisfy your dietary preferences without sacrificing flavor.

    3. Versatility

    One of the standout features of this easy dinner recipe is its versatility. You can adapt it to fit various dietary needs. For gluten-free diets, simply substitute regular orzo with a gluten-free pasta option. Vegetarians can replace sausage with hearty tofu or beans for protein. The ability to customize based on what’s left in your fridge makes this dish perfect for home cooks who want to minimize waste.

    4. Family-Friendly

    This meal appeals to everyone—kids, adults, and seniors alike. With its vibrant colors and comforting flavors, even the pickiest eaters are likely to enjoy it. Plus, the ease of preparation means you can involve your children, making cooking a fun family activity that encourages them to learn about cooking healthy meals.

    5. Time Efficiency

    In an age where time is of the essence, this recipe stands out for its quick preparation and cooking times. With just 30 minutes from start to finish, you can serve a fulfilling meal that tastes as if it came from a fine restaurant without slaving away in the kitchen.

    These compelling benefits make the Easy One-Pot Italian Sausage Orzo Dinner your go-to option for nourishing meals that fit seamlessly into your busy lifestyle.

    Ingredients Overview

    Essential Ingredients for Easy One-Pot Italian Sausage Orzo Dinner

    Creating the most delicious Easy One-Pot Italian Sausage Orzo Dinner requires a collection of simple, yet flavorful ingredients. Here’s what you’ll need:

    • 12 oz Italian sausage (or turkey/chicken sausage): Provides essential protein and rich flavor.
    • 1 cup orzo pasta: A star ingredient that absorbs flavors beautifully.
    • 1 medium onion, diced: Adds sweetness and depth to the dish.
    • 1 bell pepper (red, yellow, or green), chopped: For color and crunch.
    • 2 cups spinach leaves (fresh or frozen): Packed with nutrients, boosts health.
    • 2 cloves garlic, minced: Enhances flavor with its aromatic essence.
    • 1 can (14.5 oz) diced tomatoes: To bring acidity and moisture to the dish.
    • 4 cups chicken or vegetable broth: Provides a base of flavor and vital moisture.
    • 1 teaspoon Italian seasoning: Blends well with the sausage for a classic flavor profile.
    • Salt and pepper to taste: Essentials for balancing flavors.
    • Fresh basil for garnish (optional): Adds a finishing touch with freshness.

    Dietary Alert:

    • Vegan Option: Substitute Italian sausage with plant-based sausage or tempeh, and ensure to use vegetable broth.
    • Gluten-Free Option: Swap orzo with gluten-free pasta alternatives, such as rice or quinoa.
    • Low-Calorie Option: Use lean turkey sausage and increase veggie quantities for fullness without added calories.

    Dietary Substitutions to Customize Your Easy One-Pot Italian Sausage Orzo Dinner

    Every kitchen varies, and so do dietary needs. Below are some excellent substitutions to consider for a tailored experience:

    • Sausage: While traditional Italian sausage provides a fantastic flavor, you can easily switch it to turkey sausage for a leaner option or even a plant-based version to cater to vegan diets. For additional flavor in a vegetarian version, consider adding smoked paprika or nutritional yeast.

    • Orzo Pasta: If you need a gluten-free option, consider using gluten-free orzo or other pasta shapes. Brown rice or quinoa work as excellent alternatives that offer a different yet equally delicious texture.

    • Vegetable Choices: Feel free to replace spinach with kale, or add seasonal vegetables such as zucchini or asparagus. Using what’s fresh will enhance both flavor and nutrition.

    • Broth Options: Swap chicken broth with vegetable broth to suit vegetarian diets; homemade broth adds a richer taste if you have the time.

    • Herbs and Seasonings: Get creative with herbs. While Italian seasoning works well, feel free to substitute with fresh herbs like parsley or thyme to bring out unique flavors.

    These substitutions make crafting your Easy One-Pot Italian Sausage Orzo Dinner an enjoyable adventure in culinary creativity!

    How to Prepare the Perfect Easy One-Pot Italian Sausage Orzo Dinner: Step-by-Step Guide

    Creating this delightful Easy One-Pot Italian Sausage Orzo Dinner is a breeze! Follow these straightforward steps, ensuring to note the dietary adaptations along the way.

    1. Prepare the Base

    Start by heating a large pot or skillet over medium heat. Add a small dribble of olive oil, just enough to coat the bottom. Once hot, add the Italian sausage. If you’re using a plant-based or turkey sausage, brown it in the same manner. Tip: Use a wooden spoon to break the sausage into bite-sized pieces as it cooks.

    2. Sauté Aromatics

    Next, add the diced onion and chopped bell pepper to the pot. Stir everything together and cook for about 5 minutes, allowing the veggies to soften. Add the minced garlic towards the end for an extra hit of flavor; sauté for another minute until fragrant. Note: If you’re making a vegetarian version, skip this step initially and add the garlic while sautéing the vegetables later on.

    3. Incorporate the Orzo

    Now it’s time to add in the orzo pasta. Stir it well to coat in the drippings from the sausage and to toast it slightly for better flavor. This step can elevate the dish, providing additional nutty notes.

    4. Add Liquids and Seasonings

    Pour in the diced tomatoes with their juices and the chicken or vegetable broth. Add the Italian seasoning, salt, and pepper. Mix everything well and bring it to a gentle boil so that the flavors meld together beautifully.

    5. Cook the Orzo

    Once boiling, reduce the heat to a simmer and cover the pot. Allow the orzo to cook for about 10-12 minutes or until tender, stirring occasionally to prevent sticking. If necessary, add a bit more broth or water if the mixture gets too thick.

    6. Incorporate Fresh Veggies

    Once the orzo is nearly done, fold in the spinach. The residual heat will wilt the spinach perfectly without overcooking it. If desired, adjust seasoning to taste.

    7. Garnish and Serve

    After everything is nicely cooked and combined, remove the pot from heat. Let it stand for a few minutes before serving. Optional: Garnish with fresh basil or grated Parmesan cheese for an extra touch of flavor.

    8. Enjoy!

    Serve hot and enjoy your Easy One-Pot Italian Sausage Orzo Dinner with friends and family!

    You’ll find that this dish is incredibly satisfying, and with its adaptability, it’s sure to fit into any dietary preference or temporary ingredient shortage, reinforcing its status as a go-to for easy dinner recipes.

    Mastering Easy One-Pot Italian Sausage Orzo Dinner: Advanced Tips and Variations

    To elevate your cooking experience and ensure your Easy One-Pot Italian Sausage Orzo Dinner reaches perfection, consider the following tips and variations:

    Advanced Cooking Tips

    • Use High-Quality Sausage: Always choose high-quality sausage for the best flavor. Whether you’re going for spicy or mild, the choice will significantly influence the dish.

    • Customize Seasonings: Personalize your seasoning blend by adding crushed red pepper for heat or freshly chopped herbs like oregano or parsley for more freshness.

    • Lid On or Off: For a creamier consistency, you can cook with the lid on most of the time but remove it during the last few minutes to allow excess moisture to evaporate.

    Delicious Variations

    • Mediterranean Twist: Add ingredients like Kalamata olives, sun-dried tomatoes, or feta cheese to give your dish a Mediterranean flair.
    • Creamy Version: For a creamier take, consider stirring in a dollop of cream cheese or sour cream right before serving. This will enrich the dish and create luscious textures.

    • Make It a Bake: After combining all ingredients, transfer them to a baking dish, top with shredded cheese, and bake at 375°F for about 15 minutes until bubbly and golden.

    Meal Prep Option

    You can easily scale this recipe for meal prep. Make a larger batch, portion it out into containers, and store them in the fridge for quick meals later in the week. Easy to reheat and super filling!

    These advanced tips and variations not only enhance the flavor and texture but also invite creativity into your cooking process, making your Easy One-Pot Italian Sausage Orzo Dinner a personal masterpiece.

    How to Store Easy One-Pot Italian Sausage Orzo Dinner: Best Practices

    After enjoying your Easy One-Pot Italian Sausage Orzo Dinner, you may have leftovers. Here’s how to store it effectively for maximum freshness.

    Refrigeration: Store any leftover orzo dinner in an airtight container in the refrigerator. It will last about 3-4 days. To reheat, simply warm it in the microwave or on the stovetop with a splash of broth to regain moisture.

    Freezing: If you want to extend its lifespan, you can freeze portions of this dish. Place the cooled orzo dinner in freezer-safe containers or bags. It will keep well for up to 3 months. When you’re ready to eat, thaw in the refrigerator overnight and re-heat on the stovetop or microwave.

    Reheating: When reheating, adding a little bit of broth or water during the warming process helps retain moisture, preventing it from turning dry.

    By following these storage practices, you ensure that your Easy One-Pot Italian Sausage Orzo Dinner remains delicious and ready for a quick meal at any time!

    Nutritional Value of Easy One-Pot Italian Sausage Orzo Dinner

    Understanding the nutritional profile of your meals is essential, especially when looking for the best easy dinner recipes that keep you fueled and healthy. Here’s the estimated nutritional value per serving (assuming 6 servings):

    • Calories: 380
    • Protein: 18g
    • Carbohydrates: 45g
    • Fat: 14g
    • Saturated Fat: 4g
    • Cholesterol: 50mg
    • Sodium: 800mg
    • Fiber: 4g
    • Sugar: 3g

    Nutrition Insights

    • Protein: The Italian sausage adds a good amount of protein while the orzo provides carbohydrates for energy.
    • Vitamins and Minerals: The inclusion of vegetables like spinach and bell peppers enriches the meal with vitamins A and C, iron, and essential antioxidants.
    • Customization: Remember, personalizing the recipe can alter the nutritional content. Opting for turkey sausage or adding more vegetables will make it even healthier.

    Understanding the nutritional value helps tailor the recipe to fit your dietary needs. You can indulge in this splendid dish while remaining aware of its health benefits!

    FAQs: Frequently Asked Questions About Easy One-Pot Italian Sausage Orzo Dinner

    1. Can I make this dish without meat?

    Absolutely! Simply use plant-based sausage, tofu, or skip the protein altogether and rely on the orzo and vegetables for a hearty meal.

    2. Is orzo gluten-free?

    Traditional orzo is made from wheat and is not gluten-free. However, you can find gluten-free orzo made from rice or other gluten-free grains available at most supermarkets.

    3. Can I use other types of pasta?

    Yes! Feel free to substitute orzo with another small pasta shape like ditalini or even larger shapes such as penne. Just be sure to adjust the cooking time accordingly.

    4. How can I adjust the flavors?

    You can customize the flavors by adjusting the seasonings, adding different herbs, or including extras like olives or capers for a Mediterranean vibe.

    5. How do leftovers reheat?

    Reheating leftovers is easy. Use a microwave or stovetop, adding a little broth or water to maintain moisture during reheating.

    With these FAQs answered, you’re now equipped with all the knowledge you need to tackle the Easy One-Pot Italian Sausage Orzo Dinner. Enjoy creating a dish that’s not only simple but also delightful and nutritious—proving effortlessly that delicious meals can be quick and easy!

  • Crispy Cottage Cheese Chips

    Crispy Cottage Cheese Chips

    Crispy Cottage Cheese Chips: A Tropical Delight

    Introduction to Crispy Cottage Cheese Chips

    If you’re on the hunt for healthy snacks that are not only delicious but also simple to prepare, look no further than these Crispy Cottage Cheese Chips! These delightful treats offer an innovative way to enjoy the benefits of cottage cheese while satisfying your cravings for something crunchy. Perfect for busy parents, students, or anyone seeking quick, nutritious options, these chips are a fantastic choice for curbing hunger between meals.

    Crispy Cottage Cheese Chips are also vegan and gluten-free, making them suitable for various dietary preferences and restrictions. The excellent protein content of cottage cheese helps keep you full, while the low-calorie nature of this recipe allows you to indulge without the guilt. Plus, they are easily customizable, meaning you can tailor them to your taste—whether you prefer them savory or sweet.

    This recipe is a great opportunity to tap into your culinary creativity and impress friends at gatherings. The combination of taste, health benefits, and adaptability makes this recipe a must-try. Here’s why you should consider adding Crispy Cottage Cheese Chips to your next snacking adventure!

    Benefits and Advantages of Crispy Cottage Cheese Chips

    When considering your options for nutritious, satisfying snacks, Crispy Cottage Cheese Chips stand out for multiple reasons. Firstly, they are remarkably easy to prepare, requiring minimal time and effort. With just a handful of ingredients and straightforward steps, you can whip up a batch in no time.

    The health benefits of cottage cheese are well documented. It’s rich in protein and calcium, making these chips an excellent choice for those wishing to incorporate more nutrients into their diets. Protein is essential for maintaining muscle mass and supporting overall health, which is especially crucial for active individuals, working professionals, and fitness enthusiasts. Additionally, by using minimal oil for baking or air frying, the chips stay low in calories, allowing you to snack without worry.

    These chips are incredibly versatile as well. They can be flavored to suit any palate; from herbs to spices, the flavor combinations you can explore are near limitless. Also, because they’re gluten-free and can be easily adjusted to suit a vegan diet, they fit seamlessly into the lifestyles of those with dietary restrictions. Whether you are a food enthusiast or a beginner in the kitchen, these crispy delights will make a tasty and crowd-pleasing addition to your repertoire of healthy snacks.

    Ingredients Overview

    Essential Ingredients for Crispy Cottage Cheese Chips

    To create these delicious crunchy snacks, you will need the following ingredients:

    • Cottage Cheese (1 cup): A great source of protein and calcium; ensure you choose low-fat or fat-free options if you’re seeking a lighter alternative.
    • Cornstarch (2 tablespoons): This helps to create a light, crispy texture while keeping the recipe gluten-free.
    • Salt (1/2 teaspoon): Enhances the flavor of the chips.
    • Pepper or other spices (1/4 teaspoon each): Customize your flavor with options like garlic powder, paprika, or even nutritional yeast for a cheesy flavor.
    • Olive oil (1 teaspoon): This adds richness and helps achieve a crisp texture when baking. For a lower-calorie option, you can omit this or use a cooking spray.

    Vegan Option: To make this recipe fully vegan, look for plant-based cottage cheese available on the market.

    Dietary Substitutions to Customize Your Crispy Cottage Cheese Chips

    Don’t have cottage cheese on hand? No worries! Here are a few convenient substitutions to try:

    • Greek Yogurt: High in protein and creamy; can be used instead of cottage cheese for a tangy flavor.
    • Ricotta Cheese: Offers a slightly different texture but works well as an alternative and is also rich in protein.

    To make these chips even more nutritious, consider adding:

    • Chia seeds or Flaxseeds: Stir them into the mixture for added fiber and omega-3 fatty acids.
    • Nutritional yeast: A great way to infuse cheesy goodness without dairy, suitable for vegan diets.

    When it comes to spices, feel free to experiment! From dried herbs like oregano and thyme to spicy seasonings such as chili powder, customization is the key to crafting the perfect crispy snack that suits your palate.

    How to Prepare the Perfect Crispy Cottage Cheese Chips: Step-by-Step Guide

    Now that you have a clear understanding of the ingredients and options available to tailor your recipe, let’s walk through the step-by-step instructions to create your Crispy Cottage Cheese Chips.

    1. Preheat the Oven: Start by preheating your oven to 375°F (190°C). If using an air fryer, set it to the same temperature.

    2. Prepare the Base: In a mixing bowl, combine 1 cup of cottage cheese with 2 tablespoons of cornstarch. This mixture will serve as the base of your chips.

    3. Season Generously: Add 1/2 teaspoon of salt and any other spices you choose—1/4 teaspoon of pepper, garlic powder, or paprika works well. Adjust based on your flavor preference.

    4. Blend Together: Use a fork or a whisk to blend the mixture until it is smooth and consistent. The cornstarch should be dissolved without any lumps remaining.

    5. Form the Chips: Using a spoon, drop small portions of the mixture onto a parchment-lined baking sheet. Flatten them slightly with the back of the spoon to form thin circles. Keep them about an inch apart, as they will spread slightly while baking.

    6. Add Olive Oil: If desired, lightly brush the tops of the chips with olive oil or use cooking spray for a lower-calorie option. This step enhances crispness and flavor.

    7. Bake the Chips: Place the baking sheet in your preheated oven and bake for 20-25 minutes. Keep an eye on them—when they turn golden brown and crispy, they are ready!

    8. Air Fry Option: If you prefer air frying, arrange the chips in a single layer in your air fryer basket. Cook at 375°F for about 10-15 minutes, checking frequently to avoid burning. Flip halfway for even cooking.

    9. Cool Completely: Once baked, remove the chips from the oven and let them cool on a wire rack. This cooling process allows them to firm up further and achieve that much-desired crispiness.

    10. Serve and Enjoy: Your delicious, healthy snacks are now ready to be enjoyed! Serve them plain or with your favorite dipping sauces such as hummus or guacamole.

    Feel free to customize the chips further or experiment with flavors—this recipe is a blank canvas for your creativity!

    Mastering Crispy Cottage Cheese Chips: Advanced Tips and Variations

    Perfecting your Crispy Cottage Cheese Chips may require some experimentation, so here are a few advanced tips to consider:

    • Thickness Matters: Thin chips will crisp up nicely, while thicker ones may remain chewier. Adjust the layer of your mixture according to your preference for crunch.

    • Flavor Layering: For added flavor fun, you can layer the seasonings before baking. Sprinkling your choice of spices on top of the chips before baking gives an enhanced taste experience.

    • Store-Bought Options: If you’re short on time, you can opt for pre-packaged crispy chips that use cottage cheese as a primary ingredient. However, homemade is often fresher and healthier!

    • Freezing: If you make a larger batch, consider freezing them. You can freeze the uncooked mixture in dollops on a baking sheet, then transfer to a freezer bag. Bake directly from frozen, adding a few extra minutes to the cooking time.

    How to Store Crispy Cottage Cheese Chips: Best Practices

    To keep your Crispy Cottage Cheese Chips fresh and crunchy, proper storage is essential. Here are some best practices:

    • Refrigeration: Store leftover chips in an airtight container at room temperature for up to three days. However, they are best enjoyed fresh!

    • Freezing: If you make a large batch, these chips can be frozen after baking. Place them in a single layer in a freezer-safe bag or container. They will maintain their best quality for up to a month.

    • Reheating: To re-crisp baked chips, you can briefly warm them in the oven at 350°F (175°C) for about 5-7 minutes. Avoid microwaving, as it can make them chewy.

    Following these storage guidelines ensures your healthy snacks remain delicious and enjoyable.

    Nutritional Value of Crispy Cottage Cheese Chips

    Crispy Cottage Cheese Chips are not only flavorful but also nutritious! Below is a summary of the nutritional profile for a serving size of approximately 10 chips (this may vary depending on the specific ingredients used):

    • Calories: 120
    • Protein: 14g
    • Fat: 3g
    • Carbohydrates: 10g
    • Fiber: 1g
    • Sugars: 1g
    • Sodium: 200mg

    These chips provide a great balance of macronutrients, making them an ideal option for anyone looking for healthy snacks that nourish the body while pleasing the taste buds.

    FAQs: Frequently Asked Questions About Crispy Cottage Cheese Chips

    Q: Can I make Crispy Cottage Cheese Chips in advance?
    A: Yes! You can prepare them ahead of time and store them. However, for optimal crispiness, consume them within a few days of making.

    Q: Are there gluten-free options available?
    A: Absolutely! This recipe is inherently gluten-free, especially since it uses cornstarch instead of flour. Just be sure to check ingredient labels if using packaged items.

    Q: How can I make these chips spicy?
    A: For a spicy kick, add cayenne pepper, crushed red pepper flakes, or chili powder to the mixture. You can adjust the quantities to your heat tolerance.

    Q: Can I air fry the chips?
    A: Yes! Air frying is a great alternative to baking and produces crispy results. Just be sure to check frequently to achieve your desired crunch.

    Q: What can I dip these chips in?
    A: These chips pair wonderfully with a variety of dips. Try serving them with guacamole, hummus, or a yogurt-based dip for added flavor.

    Make these Crispy Cottage Cheese Chips your go-to recipe for healthy snacks that delight the palate! Whether you’re enjoying them during a movie night or at a work lunch, they are sure to become a staple in your kitchen. Happy cooking!

  • Cucumber Caesar Salad

    Cucumber Caesar Salad

    Cucumber Caesar Salad: A Tropical Delight

    Introduction to Cucumber Caesar Salad

    Imagine indulging in a refreshing and vibrant cucumber salad that brings the classic Caesar dish into a healthier, lighter version! The Cucumber Caesar Salad is a delightful fusion that pairs crisp cucumbers with the rich flavors of traditional Caesar dressing, all while being incredibly simple to make. This dish stands out not only for its tantalizing flavors but also for its health benefits, making it ideal for various dietary needs.

    The beauty of this cucumber salad lies in its versatility—it can easily be tailored to fit vegan and gluten-free lifestyles, making it perfect for busy parents seeking nutritious meals for their families or food enthusiasts wanting to explore new flavors. Whether you’re a student hustling between classes, a newlywed exploring cooking together, or a busy professional who craves something quick yet satisfying, this salad is designed to inspire you.

    With cucumbers at the heart of this recipe, you can enjoy a hydrating crunch that’s low in calories yet high in vital nutrients like vitamin K and potassium. Plus, the salad is packed with dietary fiber, helping to keep you full and satisfied. Ready to dive into this tropical delight? Let’s explore the myriad benefits of Cucumber Caesar Salad.

    Benefits and Advantages of Cucumber Caesar Salad

    Cucumber Caesar Salad is not just another recipe; it’s a celebration of flavor, simplicity, and health. Here are some compelling benefits that make this cucumber salad a must-try:

    1. Simplicity of Preparation: This recipe shines in its straightforwardness. With minimal ingredients and quick procedures, you can whip it up in 20 minutes or less. Perfect for live-in situations like students or busy professionals who appreciate easy meal prep.

    2. Health Benefits: Cucumbers are renowned for their high water content, which keeps you hydrated—an essential factor, especially in warmer months. They are low in calories and can aid in weight management. Furthermore, this salad can be enriched with protein through the addition of chickpeas, grilled chicken, or tofu, safeguarding your nutritional needs while satisfying your taste buds.

    3. Dietary Suitability: Whether you’re vegan, gluten-free, or watching your calorie intake, this cucumber salad adapts wonderfully. It can further incorporate various ingredients to meet specific dietary preferences. Busy parents will find the versatility appealing as it can be a side dish to accompany any protein or served alone as a refreshing meal.

    4. Flavor Profile: Combining the cool crunch of cucumbers with a homemade or store-bought Caesar dressing yields an extraordinary flavor experience. Garnish with crunchy croutons or a sprinkle of parmesan cheese for those not adhering to strict dietary restrictions, enhancing its rich taste.

    5. Brings Joy to Gatherings: This salad is not only healthy but also visually appealing. With its vibrant colors and fresh appearance, it holds its own as an ideal dish for picnics, potlucks, or family gatherings. Its simplicity encourages home cooks to share more healthy dishes without fuss.

    Now that we’ve delved into the benefits of this Cucumber Caesar Salad, let’s look closely at the ingredients that make this flavorful dish come together.

    Ingredients Overview

    Essential Ingredients for Cucumber Caesar Salad

    Here’s a list of essential ingredients required for a truly scrumptious cucumber salad, complete with measurements and benefits:

    • 2 large cucumbers: These form the base, providing crunch, hydration, and essential nutrients. Opt for organic if possible.
    • 2 cups romaine lettuce: Offers a fresh, leafy crunch while acting as a base layer for your salad.
    • 1/2 cup parmesan cheese (optional): Adds a rich, savory depth. For a vegan option, consider nutritional yeast as a substitute for a cheesier flavor.
    • 1 cup croutons: Gives a delightful crunch; store-bought or homemade—seasoned for additional flavor; gluten-free croutons are acceptable.
    • 1/4 cup Caesar dressing: You can use store-bought or a homemade version; ensure it aligns with your dietary needs (vegan or gluten-free options available).

    Vegan Option: Replace traditional Caesar dressing with a vegan alternative, often made with tahini, cashews, or homemade avocado dressing.

    Gluten-Free Option: Use gluten-free croutons or omit them altogether for a lighter option.

    Low-Calorie Option: Skip the cheese and croutons, and add a squeeze of lemon juice for flavor!

    Dietary Substitutions to Customize Your Cucumber Caesar Salad

    To ensure everyone can enjoy your cucumber salad, consider these dietary substitutions:

    • Protein Choices: Add chickpeas, grilled chicken, or tofu for those needing a protein boost. For a plant-based diet, lentils can be a delicious and healthy substitute.
    • Dressing Alternatives: As previously mentioned, adjust the dressing according to your preferences. For a lighter option, make a yogurt-based dressing or a vinaigrette with olive oil, vinegar, and spices for distinct flavors.
    • Cheese Substitutes: Swap parmesan with vegan cheese or omit it completely if avoiding dairy. Nutritional yeast can provide a cheesy flavor without added calories.

    Now that you know the crucial ingredients and substitutions for Cucumber Caesar Salad, let’s progress to preparing this delightful dish step-by-step.

    How to Prepare the Perfect Cucumber Caesar Salad: Step-by-Step Guide

    Step 1: Prepare the Base

    1. Wash the Cucumbers: Rinse the cucumbers under cool running water to ensure they’re clean. Pat them dry with a kitchen towel.

    2. Slice the Cucumbers: Cut the cucumbers into thin rounds or half-moons, depending on your preference. A sharper knife helps maintain a clean cut and enhances presentation.

    3. Chop the Romaine Lettuce: Tear the romaine lettuce into bite-sized pieces. Ensure it’s dry to prevent a soggy salad.

    Step 2: Mix Ingredients

    1. Combine the Greens: In a large salad bowl, combine the sliced cucumbers and chopped romaine. If you’re adding any additional ingredients like chickpeas or grilled chicken, toss them in at this stage.

    2. Add Cheese and Croutons: Sprinkle your parmesan cheese or nutritional yeast onto the salad, followed by the croutons, ensuring even distribution. Adjust quantities based on dietary needs.

    Step 3: Dress the Salad

    1. Pour the Dressing: Drizzle the Caesar dressing over the assembled salad. Start with ¼ cup and adjust according to taste. Toss gently to coat the ingredients evenly.

    Step 4: Serve and Enjoy

    1. Garnish for Flavor: For added flair, sprinkle extra parmesan, croutons, or fresh herbs like parsley or basil on top.

    2. Chill or Serve Immediately: Let the salad chill in the refrigerator for about 10-15 minutes for enhanced flavors, or serve immediately to enjoy the fresh, crunchy textures.

    Step 5: Store Leftovers (If Any)

    1. Refrigerate Leftovers: If you have any leftover salad, store it in an airtight container in the refrigerator. Note that croutons may become soggy over time, so store them separately if possible.

    By following these steps, you’ll create a vibrant Cucumber Caesar Salad that’s as delightful to dine on as it is easy to prepare. It’s time to master the dish with a few advanced tips and variations.

    Mastering Cucumber Caesar Salad: Advanced Tips and Variations

    Elevate your cucumber salad game with these advanced tips and delicious variations:

    • Experiment with Dressings: Try out different dressings to give a unique twist. Creamy avocado dressing or a zesty lemon vinaigrette can switch things up while keeping the salad fresh.

    • Add more Vegetables: You can customize your salad with extra vegetables like cherry tomatoes or bell peppers to boost nutritional value. This also adds vibrant colors, making the dish visually stunning.

    • Grill the Ingredients: For a smoky flavor, consider grilling the cucumbers lightly or adding grilled veggies alongside your greens. This heightens the flavor profile, perfect for summer BBQs.

    • Play with Textures: Adding sunflower seeds or sliced almonds contributes not just nutty flavor but crunch as well. This duo can provide healthy fats and additional minerals.

    With these tips in mind, you can create your own signature Cucumber Caesar Salad, making it a refreshing staple in your culinary repertoire.

    How to Store Cucumber Caesar Salad: Best Practices

    To enjoy your Cucumber Caesar Salad later, follow these best practices for storing it:

    1. Refrigeration: Store your salad in an airtight container. It’s ideal to keep the dressing separate until you are ready to serve, to prevent sogginess.

    2. Freezing: While fresh cucumbers do not freeze well, if you make a large batch of dressing, consider freezing it in portions for future use.

    3. Reheating Options: This salad is best served cold and does not require reheating. However, if you have added grilled proteins, you may need to reheat those separately.

    By following these guidelines, your cucumber salad will retain its freshness and flavor for when hunger strikes again.

    Nutritional Value of Cucumber Caesar Salad

    Knowing the nutritional profile allows you to enjoy your Cucumber Caesar Salad guilt-free. Here’s a quick breakdown of the average nutritional values (per serving, without protein):

    • Calories: Approximately 150-200 calories (depending on the dressing and cheese used)
    • Fat: 10 g
    • Saturated Fat: 3 g (if using parmesan)
    • Carbohydrates: 12 g
    • Dietary Fiber: 3 g
    • Sugars: 4 g
    • Protein: 4 g (with additional protein/cheese, this can significantly increase)
    • Vitamins and Minerals: High in Vitamin K and potassium, with good amounts of folate and Vitamin C.

    Feel free to adjust to your dietary needs by adding proteins, dairy substitutes, or low-fat dressings. This formula ensures a nutritious, satisfying option for everyone.

    FAQs: Frequently Asked Questions About Cucumber Caesar Salad

    1. Can I make Cucumber Caesar Salad in advance?

    Absolutely! You can prepare the salad components ahead of time. Just keep the dressing separate until you are ready to serve for optimal freshness.

    2. Is Cucumber Caesar Salad suitable for vegans?

    Yes! You can easily make it vegan by using a plant-based Caesar dressing and omitting any cheese.

    3. How can I make this salad gluten-free?

    To make a gluten-free cucumber salad, simply use gluten-free croutons or omit them. A variety of gluten-free dressings are also available on the market to suit your tastes.

    4. What can I substitute for the Caesar dressing?

    You can try a simple olive oil and vinegar dressing or a homemade yogurt-based dressing with lemon juice for a healthier option.

    5. How long can I store leftovers in the fridge?

    Stored in an airtight container, your Cucumber Caesar Salad can last about 1 to 2 days in the refrigerator. However, it’s best eaten fresh due to the risk of sogginess.

    These FAQs cover the most common inquiries about Cucumber Caesar Salad. Feel free to experiment and adapt this recipe to create your unique version!


    Now that you’re armed with the information and steps to create the perfect Cucumber Caesar Salad, it’s time to bring this refreshing dish to life. Grab your ingredients and let your culinary creativity flow. Whether it’s a simple weeknight dinner or an inviting side dish for your next gathering, this salad is guaranteed to impress all who taste it! Enjoy!