Blog

  • Strawberry Shortcake Rice Krispie Treats

    Strawberry Shortcake Rice Krispie Treats

    Strawberry Shortcake Rice Krispie Treats: A Tropical Delight

    Introduction to Strawberry Shortcake Rice Krispie Treats

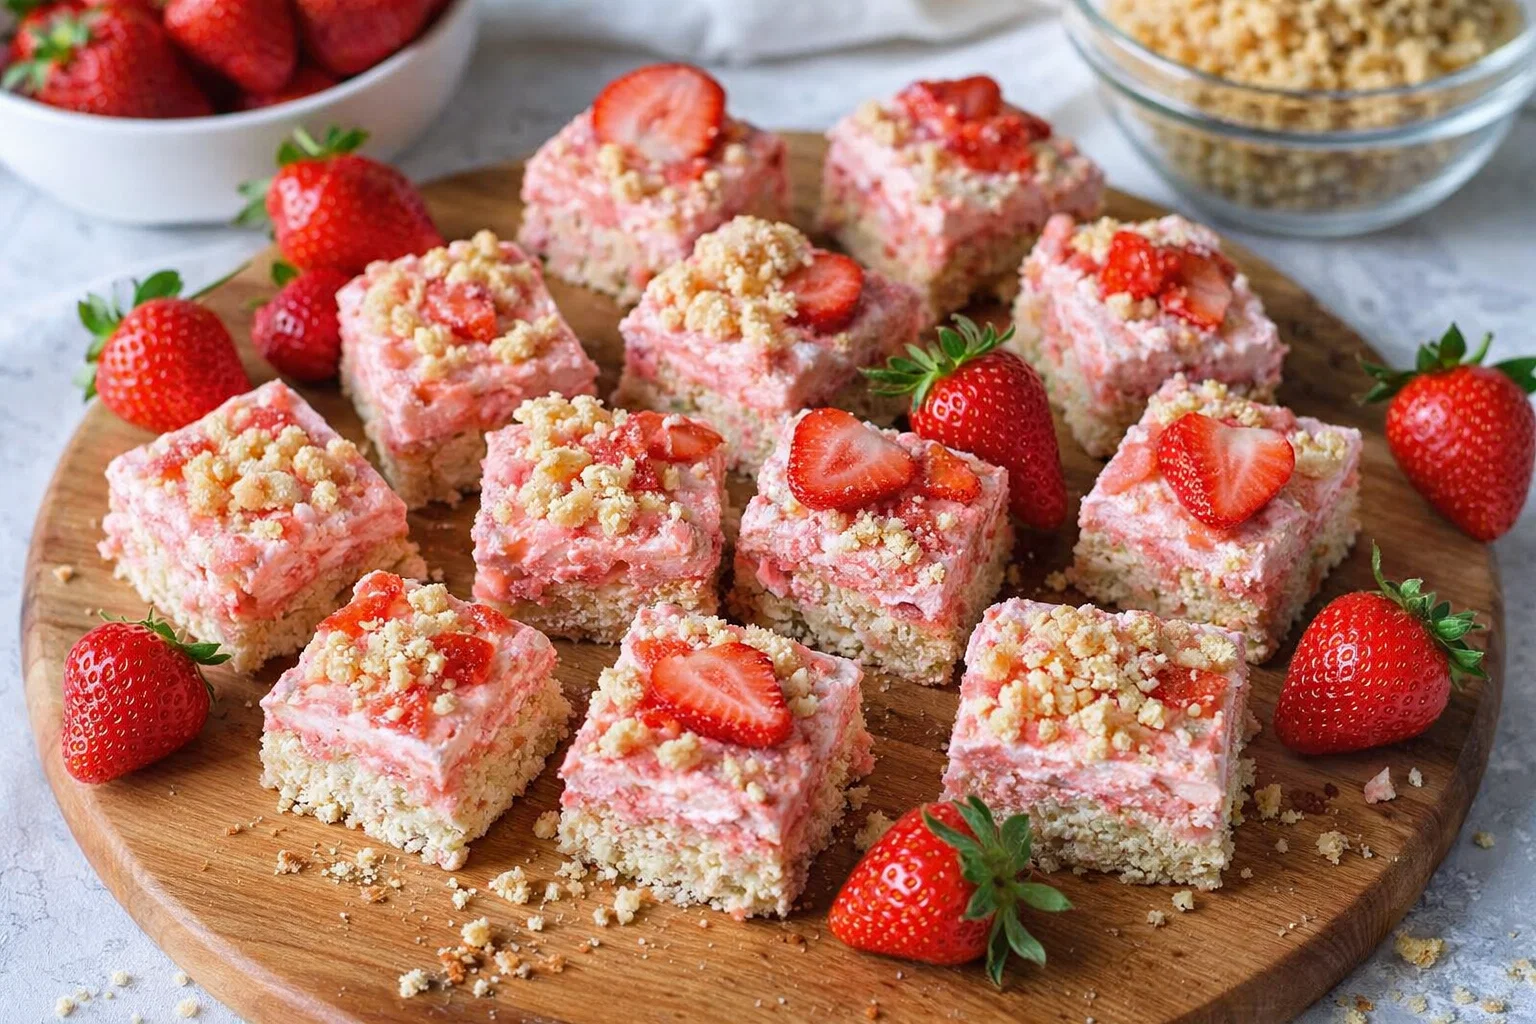
    Are you in search of easy, delicious, and visually striking dessert options? Look no further than these Strawberry Shortcake Rice Krispie Treats! Combining the beloved flavors of strawberry shortcake with the classic crispiness of Rice Krispies, this delightful treat is perfect for all ages and occasions. Whether you’re a busy parent looking for a quick dessert, a student searching for easy recipes, or a baking enthusiast eager to experiment, these treats deliver.

    What’s more, they are incredibly simple to make and can easily meet various dietary needs. You can enjoy them in a vegan, gluten-free, or low-calorie version without sacrificing flavor or texture. The strawberries provide natural sweetness and health benefits, being rich in vitamin C and antioxidants. Therefore, if you’re scouring the internet for mouth-watering strawberry recipes, this one is bound to inspire you to try something new. With just a handful of ingredients and minimal prep time, Strawberry Shortcake Rice Krispie Treats will quickly become a staple in your delicious repertoire.

    Benefits and Advantages of Strawberry Shortcake Rice Krispie Treats

    Strawberry Shortcake Rice Krispie Treats offer numerous advantages that make them a fantastic addition to any recipe collection. First and foremost, they require minimal preparation, taking only about 20 minutes from start to finish, which makes them ideal for busy parents and professionals alike. Imagine being able to whip up a delightful dessert in less time than it takes to watch an episode of your favorite TV show!

    In addition to their quick preparation time, these treats boast several health benefits. Strawberries, the star of our recipe, are not only delicious but also loaded with essential vitamins and minerals. They are low in calories and saturated fat, making this dessert suitable for health-conscious individuals. Plus, the Rice Krispies provide a satisfying crunch while being a lighter option compared to traditional bases like cake.

    What sets these strawberry treats apart is their versatility. They can cater to a variety of dietary needs. You can easily make them gluten-free with the right ingredients, or opt for vegan marshmallows and dairy-free options to keep them plant-based. This adaptability ensures that everyone—whether they are seniors, newlyweds, or gluten-free enthusiasts—can enjoy this delectable dessert.

    Lastly, they offer a delightful twist on a classic dessert. Rather than the usual cake or pie, serving Rice Krispie Treats can surprise and delight your guests, making your gathering memorable. In summary, these treats not only satisfy your sweet tooth but also provide a guilt-free indulgence that everyone can enjoy.

    Ingredients Overview

    Essential Ingredients for Strawberry Shortcake Rice Krispie Treats

    To create the perfect Strawberry Shortcake Rice Krispie Treats, you will need the following essential ingredients:

    • 3 tablespoons unsalted butter (or vegan butter)
      This helps to bind the Rice Krispies together and adds richness to the flavor.

    • 1 package (10 oz) mini marshmallows (or vegan marshmallows)
      The marshmallows are the key to achieving that gooey texture we love in Rice Krispie treats.

    • 5 cups Rice Krispies cereal
      This forms the base of your treats and gives them the signature crunch.

    • 1 cup chopped fresh strawberries
      Provides natural sweetness, flavor, and a pop of color. They’re a star ingredient in this recipe.

    • 1 teaspoon vanilla extract
      Enhances the overall flavor and adds a hint of sweetness.

    • Whipped cream (optional; use coconut cream for a dairy-free option)
      For serving, adding whipped cream can elevate these treats even further.

    Dietary Substitutions to Customize Your Strawberry Shortcake Rice Krispie Treats

    For those with different dietary needs or preferences, there are several substitutions you can consider:

    • To make it gluten-free: Ensure you’re using gluten-free Rice Krispies, which are readily available at most grocery stores.

    • To keep it vegan: Use plant-based butter and vegan marshmallows. Coconut cream can substitute for whipped cream, offering a luscious topping.

    • For a lighter version: You can substitute with low-calorie marshmallows and reduce the amount of butter, while still allowing for a delightful dessert.

    • Add flavors: Incorporate a bit of almond or lemon extract for a different twist on the recipe.

    With these substitutions, you ensure that no one has to miss out on a delicious slice of strawberry goodness.

    How to Prepare the Perfect Strawberry Shortcake Rice Krispie Treats: Step-by-Step Guide

    Making Strawberry Shortcake Rice Krispie Treats is an enjoyable and straightforward process. Follow these simple steps to create your delightful treat:

    1. Prepare Your Pan:
      Start by greasing a 9×13 inch baking pan with butter or non-stick spray. This will prevent the treats from sticking to the pan once they cool.

    2. Melt the Butter:
      In a large saucepan, melt the butter over medium heat. Keep an eye on it to ensure it doesn’t burn.

    3. Add Marshmallows:
      Once the butter is melted, add the mini marshmallows to the saucepan. Stir continuously until the marshmallows are completely melted and smooth. This may take about 3-5 minutes.

    4. Mix in Vanilla:
      Remove the pan from the heat and stir in the teaspoon of vanilla extract. This will give your mixture an extra layer of flavor.

    5. Combine with Rice Krispies:
      Gradually add the Rice Krispies to the melted marshmallow mixture. Stir gently to coat all the cereal evenly.

    6. Fold in Strawberries:
      Once your Rice Krispies are coated, gently fold in the chopped strawberries. It’s essential to do this delicately to ensure that the berries do not get mushy.

    7. Press into the Pan:
      Spread the mixture into the prepared baking pan. Use a spatula or your hands (moistened with a little water to prevent sticking) to press down firmly and evenly into the corners of the pan.

    8. Cool and Slice:
      Allow the mixture to cool at room temperature for at least 30 minutes. Once set, slice into squares or rectangles for serving.

    9. Serve:
      Top with whipped cream and additional strawberry slices right before you’re ready to serve. This adds a colorful and appetizing finish.

    10. Enjoy Your Treat!
      Indulge in the deliciousness of your Strawberry Shortcake Rice Krispie Treats, sharing them with loved ones or enjoying them as a personal dessert.

    Remember, feel free to adapt or modify any step based on your dietary needs or personal preference, making this recipe truly yours!

    Mastering Strawberry Shortcake Rice Krispie Treats: Advanced Tips and Variations

    To take your Strawberry Shortcake Rice Krispie Treats to the next level, consider these advanced tips and variations:

    • Add a Crunch: Toss in some crushed graham crackers or even a sprinkle of granola for added texture. This mimics the crust of a traditional strawberry shortcake, giving your treats a delicious twist.

    • Flavor Infusions: Experiment with different extracts such as almond or coconut. You can enhance the dessert’s aroma and taste, making it even more flavorful.

    • Change the Fruit: While strawberries are the star of this recipe, feel free to add other fruits, such as raspberries or blueberries, to create a mixed berry version.

    • Chocolate Drizzle: Melt some semi-sweet or white chocolate and drizzle it over the top of the treats for a chocolatey finish that adds both sweetness and visual appeal.

    • Layering: For a more elaborate presentation, consider layering the Rice Krispies with whipped cream and strawberries in a clear jar to create a parfait effect.

    By applying these tips, you’ll impress your family and friends and elevate your dessert game!

    How to Store Strawberry Shortcake Rice Krispie Treats: Best Practices

    The best part about Strawberry Shortcake Rice Krispie Treats? They store well! Here’s how to keep them fresh and delicious:

    • At Room Temperature: Store the treats in an airtight container at room temperature for up to 3 days. This keeps them soft and chewy.

    • Refrigeration: If you need to keep them longer, refrigeration is an option. Place the treats in an airtight container in the fridge for up to a week. They may harden slightly; just allow them to come to room temperature before serving.

    • Freezing: For longer storage, you can freeze the treats. Wrap them tightly in plastic wrap and then foil to prevent freezer burn. They will keep well for up to 3 months. To enjoy, simply let them thaw in the fridge overnight.

    When reheating any leftover treats, avoid the microwave if possible, as it can make them chewy. Instead, let them come back to room temperature naturally for the best texture.

    Nutritional Value of Strawberry Shortcake Rice Krispie Treats

    Understanding the nutritional content of your treats can help you enjoy them even more guilt-free. Here’s a general breakdown for one piece (based on making 12 servings):

    • Calories: Approximately 150
    • Total fat: 5g (Saturated fat 3g)
    • Cholesterol: 15mg (if using butter)
    • Sodium: 90mg
    • Total carbohydrates: 23g
    • Dietary fiber: 1g
    • Sugars: 10g
    • Protein: 1g

    For those adapting the recipe to be vegan or gluten-free, ingredients can affect these numbers slightly, so always check labels when shopping. This dessert can be a part of balanced strawberry recipes thanks to the nutritional benefits of strawberries and whole grains in Rice Krispies. Enjoy a sweet treat while being mindful of your dietary choices!

    FAQs: Frequently Asked Questions About Strawberry Shortcake Rice Krispie Treats

    1. Can I make Strawberry Shortcake Rice Krispie Treats in advance?

    Absolutely! These treats can be made a few days in advance. Store them in an airtight container to keep them fresh.

    2. How can I troubleshoot hard Rice Krispie Treats?

    If your treats come out hard, it’s likely that they were over-pressed into the pan or the mixture was overcooked. Next time, try to press lightly and watch the heat while melting marshmallows.

    3. Can I substitute fresh strawberries with frozen?

    You can use frozen strawberries, but be sure to thaw and drain them well to remove excess moisture. Fresh berries definitely provide the best texture and taste!

    4. Can I use another type of cereal?

    Yes! This recipe can easily be adapted using other crispy cereals like Fruity Pebbles or Cocoa Krispies for a fun twist.

    5. How do I make these treats more festive?

    Decorate with colored sprinkles or seasonal fruit garnishes, or even layer them into a dessert bar with whipped cream, as described in our variations section.

    With these FAQs, you’re well on your way to mastering your own batch of Strawberry Shortcake Rice Krispie Treats! Enjoy making and sharing this delightful and versatile dessert. Happy cooking!

  • Mediterranean Chicken Gyros with Creamy Feta Tzatziki

    Mediterranean Chicken Gyros with Creamy Feta Tzatziki

    Mediterranean Chicken Gyros with Creamy Feta Tzatziki: A Tropical Delight

    Introduction to Mediterranean Chicken Gyros with Creamy Feta Tzatziki

    If you’re on the lookout for a fulfilling meal that’s not only delicious but also easy to prepare, look no further than Mediterranean Chicken Gyros with Creamy Feta Tzatziki. As one of the best chicken recipes you’ll ever make, this dish brings the vibrant flavors of the Mediterranean straight to your kitchen. With tender, marinated chicken, crunchy veggies, and a creamy sauce, it offers a balance of taste and health benefits that busy parents, food enthusiasts, and diet-conscious individuals will surely appreciate.

    Not only does this meal cater to a variety of dietary needs, but it can also be effortlessly adjusted to suit vegan and gluten-free alternatives. The convenience of this recipe makes it perfect for anyone—from students preparing quick meals to newlyweds honing their cooking skills.

    Furthermore, the health benefits are noteworthy. Chicken is an excellent source of protein, while the vegetables add essential vitamins and minerals. The creamy feta tzatziki provides a dose of healthy fats, making each bite a delightful mix of nourishment and flavor. As you read on, you’ll discover how simple it is to whip up these Mediterranean Chicken Gyros in the comfort of your home.

    Benefits and Advantages of Mediterranean Chicken Gyros with Creamy Feta Tzatziki

    When it comes to weeknight dinners or weekend meal prep, Mediterranean Chicken Gyros with Creamy Feta Tzatziki stand out for several reasons. First, this recipe is incredibly simple to follow. It requires minimal cooking skills and can be prepared in under an hour, making it an ideal choice for busy individuals or families. For those who love spending time in the kitchen, the marinating process allows you to infuse rich flavors into the chicken, upping the dish’s appeal.

    In addition to being easy to prepare, this meal is also packed with health benefits. Chicken breast is leaner than other cuts, making it a preferred choice for health-conscious eaters. The tzatziki sauce, made from Greek yogurt and feta cheese, is rich in probiotics and calcium, promoting gut health and strong bones. Veggies such as cucumbers and tomatoes offer hydration and antioxidants, ensuring a well-rounded meal.

    Moreover, this dish offers versatility. It can be served in pita bread, as a salad, or even in a grain bowl, appealing to different palates and preferences. Whether you’re a senior looking for nutritious meals or a student living on a budget, this recipe can be easily tailored to fit your lifestyle.

    By including Mediterranean Chicken Gyros in your meal rotation, you’re not just enjoying a delicious meal; you’re also making a commitment to simple ingredients and wholesome flavors that benefit your overall well-being.

    Ingredients Overview

    Essential Ingredients for Mediterranean Chicken Gyros with Creamy Feta Tzatziki

    To create mouthwatering Mediterranean Chicken Gyros with Creamy Feta Tzatziki, gather the following ingredients:

    For the Chicken Marinade:

    • 2 lbs chicken breast (Hormone-free, skinless preferred for health benefits)
    • 3 tablespoons olive oil (provides healthy fats and enhances flavor)
    • 4 cloves garlic, minced (adds flavor and has numerous health benefits)
    • 1 tablespoon dried oregano (brings a traditional Mediterranean taste)
    • 1 teaspoon paprika (adds color and mild sweetness)
    • Salt and pepper to taste

    For the Tzatziki Sauce:

    • 1 cup Greek yogurt (high in protein and probiotics)
    • ½ cucumber, grated and drained (adds freshness)
    • 2 tablespoons feta cheese, crumbled (adds creaminess)
    • 1 clove garlic, minced (for flavor)
    • 1 tablespoon lemon juice (balances flavors and adds acidity)
    • Salt to taste

    For Serving:

    • 4 pita breads (whole wheat or gluten-free options available)
    • 1 cup lettuce, shredded
    • 1 cup tomatoes, diced
    • ½ red onion, thinly sliced
    • Fresh parsley, for garnish (optional)

    These ingredients not only work harmoniously to create delightful flavors but also offer various health benefits, making them suitable for a range of dietary preferences.

    Dietary Substitutions to Customize Your Mediterranean Chicken Gyros with Creamy Feta Tzatziki

    If you’re looking to cater to specific dietary needs, consider the following substitutions for Mediterranean Chicken Gyros:

    • Vegan Option: Swap the chicken with marinated tofu or jackfruit. Use a plant-based yogurt for the tzatziki sauce, such as almond or coconut yogurt.
    • Gluten-Free Option: Use gluten-free pita bread or burrito wraps. You may also serve the chicken and tzatziki over a salad instead of in bread.
    • Low-Calorie Option: Opt for grilled or baked chicken thighs instead of breasts for more flavor with less fat. You can also reduce the amount of feta in the tzatziki to lower calories.

    When accommodating dietary alternatives, always check for certified products. Ingredients like gluten-free pita bread or plant-based yogurts are increasingly easier to find. Being creative with substitutes allows you to enjoy this recipe while adhering to your nutritional preferences.

    How to Prepare the Perfect Mediterranean Chicken Gyros with Creamy Feta Tzatziki: Step-by-Step Guide

    Now that you have your ingredients prepped, it’s time to dive into the cooking process. Follow this step-by-step guide to create your very own Mediterranean Chicken Gyros with Creamy Feta Tzatziki:

    1. Marinate the Chicken:
    2. In a bowl, mix together olive oil, minced garlic, oregano, paprika, salt, and pepper.
    3. Add the chicken breast to the marinade, ensuring each piece is fully coated. Let it marinate for at least 30 minutes. If you can, marinate for a few hours or overnight to deepen the flavors.

    4. Prepare the Tzatziki Sauce:

    5. In another bowl, combine Greek yogurt, grated cucumber (make sure to squeeze out excess water), garlic, lemon juice, and crumbled feta.
    6. Mix until smooth and creamy. Adjust salt to taste.
    7. Refrigerate while you cook the chicken to allow flavors to meld.

    8. Cook the Chicken:

    9. Preheat your grill or stovetop grill pan over medium-high heat.
    10. Remove the chicken from the marinade and place it on the hot grill. Cook for about 6-8 minutes on each side, or until the internal temperature reaches 165°F (75°C).
    11. After cooking, let the chicken rest for a few minutes before slicing to retain juices.

    12. Warm the Pita:

    13. While the chicken is resting, warm the pita bread on the grill for about 1-2 minutes per side until they are soft and pliable.

    14. Assemble the Gyros:

    15. Slice the cooked chicken into strips.
    16. On each piece of pita bread, layer lettuce, diced tomatoes, red onion, and the sliced chicken.
    17. Generously drizzle the creamy feta tzatziki sauce over the top.

    18. Finish with Garnish:

    19. Sprinkle fresh parsley on top for an added burst of flavor and presentation.
    20. Wrap the pita and serve immediately. Enjoy your delicious Mediterranean Chicken Gyros!

    Tips for Modification

    • For a spicy kick, add sliced jalapeños or a pinch of red pepper flakes to your tzatziki.
    • If you’d like to include more veggies, consider slicing bell peppers or grilling zucchini to include in your gyros.

    With this easy and quick guide, you can whip up this delightful dish that’s perfect for any occasion.

    Mastering Mediterranean Chicken Gyros with Creamy Feta Tzatziki: Advanced Tips and Variations

    To elevate your Mediterranean Chicken Gyros experience, consider these advanced tips and variations:

    • Marinate Longer: For the best flavor, let your chicken marinate overnight. The longer it sits, the more flavorful it becomes.
    • Grilled Vegetables: Add grilled vegetables such as eggplant or zucchini to your gyros for extra texture and flavor.
    • Try Different Meats: Swap chicken for lamb or beef for a different taste. Just be mindful of their respective cooking times.
    • Serve with Side Dishes: Pair your gyros with Greek salad, roasted potatoes, or couscous for a complete meal.
    • Make it a Meal Prep: Prepare multiple servings of the chicken and tzatziki ahead of time. Store in individual containers for easy grab-and-go lunches throughout the week.

    These variations will keep the dish exciting and adaptable to your evolving palate or dietary needs.

    How to Store Mediterranean Chicken Gyros with Creamy Feta Tzatziki: Best Practices

    If you find yourself with leftovers or want to meal prep, here are the best methods for storing your Mediterranean Chicken Gyros with Creamy Feta Tzatziki:

    • Refrigeration: Store leftover chicken gyros in an airtight container in the fridge for up to 3 days. Assemble the gyros fresh to prevent the pita from becoming soggy.
    • Freezing Chicken: The cooked chicken can be frozen for up to 3 months. Ensure it’s tightly wrapped or sealed in a freezer bag. Thaw in the fridge before reheating.
    • Reheating Chicken: To reheat, place chicken in the microwave or oven. If using the oven, cover with foil to retain moisture and heat at 350°F (175°C) for about 15 minutes or until warmed through.

    Be cautious not to freeze the tzatziki, as it may separate when thawed. Simply whip up a fresh batch when you’re ready to enjoy your gyros again.

    Nutritional Value of Mediterranean Chicken Gyros with Creamy Feta Tzatziki

    Understanding the nutritional value can help incorporate Mediterranean Chicken Gyros into your diet mindfully. Here’s a breakdown of this dish’s nutritional information per serving:

    • Calories: Approximately 450
    • Protein: 36g
    • Total Fat: 20g (includes healthy fats from olive oil and feta)
    • Carbohydrates: 25g
    • Fiber: 4g
    • Sugar: 3g

    These gyros stand out as a well-balanced meal, providing sufficient protein, healthy fats, and carbohydrates, making them a worthwhile addition to anyone’s recipe collection, particularly those focused on healthy chicken recipes.

    FAQs: Frequently Asked Questions About Mediterranean Chicken Gyros with Creamy Feta Tzatziki

    Can I make these gyros in advance?

    Yes! You can marinate the chicken and prepare the tzatziki sauce ahead of time. For best results, assemble the gyros shortly before serving to keep the pita fresh.

    Is there a vegetarian alternative to chicken?

    Absolutely! Consider using marinated tofu or grilled portobello mushrooms. Both can deliver great flavor while keeping the essence of this dish intact.

    How can I make the dish spicier?

    Incorporate red pepper flakes into the chicken marinade or add sliced jalapeños into your gyro before serving for an extra kick.

    What to serve with Mediterranean Chicken Gyros?

    These gyros pair beautifully with a Greek salad, roasted vegetables, or even fries for a satisfying meal.

    Can I substitute Greek yogurt for the tzatziki sauce?

    If lactose intolerant or vegan, use a plant-based yogurt, ensuring your shaker incorporates those fresh cucumber flavors.

    Mediterranean Chicken Gyros with Creamy Feta Tzatziki is not just a meal; it’s an experience filled with vibrant flavors and health benefits. Whether you’re cooking for yourself or hosting a dinner party, this dish will certainly impress your guests and family alike. Enjoy cooking this delightful recipe and make it a staple in your rotating menu!

  • Steak  Pepper Jack Queso Mac

    Steak Pepper Jack Queso Mac

    Steak & Pepper Jack Queso Mac: A Tropical Delight

    Introduction to Steak & Pepper Jack Queso Mac

    Are you ready to elevate your mac and cheese game? Introducing Steak & Pepper Jack Queso Mac, a creamy, savory dish that combines the beloved classic with bold, tropical flavors. This recipe is perfect for anyone looking for something simple yet indulgent, combining sautéed steak, spicy pepper jack cheese, and a gooey queso sauce—a delightful twist on traditional mac and cheese that will keep your taste buds dancing.

    Not only is this dish a pleasure to make, but it also provides significant health benefits when prepared with fresh ingredients. Packed with protein from the steak and enriched with creamy cheeses, this concoction will satisfy your cravings without the guilt. Whether you’re a busy parent throwing together a quick dinner or a college student needing a comforting meal after a long day, Steak & Pepper Jack Queso Mac offers deliciousness in every bite.

    In this recipe, we embrace dietary inclusivity. You’ll find tips on making this dish gluten-free or even vegan-friendly, catering to various dietary needs. With just a few simple steps, you can create a memorable dining experience that’s sure to impress family, friends, or just yourself on a cozy night in. Get ready to indulge in a bowl of mac and cheese that transcends the ordinary—and watch as it becomes a staple in your cooking repertoire!

    Benefits and Advantages of Steak & Pepper Jack Queso Mac

    The Steak & Pepper Jack Queso Mac is not just another comfort food—it’s a dish that embodies the perfect balance between taste and nutritional value. One benefit of this recipe is its flexibility in preparation. It takes minimal time to assemble and can be easily adapted based on what you have on hand. This makes it an ideal choice for busy weeknights when time is of the essence.

    Another significant advantage lies in the richness of flavors derived from the combination of steak and spicy pepper jack cheese. While traditional mac and cheese can sometimes feel bland, the addition of these ingredients delivers an exciting flavor profile that will make you crave more. The creamy queso sauce coats every noodle, ensuring that every mouthful bursts with flavor.

    Health-wise, this mac and cheese dish provides a good source of protein thanks to the steak. It can also be tailored for health-conscious individuals by opting for leaner cuts of meat and whole-grain pasta. When you consider that it can easily be made gluten-free or vegan by using alternative ingredients, this dish stands out as a versatile option for various dietary needs.

    While this recipe boasts its benefits, it does not shy away from being indulgent. Perfect for special occasions or just a comforting night in, Steak & Pepper Jack Queso Mac brings joy to the table. Treat yourself to this extraordinary meal that checks all the boxes—delicious, nutritious, and incredibly simple to make!

    Ingredients Overview

    Essential Ingredients for Steak & Pepper Jack Queso Mac

    To whip up a mouthwatering bowl of Steak & Pepper Jack Queso Mac, you’ll need the following ingredients. We will highlight dietary-friendly options where applicable:

    • 8 oz elbow macaroni (or gluten-free pasta)
    • 1 lb steak (sirloin or ribeye work well—opt for lean cuts if preferred)
    • 1 tbsp olive oil (for sautéing)
    • 1 cup pepper jack cheese, shredded (for a milder flavor, substitute with Monterey Jack or Cheddar)
    • 1 cup queso dip (you can also use a homemade version or store-bought)
    • ½ cup milk (alternative milks like almond or oat for a dairy-free option)
    • ½ tsp garlic powder
    • ½ tsp onion powder
    • Salt and pepper to taste
    • Chopped cilantro for garnish (optional)

    These ingredients come together to create a rich and creamy sauce that envelops every piece of pasta, while the steak adds a hearty touch.

    Dietary Substitutions to Customize Your Steak & Pepper Jack Queso Mac

    Customization is key when it comes to cooking, especially for individuals with dietary restrictions. Here are some suggestions to ensure that your Steak & Pepper Jack Queso Mac can cater to various preferences:

    • For a Gluten-Free Version: Swap out regular elbow macaroni for gluten-free pasta made from rice or corn. Most stores offer a variety of gluten-free pasta shapes, so you aren’t limited to macaroni.

    • Vegan Options: Replace the steak with sautéed mushrooms or lentils for added texture and protein. Use vegan queso and dairy-free cheese options to keep the dish entirely plant-based.

    • Low-Calorie Adaptation: Use whole grain or veggie pasta to increase fiber content and reduce caloric intake. Opt for a smaller portion of cheese or use a lower-fat cheese variety.

    • Spice Adjustment: For those who prefer a milder mac and cheese experience, feel free to reduce the amount of pepper jack cheese or replace it with a less spicy alternative.

    These modifications not only make the recipe accessible for different dietary needs but also open up exciting new taste combinations that you won’t want to miss.

    How to Prepare the Perfect Steak & Pepper Jack Queso Mac: Step-by-Step Guide

    Preparing your delicious Steak & Pepper Jack Queso Mac is a straightforward process that anyone can master. With this step-by-step guide, you’ll have a scrumptious dish ready in no time.

    1. Cook the Pasta:
    2. Bring a large pot of salted water to a boil. Once boiling, add the elbow macaroni and cook according to the package instructions until al dente. Drain and set aside.

    3. Sauté the Steak:

    4. In a large skillet, heat the olive oil over medium-high heat. Season the steak with salt and pepper, then add it to the skillet. Sauté until browned (about 4-5 minutes). Remove from heat and let it rest for a few minutes before slicing it into bite-sized pieces.

    5. Make the Cheese Sauce:

    6. In the same skillet, reduce heat to medium and add the queso dip, milk, garlic powder, and onion powder. Stir until well combined and let it simmer for 2-3 minutes, allowing it to thicken slightly.

    7. Combine Ingredients:

    8. Add the cooked pasta and sautéed steak to the cheese sauce. Stir well to ensure that all ingredients are evenly coated. If the mixture appears too thick, feel free to add a splash more milk to reach your desired consistency.

    9. Add the Pepper Jack Cheese:

    10. Gradually mix in the shredded pepper jack cheese until it melts entirely, creating a creamy and cheesy sauce. Adjust seasoning with extra salt or pepper as per taste.

    11. Serve with Love:

    12. Once everything is well integrated, remove from heat and serve immediately. Garnish with fresh chopped cilantro if desired, adding a pop of color and flavor.

    13. Storage Options:

    14. If you have any leftovers, allow the dish to cool before storing it in an airtight container. Refrigerate for up to three days or freeze for longer storage. Reheat in the microwave, adding a splash of milk to restore creaminess.

    That’s it! You now have a beautifully crafted Steak & Pepper Jack Queso Mac, ready to delight your family or guests.

    Mastering Steak & Pepper Jack Queso Mac: Advanced Tips and Variations

    To truly master this mac and cheese recipe, consider these advanced tips and variations that can elevate your cooking skills and taste experiences:

    • Add Vegetables: For a healthier twist, incorporate sautéed veggies such as bell peppers, spinach, or zucchini. This addition will not only enhance the dish’s nutritional profile but also add vibrant colors.

    • Experiment with Meats: Different proteins can be used to mix things up, like shredded chicken or shrimp. These alternatives can provide unique flavors and textures to the dish.

    • Baking Option: For a crispy topping, transfer your mac and cheese to a baking dish after combining all ingredients; sprinkle with breadcrumbs and a bit more cheese, then bake at 350°F for 20-25 minutes until golden brown.

    • Add Spice: For those who crave intense flavors, sprinkle in jalapeños or hot sauce when mixing ingredients to give your mac and cheese a spicy kick.

    These tips can help you create variations of Steak & Pepper Jack Queso Mac that cater to different tastes and preferences. The possibilities are endless, and experimenting can lead to new favorites for everyone.

    How to Store Steak & Pepper Jack Queso Mac: Best Practices

    Storing Steak & Pepper Jack Queso Mac properly will help maintain its creamy texture and delicious flavor. Here’s how:

    • Refrigeration: Allow the dish to cool to room temperature before transferring it to an airtight container. Refrigerate for up to three days. Make sure to let your family or guests know not to leave it out at room temperature for more than two hours.

    • Freezing: If you’d like to store it for a longer period, you can freeze it. Place portions in freezer-safe containers or bags, removing excess air to avoid freezer burn. It keeps well for up to 3 months.

    • Reheating: To reheat, simply take it out of the fridge or freezer and warm it up on the stove over medium heat. Add a splash of milk or cream to help restore that creamy texture. You can also heat it in the microwave at medium power, stirring every minute until heated through.

    Following these storage tips will allow you to enjoy your flavorful mac and cheese dish even days later without compromising quality.

    Nutritional Value of Steak & Pepper Jack Queso Mac

    The nutritional information for Steak & Pepper Jack Queso Mac varies based on ingredients used, but here’s a general breakdown of what you can expect in a standard serving (approximately 1 cup):

    • Calories: 560
    • Protein: 36g
    • Fat: 27g
    • Carbohydrates: 53g
    • Fiber: 2g
    • Sugars: 2g
    • Sodium: 680mg

    To enhance nutritional content, consider using whole grain pasta and reducing fat content by opting for lean cuts or lower-fat cheese options. This dish is an excellent source of protein thanks to the steak and cheese, while pasta provides essential carbohydrates for energy. Incorporating vegetables will also boost vitamins and fiber, offering a more balanced meal.

    FAQs: Frequently Asked Questions About Steak & Pepper Jack Queso Mac

    1. Can I make Steak & Pepper Jack Queso Mac ahead of time?
    Yes, you can prepare it in advance. Cook the pasta and steak, then combine ingredients, and store them separately. When you are ready to eat, mix the components and heat them together.

    2. How can I make a gluten-free version?
    Simply use gluten-free pasta, which is widely available, and ensure your queso dip is also gluten-free.

    3. What can I substitute for steak?
    If you’re looking for a meatless option, consider substituting the steak with sautéed mushrooms or even canned black beans.

    4. How does this recipe reheat?
    Reheating is easy, just add a splash of milk when warming to restore the creamy texture. It can be done on the stove or in the microwave.

    5. Can I freeze leftovers?
    Absolutely! Store leftovers in airtight containers, and it keeps well in the freezer for up to three months.

    With these tips and knowledge, you’re ready to craft your very own Steak & Pepper Jack Queso Mac. It’s a culinary adventure you won’t want to miss! Happy cooking!

  • Melt In Your Mouth Caesar Chicken

    Melt In Your Mouth Caesar Chicken

    Melt In Your Mouth Caesar Chicken: A Tropical Delight

    Introduction to Melt In Your Mouth Caesar Chicken

    Welcome to the culinary adventure of creating the Melt In Your Mouth Caesar Chicken! If you’re on the lookout for irresistible chicken recipes that meld rich flavors and health benefits, you’ve come to the right place. This dish is not just a meal; it’s a delightful experience for your taste buds. Imagine tender, juicy chicken fillets complemented by a creamy Caesar dressing bursting with zesty herbs and spices. What’s more? It’s remarkably simple to prepare, making it an ideal choice for busy parents, working professionals, and even cooking novices.

    Not only is this recipe packed with flavor, but it can also cater to various dietary preferences – whether you’re vegetarian, gluten-free, or looking for a low-calorie option. Its versatility ensures that you can enjoy a wholesome dinner any day of the week. Furthermore, this Caesar chicken can easily fit within a balanced diet, offering lean protein that fits the needs of fitness enthusiasts and diet-conscious individuals alike. As you venture into this delectable journey, know that you’re preparing a dish that brings joy not only to your palate but also to your loved ones.

    Dive into the world of melt-in-your-mouth chicken recipes; you won’t regret it!

    Benefits and Advantages of Melt In Your Mouth Caesar Chicken

    One of the most compelling reasons to embrace the Melt In Your Mouth Caesar Chicken is its extraordinary ease of preparation. With just a handful of accessible ingredients, you can create a hearty and sumptuous dish that feels gourmet. This is perfect for home cooks who may not have hours to devote to dinner preparation.

    Health benefits abound! This chicken dish is not only low in carbohydrates but also high in protein, making it a wonderful meal for those focused on maintaining muscle mass or managing their weight. Additionally, protein-rich meals have been proven to keep you satiated longer, potentially preventing unhealthy snacking later in the day.

    What makes this recipe stand out among other chicken recipes is its adaptability. You can easily swap out protein sources or dressings to suit your unique dietary needs. If you desire a vegan option, substitute chicken with tofu or chickpeas, and use plant-based Caesar dressing without compromising the creamy texture and bold flavor. Additionally, if you are specifically looking for gluten-free alternatives, many amazing gluten-free bread options exist for croutons, ensuring everyone can enjoy this dish without worry.

    Moreover, this Melt In Your Mouth Caesar Chicken is not just flavorful; it’s also visually appealing. The vivid greens of Romaine lettuce paired with grilled chicken leaves an inviting presentation, enhancing the dining experience. In conclusion, this easy-to-make dish ensures that your meals are healthy, delightful, and suitable for a myriad of dietary preferences, making it a go-to recipe for all occasions.

    Ingredients Overview

    Essential Ingredients for Melt In Your Mouth Caesar Chicken

    To create your Melt In Your Mouth Caesar Chicken, gather the following key ingredients:

    • Chicken Breasts (4 medium-sized): The lean protein base of the dish, promoting muscle health.
    • Caesar Dressing (1 cup): A creamy and flavorful accompaniment. Look for versions that are low-calorie or vegan if you want a healthier option.
    • Romaine Lettuce (1 head, chopped): The classic base that adds crunch and nutrients.
    • Parmesan Cheese (½ cup, grated): A deliciously rich cheese that enhances flavor. Vegan cheese alternatives can be used for a plant-based diet.
    • Croutons (1 cup): Often made from rustic bread, adding a satisfying crunch. Gluten-free bread can be used for a gluten-free version.
    • Olive Oil (2 tablespoons): For sautéing, offering healthy fats that are good for heart health.
    • Garlic Powder (1 teaspoon): Adds depth of flavor without overpowering the dish.
    • Salt and Pepper (to taste): Essential seasonings that enhance all flavors.

    This list brings together common ingredients you may already have at home with substitutions to cater to various dietary needs.

    Dietary Substitutions to Customize Your Melt In Your Mouth Caesar Chicken

    • To replace Chicken for a vegan option: Use tofu or tempeh, marinated in the same Caesar sauce to absorb flavors. This will offer a distinct texture while keeping it meat-free.

    • For a low-calorie option: Choose skinless chicken breasts and opt for a light Caesar dressing or homemade versions using Greek yogurt.

    • Gluten-free adjustments: When making your croutons, you can select gluten-free bread, ensuring that this dish can be enjoyed by those with gluten sensitivities or celiac disease.

    • Dairy-free alternatives: Use nutritional yeast or vegan cheese in place of Parmesan to maintain that cheesy essence without dairy.

    When it comes to creating chicken recipes, this dish stands out for its flexibility. Feel free to play around with ingredients and make it your own!

    How to Prepare the Perfect Melt In Your Mouth Caesar Chicken: Step-by-Step Guide

    Creating a Melt In Your Mouth Caesar Chicken is straightforward and rewarding. Follow these easy steps to orchestrate this delightful dish:

    1. Prepare the Base: Start by preheating your grill or oven to medium-high heat. If using chicken breasts, pound them to an even thickness (about ¾ inch) to ensure uniform cooking.

    2. Marinate the Chicken: In a bowl, combine your chicken breasts with ½ cup of Caesar dressing, ensuring they’re well-coated. Let them marinate for at least 30 minutes for maximum flavor absorption or refrigerate overnight if you plan ahead.

    3. Grill the Chicken: Place the marinated chicken on the grill. Cook each side for about 6-8 minutes, or until the internal temperature reaches 165°F. If you prefer, you can bake the chicken for about 25-30 minutes, turning halfway through.

    4. Prepare the Lettuce: While the chicken is cooking, wash and chop the Romaine lettuce. Place it in a serving bowl, and if you like, toss it with a splash of Caesar dressing to enhance flavor.

    5. Combine Ingredients: Once the chicken is cooked, remove it from the grill and let it rest for about 5 minutes. Slice the chicken into strips, ensuring each piece retains its juiciness.

    6. Add to the Salad: Top the chopped Romains lettuce with the grilled chicken strips. Sprinkle with grated Parmesan cheese and toss in croutons for added texture.

    7. Dress it Up: Finish off by drizzling any remaining Caesar dressing over the salad to your taste.

    8. Serve & Enjoy: Your Melt In Your Mouth Caesar Chicken is now ready to be enjoyed! Serve immediately while the chicken is warm for the best flavors.

    This step-by-step guide ensures that even novice cooks can create an incredible dish. Adapt each step based on your dietary preferences; all these adjustments make this recipe even more delightful!

    Mastering Melt In Your Mouth Caesar Chicken: Advanced Tips and Variations

    To elevate your Melt In Your Mouth Caesar Chicken, consider these advanced tips and variations:

    • Flavor Infusion: Try marinating the chicken in lemon juice and zest along with the Caesar dressing. This adds a bright acidity that balances the creamy dressing beautifully.

    • Herb Variations: Incorporating fresh herbs, like basil or cilantro, can introduce a new dimension of flavor. Simply mix them into your dressing or sprinkle them on top before serving.

    • Veggie Additions: Enhance the nutrition by adding avocado slices, cherry tomatoes, or even grilled bell peppers for a colorful presentation.

    • Make it a Wrap: Transform this Caesar chicken salad into a wrap by placing all the ingredients in a large tortilla or lettuce wrap. Such variations offer portable and fun meal options.

    • Alternative Proteins: Consider using shrimp or salmon instead of chicken for a seafood twist. These proteins pair excellently with Caesar flavors.

    By thinking outside the box, you transform traditional chicken recipes into uniquely personal dishes!

    How to Store Melt In Your Mouth Caesar Chicken: Best Practices

    Storage is essential for maintaining the freshness of your Melt In Your Mouth Caesar Chicken. Here are the best practices:

    • Refrigeration: Store leftovers in an airtight container in the fridge for up to 3 days. This helps keep the chicken moist while preventing other odors from seeping in.

    • Freezing: While it’s not advisable to freeze the entire salad given the lettuce’s texture, you can freeze the grilled chicken separately. Wrap it tightly in plastic wrap or foil, then place it in a freezer-safe bag. It should last up to 3 months.

    • Reheating Tips: When reheating the chicken, avoid the microwave if possible, as it may dry out the meat. Opt for a skillet on low heat, adding a bit of water to create steam. This will keep the chicken moist.

    By following these storage practices, you can enjoy your delicious Caesar chicken throughout the week, without compromising flavor or texture.

    Nutritional Value of Melt In Your Mouth Caesar Chicken

    Understanding the nutritional profile of Melt In Your Mouth Caesar Chicken is easy when considering how it benefits your health. Here’s an estimated breakdown per serving:

    • Calories: 450-500 (Depending on specific ingredients used)
    • Protein: 35-40g
    • Carbohydrates: 15-20g
    • Fats: 25-30g
    • Saturated Fats: 5-7g
    • Fiber: 2-3g
    • Sugar: 1g
    • Sodium: 800-1000mg (varies with dressing)

    The combination of lean protein from chicken and healthy fats from olive oil offers a balanced meal profile. By leveraging healthy substitutions, you can easily reduce calories or sodium levels without sacrificing the dish’s heartiness.

    Knowing the nutrition can help you make informed decisions about meal portions and ingredient choices, making this a valuable addition to your collection of chicken recipes.

    FAQs: Frequently Asked Questions About Melt In Your Mouth Caesar Chicken

    Here are some common questions regarding the Melt In Your Mouth Caesar Chicken recipe:

    1. Can I use other types of chicken?
    2. Absolutely! You can use chicken thighs for a juicier bite or even shredded rotisserie chicken for a quick option.

    3. How can I make it dairy-free?

    4. Simply swap out Parmesan cheese for nutritional yeast or a dairy-free alternative, and use a vegan Caesar dressing.

    5. What if I don’t have Caesar dressing on hand?

    6. A DIY version can be made using Greek yogurt, Dijon mustard, lemon juice, garlic, and anchovy paste for flavor.

    7. Can I prepare this in advance?

    8. Yes! The chicken can be marinated the night before, and you can assemble the salad just before serving to maintain freshness.

    9. Is this suitable for meal prep?

    10. Certainly! Just keep the salad ingredients separate from the chicken and dressing, and assemble at mealtime to preserve freshness.

    11. What are some pairings for this dish?

    12. This Caesar chicken pairs well with roasted vegetables, quinoa, or even fresh fruit for a well-rounded meal.

    This FAQ section aims to clarify any hesitations about preparing your Melt In Your Mouth Caesar Chicken, ensuring a smooth cooking experience.


    In conclusion, the Melt In Your Mouth Caesar Chicken is an exemplary recipe worthy of your kitchen. Its simplicity, versatility, and delightful flavors ensure that it fits seamlessly into your meal repertoire. Whether you’re an experienced chef or a culinary novice, this dish is just what you need for your weekly meals. So, gather those ingredients, unleash your inner chef, and enjoy your new favorite chicken recipe!

  • Frito Cowboy Cabbage

    Frito Cowboy Cabbage

    Frito Cowboy Cabbage: A Tropical Delight

    Introduction to Frito Cowboy Cabbage

    Frito Cowboy Cabbage is a delightful and hearty dish that brings together savory flavors, crispy textures, and a vibrant look. Ideal for busy weekdays or laid-back weekends, this recipe is a perfect addition to your collection of dinner recipes. Whether you’re a home cook with a family to feed or a student living in a dorm, Frito Cowboy Cabbage is not only simple to make but also adapts wonderfully to accommodate various dietary preferences.

    What’s more, this dish is healthy and satisfying. With its rich content of vegetables and protein, you can enjoy it without guilt. Plus, it’s a vegan, gluten-free, and low-calorie meal. Each bite delivers essential nutrients, making it a fantastic option for health-conscious individuals or families aiming to eat well while saving time in the kitchen.

    As you dive into this article, you’ll discover how to prepare Frito Cowboy Cabbage so you can impress friends, family, or even just yourself! You’ll learn about its benefits, ingredient substitutions, cooking methods, and more, ensuring you can recreate this delicious dish with ease.

    Benefits and Advantages of Frito Cowboy Cabbage

    The Frito Cowboy Cabbage stands out among dinner recipes for numerous reasons. Firstly, the ease of preparation makes it accessible for all levels of cooks. You can whip it up in less than an hour, ensuring that even the busiest of individuals can enjoy a home-cooked meal without spending extensive time in the kitchen.

    Secondly, this dish is packed with health benefits. Cabbage is low in calories yet high in essential vitamins C and K, fiber, and antioxidants. This makes it a great choice for anyone looking to maintain or lose weight while still feeling full and satisfied. Additionally, the inclusion of protein-rich beans and other flavorful ingredients like corn adds a fulfilling aspect to the meal without excessive calories.

    Another advantage is its versatility. If you’re mindful of dietary restrictions, Frito Cowboy Cabbage can easily be modified. The recipe can accommodate vegan diets, gluten-free preferences, and various flavor profiles with simple substitutions.

    This dish is also an excellent vehicle for creativity. Want it spicier? Add jalapeños. Prefer a smokier flavor? Try incorporating smoked paprika. Frito Cowboy Cabbage not only satisfies hunger but also invites experimentation, making it a hit among adventurous eaters and traditionalists alike.

    Ingredients Overview

    Essential Ingredients for Frito Cowboy Cabbage

    To prepare Frito Cowboy Cabbage, you will need the following ingredients. Each is selected for its health benefits, and you can easily customize the quantities based on your serving needs.

    • 1 head of green cabbage (medium size): This is the base of the recipe, providing fiber, vitamins, and a light crunch.
    • 1 can (15 oz) of black beans (drained and rinsed): A great source of plant-based protein and fiber.
    • 1 can (15 oz) of corn (drained): Adds sweetness and texture. Opt for low-sodium varieties for a healthier option.
    • 1 packet of ranch dressing mix: Choose vegan ranch mix for a plant-based option.
    • 1 cup of shredded cheddar cheese (or dairy-free cheese): For richness and flavor.
    • 1 bag of Fritos corn chips (about 10 oz): The delightful crunch that takes this dish to another level.
    • 1 tablespoon of olive oil: A heart-healthy fat for sautéing your ingredients.
    • Optional toppings: Chopped green onions, fresh cilantro, or avocado for extra nutrition and flavor.

    With a few simple adjustments, you can easily make this dish vegan or gluten-free. Just make sure to use certified gluten-free corn chips and a ranch dressing mix that aligns with your dietary needs.

    Dietary Substitutions to Customize Your Frito Cowboy Cabbage

    Frito Cowboy Cabbage is incredibly flexible, allowing you to cater to various dietary needs:

    • Vegan Version: Use plant-based cheese and a vegan ranch dressing mix. The dish still maintains a great flavor profile.
    • Gluten-Free Version: Substitute the Fritos with gluten-free tortilla chips if needed and ensure the ranch mix is certified gluten-free.
    • Low-Calorie Version: Reduce the cheese amount or omit it altogether. Increase the vegetables for a nutrient-rich alternative without compromising volume or texture.
    • Protein Boost: For those seeking extra protein, consider adding cooked lentils or quinoa. This also enriches the meal with additional minerals and fiber.

    By being adaptable, Frito Cowboy Cabbage caters to a variety of dietary needs without sacrificing flavor or enjoyment.

    How to Prepare the Perfect Frito Cowboy Cabbage: Step-by-Step Guide

    Frito Cowboy Cabbage can be prepared in a few simple steps that make it foolproof for home cooks of any experience level. Below is a comprehensive guide to ensure your dish turns out perfectly.

    1. Prepare the Base: Finely chop the cabbage into bite-sized pieces. This allows for even cooking and ensures each bite is full of flavor.

    2. Heat the Oil: In a large skillet, heat one tablespoon of olive oil over medium heat. The oil will help cook the cabbage while adding a rich flavor.

    3. Sauté the Cabbage: Add the chopped cabbage to the skillet. Sauté for about 5-7 minutes until the cabbage becomes tender. Make sure to stir it frequently to avoid burning.

    4. Add in Beans and Corn: Once the cabbage is cooked, stir in the drained black beans and corn. Cook for an additional 2-3 minutes until everything is heated through.

    5. Mix in Dressing: Sprinkle the ranch dressing mix over the cabbage mixture. Stir thoroughly to coat the vegetables evenly with the seasoning.

    6. Incorporate Cheese: Add the shredded cheddar cheese (or vegan alternative) into the skillet. Mix until the cheese melts and blends into the veggies. You can omit the cheese if you prefer a dairy-free option.

    7. Prepare for Serving: Transfer the mixture into a baking dish or large serving bowl. This helps in presenting the dish beautifully on the table.

    8. Top with Fritos: Just before serving, sprinkle the Fritos chips on top to maintain their crispiness. This touch ensures a delightful crunch in every serving.

    9. Add Optional Toppings: Consider adding chopped green onions, fresh cilantro, or diced avocado as a garnish. These not only enhance the visual appeal but also contribute additional flavors and nutrients.

    10. Serve Hot: Frito Cowboy Cabbage is best enjoyed warm. You can serve it as a standalone dish or alongside your favorite protein.

    This easy-to-follow recipe makes Frito Cowboy Cabbage a standout choice among dinner recipes that are both flavorful and nutritious. Feel free to adjust the quantities according to your preference, making it as spicy or cheesy as you like!

    Mastering Frito Cowboy Cabbage: Advanced Tips and Variations

    While the basic Frito Cowboy Cabbage recipe is delicious on its own, there are various ways to elevate it further. Here are some advanced tips and variations to experiment with:

    • Spice It Up: For those who enjoy a little heat, sprinkle in some red pepper flakes or add diced jalapeños while sautéing the cabbage. This will provide a delightful kick to the flavors.

    • Smoke Flavor: Incorporating smoked paprika or chipotle powder can introduce a lovely smoky undertone that enhances the dish’s overall taste.

    • Vegetable Variations: Feel free to experiment with other vegetables like diced bell peppers, zucchini, or spinach. This is a great way to incorporate more vitamins and minerals while adding different textures.

    • Protein Variants: For a heartier meal, consider adding cooked chicken, turkey, or ground beef. This can make it a complete meal, suitable for serving at gatherings or family dinners.

    • Summer Version: During the warmer months, you can grill the cabbage lightly before mixing it with the other ingredients. This adds a distinctive grilled flavor and makes it a perfect dish for summer cookouts.

    • Cooling Dips: Serve the dish with a side of sour cream, Greek yogurt, or guacamole as a creamy and refreshing accompaniment.

    These tips not only help in enhancing the flavor profile of Frito Cowboy Cabbage but also allow you to personalize the dish to your liking. By keeping the foundation of this dinner recipe and playing with various elements, you can create a dish that feels new and exciting every time you serve it.

    How to Store Frito Cowboy Cabbage: Best Practices

    Making Frito Cowboy Cabbage in advance? Here’s how to store it properly for the best flavor and freshness:

    • Refrigeration: Store leftover Frito Cowboy Cabbage in an airtight container in the refrigerator. It will typically last for 3-4 days. When reheating, you may need to add a splash of water or broth to prevent it from drying out.

    • Freezing: While this dish is best enjoyed fresh, you can freeze it if necessary. Portion the cabbage mixture into freezer-safe containers. Just be aware that the Fritos’ texture may change upon freezing. Consider keeping them separate until serving.

    • Reheating: To enhance the flavors again, reheat in a skillet over medium heat, stirring gently until heated through. If reheating in a microwave, use a covered dish and heat in short increments, stirring in between to ensure even heating.

    Proper storage ensures that your Frito Cowboy Cabbage remains tasty and nourishing, making it a convenient option for meal prep enthusiasts looking to maximize their kitchen efficiency while exploring various dinner recipes.

    Nutritional Value of Frito Cowboy Cabbage

    Understanding the nutritional benefits of Frito Cowboy Cabbage can help you appreciate this dish even more. Per serving (estimated serving size of 1 cup), here’s a breakdown of the nutritional content:

    • Calories: Approximately 300-350 (depending on cheese and Fritos used)
    • Protein: 12-15 grams (from beans and cheese)
    • Total Fat: 12-15 grams (mostly from olive oil and cheese)
    • Carbohydrates: 40 grams (including dietary fiber)
    • Dietary Fiber: 10-12 grams (thanks to cabbage and beans)
    • Sugars: 2-4 grams (natural sugars from corn)
    • Sodium: Varies based on ranch dressing mix; opt for lower-sodium varieties for a healthier choice.

    As you can see, Frito Cowboy Cabbage is nutritious, offering a good blend of macronutrients that keeps you fueled and feeling good. You can also modify the ingredients based on your dietary preferences for further optimization.

    This dish aligns perfectly with anyone focused on maintaining balanced nutrition amidst a busy day filled with home, work, or study responsibilities. The inclusion of healthy ingredients ensures that it’s more than just a fulfilling meal.

    FAQs: Frequently Asked Questions About Frito Cowboy Cabbage

    1. Can I make Frito Cowboy Cabbage ahead of time?
    Absolutely! You can prepare the cabbage mixture and store it in an airtight container in the refrigerator for 3-4 days. Just add the Fritos right before serving to maintain their crunch.

    2. How can I make this dish spicier?
    If you’re a fan of heat, consider adding diced jalapeños or cayenne pepper while sautéing the cabbage. You can also sprinkle crushed red pepper flakes before serving.

    3. Is there a way to make this recipe lower in calories?
    Definitely! You can reduce the cheese quantity, choose low-fat options, or even skip it entirely. Increase the vegetable ratio for bulk without significant calorie addition.

    4. What are some good side dishes to serve with this?
    Frito Cowboy Cabbage is fantastic on its own but can also pair well with cornbread or a mixed salad for a complete meal.

    5. Can I freeze leftovers?
    Yes, but it’s best to freeze the cabbage mixture without the Fritos. Store in freezer-safe containers, and once you reheat it, add fresh Fritos to maintain their crunch.

    6. What can I substitute for ranch dressing mix?
    You can create a simple dressing using Greek yogurt mixed with garlic powder, onion powder, and dill. Alternatively, look for vegan ranch mixes available in stores.

    Frito Cowboy Cabbage is not just a meal; it’s an experience that brings people together. It’s versatile, savory, and full of healthy goodness — perfect for anyone looking to enjoy dinner recipes that pack flavor without the fuss. So why not try making this dish at home? Your taste buds will thank you!

  • Cajun Wings

    Cajun Wings

    Cajun Wings: A Tropical Delight

    Introduction to Cajun Wings

    Cajun wings bring the heat and the flavor, making them an exceptional choice for anyone looking to elevate their chicken recipes. These spicy, savory delights are perfect for casual gatherings, cozy family dinners, or even a late-night snack. With the combination of bold Cajun spices and succulent chicken, this recipe is bound to become a household favorite.

    What makes Cajun wings appealing is their simplicity. The process of preparing them is quick and straightforward, making it easy for busy parents and working professionals to dive into the kitchen without stress. Moreover, this dish can accommodate various dietary preferences, including gluten-free and low-calorie versions, making Cajun wings a versatile option. Whether you enjoy them alongside a cooling dip or on their own, these wings pack a flavorful punch that satisfies any craving.

    When preparing Cajun wings, you can look forward to health benefits as well. Chicken is a great source of lean protein, packed with essential vitamins and minerals. By opting for baking instead of frying, you can create a lower-fat dish that doesn’t compromise on taste. With countless chicken recipes available, Cajun wings stand out for their exciting spices and adaptiveness to numerous palates. Gather your ingredients and get ready to impress yourself and your guests with this tantalizing recipe!

    Benefits and Advantages of Cajun Wings

    Cajun wings offer numerous advantages that make them an excellent choice for home cooks of all skill levels. Firstly, the ease of preparation allows you to whip up a batch even if you’re short on time. A simple spice blend and a few minutes of baking can lead to a delicious meal or snack that everyone will love. For busy families and students, these wings provide a fantastic way to enjoy a home-cooked dish without spending hours in the kitchen.

    Health-wise, Cajun wings boast a significant number of benefits due to their main ingredient: chicken. Lean chicken is rich in protein, which helps in muscle building and provides long-lasting energy. Moreover, innovative ingredient substitutions can cater to various dietary regulations, making them suitable for health-conscious individuals and those with dietary restrictions.

    A unique feature of Cajun wings is their customization potential. You can easily adjust the spice levels based on your family’s preferences, providing a tailored dish that suits various tastes. For those seeking vegetarian options, swapping out chicken for plant-based alternatives presents endless possibilities to enjoy Cajun flavors without compromising dietary choices.

    In conclusion, Cajun wings aren’t just delicious; they’re also accessible, healthful, and highly adaptable, making them an exceptional addition to your repertoire of chicken recipes. Whether it’s a family dinner, game night, or a special occasion, these wings promise to satisfy and impress all guests.

    Ingredients Overview

    Essential Ingredients for Cajun Wings

    To create your own batch of scrumptious Cajun wings, you will need the following ingredients:

    • 2 lbs chicken wings: Choose fresh, organic wings for the best flavor.
    • 2 tablespoons olive oil: This adds richness and helps the spices adhere to the wings.
    • 1 tablespoon Cajun seasoning: A blend of spices typical of Cajun cuisine, provides heat and flavor. [Vegan option: Use plant-based protein wings.]
    • 1 teaspoon garlic powder: Adds depth and enhances the umami flavor.
    • 1 teaspoon onion powder: Complements the garlic and rounds out the spice profile.
    • 1 teaspoon smoked paprika: Provides a hint of smokiness to balance the spices.
    • Salt and pepper to taste: Seasoning to enhance the natural flavors of the chicken.
    • Fresh parsley for garnish: Optional, but adds freshness and a pop of color to your dish.

    Taking a moment to understand these ingredients can help you appreciate the complexity of flavors in this dish. Each adds not only taste but also nutrition, making this recipe a great choice for feeding your family or whipping up a fun treat for yourself.

    Dietary Substitutions to Customize Your Cajun Wings

    Customization is key to making your Cajun wings suitable for anyone’s dietary needs. Here are a few suggestions to modify the recipe:

    • Gluten-Free: Ensure that the Cajun seasoning you use is gluten-free, as some blends may contain wheat-based fillers.
    • Vegan: Swap chicken wings for plant-based protein options, such as cauliflower or tofu. This substitution not only accommodates vegans but also adds an intriguing twist to the classic recipe.
    • Low-Calorie: Baking the wings instead of frying drastically reduces the calorie content. In addition, you can use a minimal amount of olive oil or replace it with a non-stick cooking spray.

    These substitutions maintain the essence of classic Cajun wings while enhancing dietary flexibility, ensuring everyone at your table can enjoy this delightful dish.

    How to Prepare the Perfect Cajun Wings: Step-by-Step Guide

    Creating Cajun wings can be a fun and satisfying experience. Follow these simple steps to prepare these delicious chicken recipes.

    1. Preheat the Oven: Start by preheating your oven to 400°F (200°C). This temperature allows the wings to cook evenly and become crisp without frying.

    2. Prepare the Wings: Rinse the chicken wings under cold water and pat them dry with paper towels. This step is crucial for achieving a crispy texture.

    3. Mix Ingredients: In a mixing bowl, combine the olive oil, Cajun seasoning, garlic powder, onion powder, smoked paprika, salt, and pepper. Whisk until well blended, creating a flavorful coating for the wings.

    4. Coat the Wings: Add the chicken wings to the bowl and toss them in the mixture until all wings are evenly coated. For extra flavor, you can marinate them for at least 30 minutes, or even overnight.

    5. Arrange on Baking Sheet: Line a baking sheet with parchment paper or aluminum foil for easy clean-up. Arrange the wings in a single layer, ensuring they have space in between for even cooking.

    6. Bake the Wings: Place the baking sheet in the preheated oven and bake for 40-45 minutes, flipping the wings halfway through to get them crispy on both sides.

    7. Check for Doneness: Use a meat thermometer to ensure the internal temperature reaches 165°F (74°C), confirming that the wings are fully cooked.

    8. Garnish and Serve: Once baked, remove the wings from the oven, let them cool for a few minutes, then garnish with freshly chopped parsley before serving. Pair with your favorite dipping sauce, like ranch or blue cheese dressing.

    By following this step-by-step guide, you can create mouth-watering Cajun wings that are both satisfying and delicious. Plus, these instructions can easily be adapted based on dietary needs or preference.

    Mastering Cajun Wings: Advanced Tips and Variations

    While the basic recipe for Cajun wings is fantastic, there are several advanced tips and variations that can elevate your dish further.

    • Add Unique Flavors: Incorporate your favorite spices into the Cajun seasoning to make it your own. Consider adding a pinch of cayenne pepper for extra heat or a hint of honey to balance the spice.
    • Experiment with Cooking Methods: While baking is straightforward and healthy, you can also try air-frying the wings for a crispier exterior without excessive oil. Alternatively, grilling them adds a smoky flavor that complements the Cajun spices beautifully.
    • Sauce It Up: After baking, toss the wings in a homemade BBQ sauce or a spicy buffalo sauce for an extra kick. This additional layer of flavor creates a distinct version of Cajun wings.
    • Family-Friendly Variations: For young taste buds, reduce the spice level or serve the wings with a sweeter honey mustard sauce as a dip. It makes it easier for little ones to enjoy the meal while maintaining the integrity of the dish.

    By applying these advanced tips and variations, you can personalize your Cajun wings to suit any occasion or palate, ensuring that your guests are continually surprised and delighted.

    How to Store Cajun Wings: Best Practices

    Storing Cajun wings properly helps maintain their deliciousness for future meals. Here are the best practices for refrigeration, freezing, and reheating this dish:

    • Refrigeration: Allow leftover wings to cool completely, then transfer them to an airtight container. They can safely be stored in the refrigerator for up to 3 days.

    • Freezing: If you want to preserve your Cajun wings for a longer period, consider freezing. Pack them in a freezer-safe bag, removing as much air as possible before sealing. They can last in the freezer for up to 3 months.

    • Reheating: When ready to enjoy the leftovers, preheat the oven to 350°F (175°C). Place the wings on a baking sheet and reheat for about 15-20 minutes until hot and crispy again. You can also microwave them, but be mindful that this method may not yield a crispy texture.

    By following these storage practices, you can maximize the shelf life of your Cajun wings and have them ready for indulgence whenever the craving strikes.

    Nutritional Value of Cajun Wings

    Understanding the nutritional content of Cajun wings can help you make informed choices when enjoying this dish. The following are general nutritional values for a serving of approximately 4-5 wings:

    • Calories: ~400
    • Protein: ~30g
    • Fat: ~25g
    • Carbohydrates: ~2g
    • Fiber: ~0g
    • Sugars: ~0g

    Keep in mind that nutrient values can vary based on portion sizes and any modifications you make to the recipe. For example, opting for healthier cooking methods or using leaner cuts of chicken could further enhance the dish’s nutritional profile.

    Additionally, if you make substitutions—like using vegetable wings or a different cooking method—it’s essential to recalculate those figures to suit your dietary needs.

    In summary, Cajun wings can easily fit into various dietary lifestyles, offering a great mixture of protein and flavor while remaining relatively low in carbs.

    FAQs: Frequently Asked Questions About Cajun Wings

    Whether you’re new to cooking or have experience under your belt, you may still have questions about Cajun wings. Here are some common inquiries:

    Q1: Can I use frozen chicken wings?
    A1: Yes, you can use frozen chicken wings! However, be sure to thaw them completely before baking to ensure even cooking.

    Q2: How can I make Cajun wings less spicy?
    A2: To reduce the spiciness, consider using less Cajun seasoning or balancing it with a sweeter sauce like honey mustard for serving.

    Q3: What dipping sauces pair well with Cajun wings?
    A3: Traditional choices include ranch or blue cheese dressing. You can also try a spicy aioli or a citrus-based dip for a refreshing contrast.

    Q4: Can I prepare these wings ahead of time?
    A4: Absolutely! You can marinate the wings in the seasoning mix and refrigerate for several hours or overnight. Just remember to cook them fresh before serving for the best texture.

    Q5: Are there any nutritious alternatives to traditional wings?
    A5: Yes! You can use cauliflower or mushrooms as a plant-based alternative, creating a flavorful and satisfying dish for vegetarian or vegan diets.

    These FAQs address many common concerns, helping you navigate your Cajun wing-making journey without any hitches. Enjoy experimenting with this vibrant dish as you dive into one of the most delightful chicken recipes around!

  • Brown Sugar Pineapple Chicken

    Brown Sugar Pineapple Chicken

    Brown Sugar Pineapple Chicken: A Tropical Delight

    Introduction to Brown Sugar Pineapple Chicken

    If you’re searching for a new and exciting twist on your everyday protein choices, look no further than Brown Sugar Pineapple Chicken. This dish beautifully marries the savory goodness of chicken with the sweet, tangy flavors of pineapple, creating a taste sensation that will delight your palate. Perfect for busy weeknights or special gatherings, this recipe promises to inspire cooks of all skill levels.

    Not only is this recipe simple to prepare, but it’s also packed with nutritional benefits, making it an excellent choice for health-conscious individuals. The combination of chicken, which is a lean source of protein, and pineapple, rich in vitamins and digestive enzymes, makes it both a hearty and wholesome meal. The sweet glaze adds a delightful punch without overwhelming your taste buds.

    This Brown Sugar Pineapple Chicken serves as a versatile dish that can be easily adapted for different dietary needs, including gluten-free or low-calorie options. It’s perfect for home cooks, busy parents, students whipping up a quick meal, and anyone looking to impress guests with minimal fuss. Dive into this tropical treat, and let it elevate your collection of chicken recipes!

    Benefits and Advantages of Brown Sugar Pineapple Chicken

    Brown Sugar Pineapple Chicken stands out among other chicken recipes for several compelling reasons. First and foremost, its preparation is straightforward and requires minimal culinary finesse, making it perfect for novice cooks and seasoned chefs alike. The entire dish can be made in under 30 minutes, providing a quick solution for busy weeknight dinners.

    Health-wise, this dish is an excellent choice. Utilizing chicken breast as the main protein source means you’re choosing a low-fat option packed with essential amino acids and proteins needed for muscle repair and overall health. The addition of pineapple contributes a myriad of vitamins and minerals, including vitamin C, vitamin B6, and dietary fiber – all while bringing an enticing sweetness that reduces the need for overly sugary sauces.

    Another benefit is this dish’s adaptability. It can be served on a bed of whole grains like brown rice or quinoa for a better carbohydrate source. For those following a low-carb or ketogenic diet, serving it alongside non-starchy vegetables like broccoli or sautéed zucchini can keep the meal nutritious and satisfying.

    Additionally, this recipe can easily cater to diverse dietary restrictions with a few tweaks. It’s gluten-free and can be made low-calorie by adjusting the amount of brown sugar or using a sugar substitute. Vegan versions can also be made using tofu or jackfruit as a protein alternative. Overall, the balance of flavors and nutritional benefits makes Brown Sugar Pineapple Chicken a fantastic option for anyone seeking delicious chicken recipes that don’t compromise on health.

    Ingredients Overview

    Essential Ingredients for Brown Sugar Pineapple Chicken

    Before we dive into creating this delectable dish, let’s take a look at the essential ingredients you’ll need:

    • 4 boneless, skinless chicken breasts (about 1.5 lbs) – A lean protein source that cooks quickly and absorbs flavors well.
    • 1 cup fresh pineapple chunks (or canned, drained) – Adds natural sweetness and juiciness; rich in vitamin C.
    • 1/3 cup brown sugar – For a rich, caramel-like sweetness that perfectly complements the pineapple.
    • 1/4 cup soy sauce (or tamari for gluten-free) – Adds umami depth and balances the sweetness.
    • 2 tablespoons olive oil (or avocado oil) – Provides healthy fats and aids in cooking the chicken to tenderness.
    • 1 tablespoon apple cider vinegar – Enhances acidity for a balanced flavor profile.
    • 2 cloves garlic, minced – Infuses a savory note and contributes antioxidant properties.
    • Salt and black pepper to taste – Essential seasonings to elevate the overall flavor.

    Vegan, Gluten-Free, and Low-Calorie Options:

    • Vegan Option: Substitute chicken with firm tofu or jackfruit, adjusting the cooking time accordingly.
    • Gluten-Free Option: Use tamari instead of soy sauce.
    • Low-Calorie Option: Reduce brown sugar to 2 tablespoons or substitute with a sugar alternative like erythritol.

    Dietary Substitutions to Customize Your Brown Sugar Pineapple Chicken

    Adapting the Brown Sugar Pineapple Chicken to meet various dietary needs is easy:

    • For a Spicy Kick: Add 1 teaspoon of crushed red pepper flakes or Sriracha to the marinade before baking.
    • To Enhance Flavor: Consider adding ginger (fresh or ground) to the marinade for another layer of warmth.
    • Low-Fat Option: Replace regular chicken with chicken thighs, which can be more succulent, and use a sugar substitute to reduce calories.
    • For Enhanced Nutrients: Include sliced bell peppers or snap peas along with the chicken and pineapple in the dish for added vitamins.

    With these substitutions and variations, this Brown Sugar Pineapple Chicken recipe remains versatile and appealing, making it one of the most exciting chicken recipes for your culinary repertoire.

    How to Prepare the Perfect Brown Sugar Pineapple Chicken: Step-by-Step Guide

    Creating mouthwatering Brown Sugar Pineapple Chicken is simple! Follow these steps to craft a dish that will surely impress:

    1. Gather Your Ingredients: Make sure all the ingredients are prepared and within reach to streamline the cooking process.

    2. Preheat the Oven: Set your oven to 375°F (190°C) to prepare it for baking.

    3. Prepare the Marinade:

    4. In a medium-sized mixing bowl, combine the brown sugar, soy sauce, olive oil, apple cider vinegar, and minced garlic. Whisk until the sugar dissolves and the mixture is well-blended.

    5. Season the Chicken:

    6. Pat the chicken breasts dry with paper towels. Season both sides lightly with salt and black pepper.

    7. Marinate the Chicken:

    8. Place the seasoned chicken breasts in a large ziplock bag or shallow dish.
    9. Pour the marinade over the chicken, ensuring it’s evenly coated. Seal the bag or cover the dish and let it marinate in the refrigerator for at least 15 minutes (or longer for more profound flavors).

    10. Prepare Baking Dish:

    11. In a baking dish suitable for the oven, arrange the pineapple chunks in a single layer.

    12. Add Chicken:

    13. After marinating, remove the chicken from the marinade (reserve the marinade) and place the chicken on top of the pineapple in the baking dish.

    14. Pour Marinade Over Chicken:

    15. Drizzle the reserved marinade over the chicken, ensuring everything is well-coated.

    16. Bake the Chicken:

    17. Place the baking dish in the preheated oven and bake for approximately 25-30 minutes, or until the chicken reaches an internal temperature of 165°F (75°C) and is cooked through. For a golden finish, broil for the last 3-5 minutes, watching carefully to avoid burning.

    18. Let it Rest:

      • Once cooked, remove the dish from the oven and let it rest for about 5 minutes, allowing the juices to redistribute for tender chicken.
    19. Serve:

      • Serve the Brown Sugar Pineapple Chicken hot, garnished with freshly chopped cilantro or green onions as a delightful touch. Pair with rice, quinoa, or steamed vegetables as desired.

    This step-by-step guide to preparing Brown Sugar Pineapple Chicken ensures a delicious meal perfect for any occasion. The simplicity of this recipe, combined with its versatility, secures its place as one of the top chicken recipes in your collection.

    Mastering Brown Sugar Pineapple Chicken: Advanced Tips and Variations

    To elevate your Brown Sugar Pineapple Chicken experience even further, consider the following advanced tips and variations:

    • Grilling Option: Instead of baking, grill the marinated chicken for a smoky flavor. Preheat your grill and cook for about 6-7 minutes on each side until the chicken is fully cooked.
    • Slow Cooker Variation: For an easy weeknight meal, toss the marinated chicken and pineapple into a slow cooker, cooking on low for 4-6 hours. This method locks in moisture and deepens flavors.
    • Tropical Fruit Additions: Feel free to customize the fruity aspect by adding mango or bell peppers to the dish for a colorful presentation and diverse taste.
    • Flavor Infusions: For more depth of flavor, add a splash of coconut milk to the marinade, a pinch of garlic powder, or layer on fresh herbs like basil or cilantro before serving.
    • Serving Alternatives: Serve the dish in lettuce wraps or on tortillas for a fun, hand-held meal, perfect for casual gatherings or taco night.

    These advanced tips and variations will provide you with limitless options, making Brown Sugar Pineapple Chicken a standout dish in the diverse world of chicken recipes.

    How to Store Brown Sugar Pineapple Chicken: Best Practices

    Proper storage of your Brown Sugar Pineapple Chicken ensures that you can enjoy leftovers safely and deliciously. Here’s how you can store this dish:

    • Refrigeration: Allow the chicken to cool completely before transferring it to an airtight container. Store in the refrigerator for up to 3-4 days. When reheating, ensure the chicken reaches an internal temperature of 165°F (75°C).

    • Freezing: For longer storage, freeze the chicken in an airtight freezer-safe container or a resealable freezer bag. Properly stored, it can last in the freezer for up to 3 months. To reheat, thaw it overnight in the refrigerator before cooking.

    • Reheating: For best results, reheat the chicken in the oven at 350°F (175°C) for 15-20 minutes or until heated through. Microwaving is also an option, but it may result in a less satisfying texture.

    Storing your Brown Sugar Pineapple Chicken using these best practices allows you to easily enjoy this tropical delight long after preparation, proving its merits amongst your favorite chicken recipes.

    Nutritional Value of Brown Sugar Pineapple Chicken

    Understanding the nutritional profile of your meals is vital, especially for health-conscious cooks. Below is the approximate nutritional value per serving (based on 4 servings):

    • Calories: 350
    • Protein: 28g
    • Fat: 12g
    • Carbohydrates: 38g
    • Fiber: 1g
    • Sugar: 18g
    • Sodium: 700mg
    • Vitamin C: 15% of the Daily Value
    • Calcium: 2% of the Daily Value
    • Iron: 6% of the Daily Value

    This Brown Sugar Pineapple Chicken recipe packs a nutritious punch, offering a satisfying balance of macronutrients while providing essential vitamins and minerals. Adjustments, like using less sugar or alternative cooking methods, can easily lower the calorie count and enhance its health benefits without sacrificing flavor.

    Being aware of the nutritional value further endorses the decision to incorporate this dish into your repertoire of delightful chicken recipes.

    FAQs: Frequently Asked Questions About Brown Sugar Pineapple Chicken

    1. Can I use frozen chicken for this recipe?

    Absolutely! If using frozen chicken, ensure it is fully thawed before marinating. Cooking times may need slight adjustments depending on the chicken thickness.

    2. What if I don’t have brown sugar?

    You can substitute brown sugar with white sugar mixed with a little molasses for a similar flavor. Alternatively, a sugar-free sweetener like stevia or erythritol can work well.

    3. Can I make this recipe ahead of time?

    Yes! You can marinate the chicken up to 24 hours in advance for even more flavor. Just be sure to store it in the refrigerator until you’re ready to cook.

    4. Is there a vegan alternative for Brown Sugar Pineapple Chicken?

    For a vegan version, substitute chicken with cubed firm tofu or young jackfruit. The cooking times will differ slightly, with tofu typically requiring about 15-20 minutes to sear.

    5. Can I bake this dish in one pan with vegetables?

    Certainly! Adding vegetables like bell peppers or snap peas into the baking dish will waive the need for a side and enhance the flavor profile. Adjust baking time as necessary for the optimal doneness of veggies.

    6. How can I make this recipe spicier?

    For an extra kick, incorporate crushed red pepper flakes or a dash of chili sauce into the marinade. Alternatively, consider ginger or a mild chili pepper for balanced heat.

    Incorporating FAQs, addresses common concerns and curiosities, enriching the reader’s understanding and experience with this delightful dish, and expanding their repertoire of chicken recipes.


    With Brown Sugar Pineapple Chicken, you get a meal that’s as flavorful as it is simple. Whether you serve it for a family dinner or a casual gathering with friends, this dish is sure to impress. It’s more than just a recipe; it’s an invitation to explore the delicious intersection of sweet and savory that defines great cooking. Happy cooking!

  • Basil Chicken in Coconut Curry Sauce

    Basil Chicken in Coconut Curry Sauce

    Basil Chicken in Coconut Curry Sauce: A Tropical Delight

    Introduction to Basil Chicken in Coconut Curry Sauce

    If you’re searching for the perfect balance of flavor and convenience in your weeknight meals, Basil Chicken in Coconut Curry Sauce might just be the perfect fit for you. This delectable dish combines tender chicken pieces smothered in a creamy coconut curry sauce, enriched with fresh basil and a mélange of spices. Not only does it burst with tropical flavors, but this recipe also embodies the simplicity of home cooking, making it an ideal candidate for busy parents, students, and anyone who enjoys good food without the fuss.

    As one of the standout chicken recipes, basil chicken in coconut curry sauce is versatile enough to accommodate various dietary needs, including gluten-free and dairy-free options. It’s also packed with essential nutrients, providing a balanced meal that can suit diet-conscious individuals and health enthusiasts alike. The aromatic herbs and spices not only enhance the taste but also bring numerous health benefits, such as anti-inflammatory properties and rich antioxidants. Whether you’re a newlywed looking to impress your partner, a senior wanting to enjoy easy-to-digest meals, or a baking enthusiast in search of a savory dish, this recipe caters to all.

    Let’s dive deeper into the benefits of this fabulous recipe and discover why it should top your dinner list!

    Benefits and Advantages of Basil Chicken in Coconut Curry Sauce

    Easy to Prepare

    One of the most appealing aspects of Basil Chicken in Coconut Curry Sauce is its straightforward preparation. Whether you’re a novice cook or an experienced Chef, this recipe offers an inviting opportunity to create a delightful meal without the need for complicated skills or extensive time commitment. Within just 30 to 40 minutes, you can serve a mouthwatering dish that looks as impressive as it tastes. The minimal prep and cooking time make it an excellent choice for busy weeknights, ensuring that you can maintain quality meal time with family or roommates without sacrificing flavor.

    Health Benefits

    Incorporating coconut milk in this recipe not only brings a creamy texture but also provides healthy fats that contribute to heart health. Moreover, basil is loaded with essential vitamins and minerals, making it a great addition to any diet. This dish can also be customized to be lighter by choosing lean chicken breasts or thighs, making it a fantastic option for health-conscious individuals. The spices used in the curry, such as turmeric and ginger, boast anti-inflammatory properties and can aid digestion, making this a savory yet healthful meal.

    Versatility

    The versatility of Basil Chicken in Coconut Curry Sauce is another reason it stands out among other chicken recipes. You can easily swap out chicken for tofu or chickpeas to create a vegetarian or vegan version that still packs a punch in flavor. This adaptability makes it perfect for hosting gatherings as you can cater to your guests’ dietary needs effortlessly without compromising taste. Additionally, you can adjust the spice levels to suit your palate, making this dish an exciting choice for everyone at the table, whether they’re spice lovers or prefer milder flavors.

    Ingredients Overview

    Essential Ingredients for Basil Chicken in Coconut Curry Sauce

    To whip up this delightful dish, you will need the following ingredients:

    • Chicken Breast or Thighs (500g): Provides lean protein. (For vegan substitutes, use tofu or tempeh.)
    • Coconut Milk (400ml): Adds creaminess and rich flavor while being dairy-free.
    • Fresh Basil Leaves (1 cup): Imparts a fragrant aroma and an explosion of freshness.
    • Onion (1 medium, chopped): For a savory base.
    • Garlic (3 cloves, minced): Boosts the dish with robust flavors.
    • Fresh Ginger (1 inch, grated): Offers a warming spice that’s great for digestion.
    • Curry Powder (2 tablespoons): The key seasoning for that aromatic flair.
    • Olive Oil (2 tablespoons): Used for sautéing the onion and garlic.
    • Salt & Pepper (to taste): Essential to enhance the overall flavors.
    • Lime Juice (1 tablespoon): Brightens the dish with acidity.

    Note: For a gluten-free option, ensure your curry powder and other ingredients do not contain gluten.

    Dietary Substitutions to Customize Your Basil Chicken in Coconut Curry Sauce

    • Plant-Based Protein: For a vegan option, replace chicken with cubed tofu or chickpeas. Both will absorb the coconut curry flavors beautifully.

    • Vegetables: Feel free to add vegetables like bell peppers, spinach, or zucchini for extra nutrients and color.

    • Low-Calorie Options: Use skinless chicken or opt for lean cuts of meat. For a lighter dish, use low-fat coconut milk.

    • Curry Alternatives: If you prefer a different flavor profile, you can experiment with other curry pastes or powders, such as Thai red curry paste or Massaman curry, to mix things up.

    With these options, you’re prepared to make a fantastic meal that everyone can enjoy, no matter their dietary preferences!

    How to Prepare the Perfect Basil Chicken in Coconut Curry Sauce: Step-by-Step Guide

    Creating Basil Chicken in Coconut Curry Sauce is not only incredibly simple, but it’s also a delightful journey through flavors. Below is a step-by-step guide on how to make this tropical dish:

    1. Prepare the Base: Begin by heating olive oil over medium heat in a large skillet or saucepan. Once the oil is shimmering, add the chopped onion. Sauté it until translucent, about 5 minutes.

    2. Add Garlic and Ginger: Stir in minced garlic and grated ginger, cooking for an additional 1-2 minutes until fragrant.

    3. Incorporate the Chicken: Add the chicken pieces to your pan. Season with salt and pepper. Cook, stirring occasionally, until the chicken is browned on all sides and cooked through, typically about 7-10 minutes.

    4. Add Curry Powder: Sprinkle the curry powder over the cooked chicken and stir well to evenly coat it. Allow it to cook for 1 minute to fully awaken the spices.

    5. Pour in Coconut Milk: Gently pour in the coconut milk, stirring to combine with the chicken and spices. Bring the mixture to a gentle simmer.

    6. Simmer and Thicken: Let the sauce simmer for about 10 minutes on low heat. The flavors will meld beautifully, and the sauce will thicken slightly. Stir occasionally to prevent sticking.

    7. Add Fresh Basil: Just before serving, stir in the fresh basil leaves. This will enhance the aromatic qualities of the dish.

    8. Finish with Lime Juice: Add a touch of lime juice to brighten the flavors. Taste and adjust the seasoning as necessary.

    9. Serve: Serve your basil chicken with warm rice or quinoa to soak up the delicious sauce. Garnish with additional fresh basil if desired.

    This straightforward methodology makes it easy for anyone—even beginners—to craft a beautiful meal that impresses without the stress of long prep times.

    Mastering Basil Chicken in Coconut Curry Sauce: Advanced Tips and Variations

    While the basic recipe is fantastic, there are several ways to elevate your Basil Chicken in Coconut Curry Sauce:

    • Infuse Different Flavors: Consider adding a dash of fish sauce or soy sauce for a depth of umami.

    • Spice it Up: If you appreciate spice, include red chili flakes or diced fresh chilies when sautéing the onions for an extra kick.

    • Cooking Methods: For an even more effortless preparation, consider preparing the dish in a slow cooker. Simply toss in all your ingredients (except for basil and lime) and cook on low for 4-6 hours.

    • Serving Suggestions: Serve it alongside naan, or a fresh salad to balance the rich flavors.

    These tips can transform a beloved dish into a unique culinary experience that can be tailored to suit your taste.

    How to Store Basil Chicken in Coconut Curry Sauce: Best Practices

    To keep your Basil Chicken in Coconut Curry Sauce preserved and taste fresh, here are some best practices for storage:

    • Refrigeration: Allow the chicken curry to cool down to room temperature. Store it in an airtight container in the refrigerator where it can last for about 3-4 days.

    • Freezing: For longer storage, consider freezing the curry. Pour it into a freezer-safe container or zip-top freezer bag, ensuring you remove as much air as possible. It can be frozen for up to three months.

    • Reheating: When ready to enjoy your leftovers, reheat the curry in a saucepan over medium heat until warmed through. If frozen, it’s best to thaw overnight in the refrigerator before reheating.

    These simple storage tips ensure that you minimize waste while still enjoying your delicious dish days later!

    Nutritional Value of Basil Chicken in Coconut Curry Sauce

    Understanding the nutritional impact of what you’re cooking is vital for health-conscious individuals. Here’s a breakdown of the nutritional content for a standard serving of Basil Chicken in Coconut Curry Sauce (assuming typical ingredients):

    • Calories: Approximately 400 calories
    • Total Fat: 22g
      • Saturated Fat: 10g from coconut milk
    • Protein: 30g
    • Carbohydrates: 10g
      • Dietary Fiber: 3g
    • Sugars: 2g
    • Sodium: 700mg (may vary depending on additional seasoning)

    These values can vary based on specific ingredient choices, such as using low-fat coconut milk or different protein sources. Overall, this dish offers a wholesome combination of protein, healthy fats, and a manageable carbohydrate count.

    FAQs: Frequently Asked Questions About Basil Chicken in Coconut Curry Sauce

    Q1: Can I make Basil Chicken in Coconut Curry Sauce in advance?

    A1: Yes! This dish can be made ahead of time, making it perfect for meal prep. Just store it in the fridge or freezer as previously mentioned, and it will taste delicious even after a few days.

    Q2: How spicy is this dish?

    A2: The spice level can be adjusted to suit your taste. If you enjoy mild flavors, use a milder curry powder and reduce added spices. Alternatively, if you prefer more heat, add chili flakes or fresh chilies during cooking.

    Q3: Can this be made vegetarian?

    A3: Absolutely! Simply replace chicken with tofu or chickpeas. You can also add a variety of vegetables for added nutrients.

    Q4: What do I serve with this recipe?

    A4: This aromatic dish pairs beautifully with warm rice, quinoa, or even naan bread to soak up the delightful coconut curry sauce.

    Q5: What if I don’t have fresh basil?

    A5: While fresh basil adds an incredible flavor, you can use dried basil or other herbs like cilantro or mint, but perhaps at a lesser quantity due to the difference in strength.


    With this comprehensive guide, you have all the tools you need to create a mouthwatering Basil Chicken in Coconut Curry Sauce. Its balance of flavor, health benefits, and versatility make it one of the most exciting chicken recipes to try. So gather your ingredients, follow the steps, and embark on a culinary adventure that transports you straight to a tropical paradise!

  • Hot Honey Feta Chicken

    Hot Honey Feta Chicken

    Hot Honey Feta Chicken: A Tropical Delight

    Introduction to Hot Honey Feta Chicken

    If you’re searching for a delicious and colorful addition to your weeknight dinner rotation, look no further than Hot Honey Feta Chicken. Not only is this dish bursting with vibrant flavors, but it also embodies the simplicity that busy cooks crave. Effortlessly blending the sweetness of honey, the rich tang of feta cheese, and the savory depth of chicken, this recipe is a wonderful example of the variety of possibilities found in chicken recipes.

    Hot Honey Feta Chicken is not just limited to meat-eaters; it can easily be adapted to suit vegan or gluten-free diets, making it a versatile choice for everyone at the table. This delightful dish is perfect for health-conscious individuals—it’s protein-packed, and the layers of flavor mean you won’t be missing out while keeping things light.

    Whether you’re a cooking novice or an experienced chef looking for a fresh take on your meals, Hot Honey Feta Chicken offers a wonderful way to excite your palate. Plus, its easy preparation means you’ll have more time to spend with family or friends. Stay tuned as we explore the many benefits, ingredients, and techniques to create this delightful dish that will impress anyone who tries it!

    Benefits and Advantages of Hot Honey Feta Chicken

    Hot Honey Feta Chicken stands out among numerous chicken recipes for many reasons that cater not just to flavor but also to practical culinary needs. Here’s why this dish is a fantastic choice:

    1. Quick and Easy Preparation: The preparation for Hot Honey Feta Chicken is straightforward, requiring few steps and minimal cooking time. This makes it perfect for busy parents, students, and working professionals who need to get dinner on the table fast without sacrificing flavor.

    2. Health Benefits: Chicken is a source of lean protein, making this dish a healthier alternative to heavier fare. The addition of honey not only adds a delectable sweet touch but can also offer antioxidant properties. Feta cheese brings in calcium and healthy fats, further enhancing the dish’s nutritional profile.

    3. Versatility: The recipe allows for numerous substitutions and modifications, which means you can cater it to various dietary needs without compromising on taste. Whether gluten-free, low-carb, or dairy-free options are required, this chicken dish can be adapted to fit those requirements.

    4. Flavor Explosion: With the sweet and spicy combination of hot honey and feta cheese, this dish creates an explosion of flavors in your mouth. The balance of sweet, spicy, and savory not only satisfies your taste buds but also elevates your dining experience.

    5. Social and Occasion Ready: Hot Honey Feta Chicken is not just a weeknight meal; it’s also perfect for entertaining guests. Its vibrant presentation and unforgettable taste will impress friends and family, making it ideal for gatherings or special occasions.

    By embracing this recipe, you take a step into a world where flavors marry health benefits and convenience, creating an enjoyable cooking experience that caters to all.

    Ingredients Overview

    Essential Ingredients for Hot Honey Feta Chicken

    To create the vibrant Hot Honey Feta Chicken, you’ll need to gather a few essential ingredients that blend together seamlessly. Here’s a detailed list along with their purpose:

    • Boneless Chicken Breasts (4 pieces)
      Lean protein source; meat can be substituted with plant-based alternatives for vegan options.
    • Hot Honey (1/3 cup)
      Adds sweetness and heat; organic honey or a honey substitute can work as alternatives.
    • Feta Cheese (1 cup, crumbled)
      Adds creaminess and a tangy flavor; vegan feta can be used for a dairy-free option.
    • Olive Oil (2 tablespoons)
      For cooking and flavor; can replace with avocado oil for a different taste.
    • Garlic Cloves (3, minced)
      Enhances flavor and offers various health benefits; can be omitted for garlic-free diets.
    • Fresh Herbs (like parsley or basil, for garnish)
      Provides fresh flavor; optional but recommended for presentation.
    • Salt and Pepper (to taste)
      Enhances overall flavor; optional spices can be used for additional heat or flavor variations.

    These ingredients come together to create a dish that is not only mouthwatering but also tailored to suit different dietary preferences.

    Dietary Substitutions to Customize Your Hot Honey Feta Chicken

    1. Vegan: To make this recipe vegan, substitute the chicken for tofu or chickpeas, and replace eggs with flaxseed or chia seeds if needed.

    2. Gluten-Free: The recipe is naturally gluten-free, but be cautious when purchasing any packaged products; ensure they are certified gluten-free.

    3. Low-Calorie: Utilize skinless chicken breasts or substitute chicken with a protein-rich vegetable such as eggplant or cauliflower for a lower-calorie option.

    4. Dairy-Free: Swap feta cheese with a dairy-free alternative or cashew cream to maintain creaminess without dairy.

    5. Spiciness Adjustment: Modify the heat level by adjusting the quantity of hot honey. Use less for mild taste or add chili flakes for extra heat!

    By customizing these ingredients, you can make Hot Honey Feta Chicken an inclusive dish that suits any dietary requirement while maintaining its delightful taste and texture.

    How to Prepare the Perfect Hot Honey Feta Chicken: Step-by-Step Guide

    Ready to dive into making this delicious dish? Follow this step-by-step guide to create your own Hot Honey Feta Chicken. We’ve simplified the process so that home cooks of any level can follow along.

    1. Prepare the Chicken:
    2. Start by trimming any fat off the chicken breasts. Rinse them under cold water and pat them dry with paper towels. Season both sides with salt and pepper.

    3. Heat the Pan:

    4. In a large skillet, heat 2 tablespoons of olive oil over medium-high heat. This will create the ideal environment for searing the chicken, ensuring a delicious golden crust.

    5. Cook the Chicken:

    6. Once the oil is hot, carefully add the chicken breasts to the pan. Cook for about 6-7 minutes on each side or until they are golden brown and cooked through. The internal temperature should reach 165°F (75°C). If you’re using a meat substitute, adjust cooking time as necessary.

    7. Add Garlic:

    8. After flipping the chicken, add minced garlic to the skillet. Stir it around the meat so it can infuse its flavor but don’t let it burn. Wonderful aromas will start to fill your kitchen!

    9. Mix the Hot Honey:

    10. While the chicken is cooking, take a separate bowl and combine the hot honey with crumbled feta cheese. Mix well to create a creamy, spicy topping that will elevatethe dish.

    11. Top the Chicken:

    12. Once the chicken is fully cooked, turn off the heat and pour the hot honey and feta mixture over the chicken breasts. Be generous and make sure each chicken breast is covered.

    13. Broil for Extra Flavor:

    14. For an added touch, place the skillet underneath the broiler for 2-3 minutes until the feta becomes slightly browned and bubbly. Make sure to keep an eye on it!

    15. Garnish and Serve:

    16. Turn off the broiler and let the chicken cool for a moment. Garnish with fresh herbs like parsley or basil for an extra burst of flavor and color. Serve warm alongside your favorite sides—think simple salads, roasted vegetables, or quinoa.

    17. Customize It:

    18. Feel free to experiment with the ingredients and spices according to your personal preferences. Give it your unique twist to make it special!

    Following these steps will lead you to a sumptuously flavorful dish that will be a hit at any meal.

    Mastering Hot Honey Feta Chicken: Advanced Tips and Variations

    Now that you are familiar with the basic recipe, here are some advanced tips and variations to make your Hot Honey Feta Chicken experience even better:

    • Marinating Options: Consider marinating the chicken in olive oil, lemon juice, garlic, and herbs for an hour before cooking. This will infuse more flavor into the chicken.

    • Veggie Addition: Add seasonal vegetables like bell peppers, onions, and zucchini into the skillet while cooking the chicken. This will create a complete meal packed with nutrients.

    • Baked Version: Instead of pan-frying, bake the chicken in a preheated oven at 400°F (200°C) for about 20-25 minutes. This method yields a juicy chicken with an equally delicious topping.

    • Grill It: Take your Hot Honey Feta Chicken outdoors by grilling it! Preheat your grill and cook the chicken until fully cooked. The smoky flavor will elevate this dish to new heights.

    • Serving Suggestions: Pair with warm pita bread or use it as a filling for wraps. A side of herbed couscous or a tangy Greek salad makes for an excellent accompaniment.

    • Make it a Meal Prep: This dish stores well, making it ideal for meal prep. Cook a big batch on the weekend and portion it out for quick lunches or easy dinners throughout the week.

    These advanced tips and variations allow you to explore a wider range of flavors and presentations, ensuring you can enjoy Hot Honey Feta Chicken in numerous exciting ways!

    How to Store Hot Honey Feta Chicken: Best Practices

    One of the best things about Hot Honey Feta Chicken is that it keeps well, making leftovers easy to enjoy.

    • Refrigeration: Store any leftovers in an airtight container within the refrigerator for up to 3-4 days. When properly sealed, the dish will retain its flavors and moisture.

    • Freezing: If you want to keep it longer, Hot Honey Feta Chicken can be frozen for up to 2-3 months. Ensure it’s in a freezer-safe container or properly wrapped to prevent freezer burn.

    • Reheating: When you’re ready to enjoy your leftovers, thaw them overnight in the fridge if frozen. Reheat in the microwave or in a preheated oven at 350°F (175°C) until warmed through, adding a splash of water to prevent drying out.

    Careful storage practices extend the life of your meal and provide easy access to a recipe that’s as delightful on day three as it was on day one!

    Nutritional Value of Hot Honey Feta Chicken

    Understanding the nutritional content can help you appreciate the health benefits of Hot Honey Feta Chicken. Here’s a simplified breakdown of nutritional information, but please note that actual values may vary based on ingredient brands and cooking methods.

    • Calories: Approximately 320 calories per serving (one chicken breast)
    • Protein: 28g
    • Fat: 16g (include healthy fats from olive oil and feta)
    • Carbohydrates: 10g, with potential adjustments based on added sides
    • Fiber: 0g (dishes can be paired with fiber-rich sides for balance)
    • Vitamins & Minerals: Rich in Vitamin B6, Calcium from feta cheese, and Iron from chicken.

    With these nutritional values, it’s easy to see how this dish fits into a balanced meal plan while also providing deliciousness at the forefront!

    FAQs: Frequently Asked Questions About Hot Honey Feta Chicken

    You may have some lingering questions about making Hot Honey Feta Chicken. Here are common queries along with clear answers to help you out:

    1. Can I substitute chicken thighs for breasts?
      Yes! Chicken thighs will yield a juicier result. Ensure they are cooked thoroughly before serving.

    2. How can I make this dish lower in sugar?
      You can reduce the amount of hot honey, or replace it with a sugar-free honey alternative.

    3. What can I serve with Hot Honey Feta Chicken?
      It pairs well with a fresh salad, rice pilaf, roasted vegetables, or even in a wrap with fresh greens.

    4. Is Hot Honey Feta Chicken gluten-free?
      Yes, the basic recipe is gluten-free. Ensure that any accompaniments or ingredient substitutes adhere to gluten-free standards.

    5. Can I make this dish ahead of time?
      Absolutely! Prepare it a day ahead, store it in the refrigerator, and reheat before serving for an easy meal.

    By addressing these common questions, you can feel confident that your culinary journey into Hot Honey Feta Chicken will be a successful one. This dish is not just a meal but an experience—a vibrant blend of health, flavor, and ease, ready to tantalize taste buds around the table. Enjoy!

  • Crock Pot Bourbon Chicken and Rice

    Crock Pot Bourbon Chicken and Rice

    Crock Pot Bourbon Chicken and Rice: A Tropical Delight

    Introduction to Crock Pot Bourbon Chicken and Rice

    Crock Pot Bourbon Chicken and Rice is a delightful way to explore a medley of tropical flavors without stepping into the kitchen for hours. This stress-free dish is not only incredibly easy to prepare but is also a fantastic option for busy parents, working professionals, food enthusiasts, and anyone looking for a healthy meal that does not compromise on taste. This recipe embraces the concept of crockpot recipes, from the sizzling bourbon-glazed chicken to the aromatic rice that absorbs all those rich flavors.

    Imagine coming home after a long day to a dinner that is ready and waiting for you! The slow cooking process transforms simple ingredients into a hearty, family-friendly dish, making it perfect for everyone at the dinner table. Plus, Bourbon Chicken is not just about taste; it’s made with wholesome ingredients and can cater to various dietary preferences. Whether you’re looking for gluten-free, low-calorie, or even vegan options, this recipe can easily be tailored to meet individual needs.

    The beauty of this dish lies in its simplicity – throw your ingredients into the crock pot, set it, and let it work its magic while you go about your day. You can enjoy this favorite comfort food guilt-free, knowing that you are nourishing your body while savoring bold flavors that warm the soul.

    Benefits and Advantages of Crock Pot Bourbon Chicken and Rice

    When it comes to crockpot recipes, the benefits are plentiful, and Bourbon Chicken and Rice is no exception. For starters, the simplicity of preparing this dish is unparalleled. You require minimal prep time and a handful of ingredients, making it ideal for those hectic weeknight dinners where you need something quick yet satisfying.

    Nutritional Advantages

    Health-wise, this dish offers numerous benefits. Packed with protein from the chicken and fiber from the rice and vegetables, it’s a balanced meal that keeps you full and energized. You can easily sneak in extra vegetables like bell peppers or broccoli for added nutrients, making it a great choice for health-conscious individuals. It’s also adaptable to accommodate dietary restrictions; you can use brown rice instead of white for a fiber boost or choose low-sodium soy sauce to keep the sodium content in check.

    Family-Friendly and Convenient

    This recipe delights family members of all ages. Children and adults alike will love the sweet and savory notes of bourbon and soy sauce, which can sometimes make vegetables more palatable for picky eaters. Additionally, the convenience of a slow cooker means you can prepare the dish in a fraction of the time compared to traditional methods. Working parents, students, and seniors will find this method incredibly desirable, allowing them to spend more time engaging in what they love while still enjoying a satisfying meal at the end of the day.

    Flexibility with Ingredients

    One of the standout features of this crockpot recipe is its flexibility. You can experiment with various proteins, grains, and flavors based on what you have on hand. This means less food waste and more creative cooking!

    Ingredients Overview

    Essential Ingredients for Crock Pot Bourbon Chicken and Rice

    To make your own Crock Pot Bourbon Chicken and Rice, you will need the following essential ingredients:

    • Chicken thighs: 2 lbs (boneless, skinless; provides flavorful protein)
    • Rice: 1 cup (white or brown; serves as the base of the dish)
    • Soy sauce: 1/2 cup (low-sodium, for minimize salt intake)
    • Brown sugar: 1/4 cup (adds sweetness to balance flavors)
    • Bourbon: 1/4 cup (for the signature flavor; can substitute with apple juice for a non-alcoholic version)
    • Garlic: 3 cloves, minced (for an aromatic touch)
    • Ginger: 1-inch piece, grated (adds warmth and richness)
    • Green onions: 1/4 cup, chopped (for garnish and extra flavor)
    • Sesame seeds: 1 tablespoon (optional, for garnish)
    • Salt and pepper: to taste

    Dietary Substitutions to Customize Your Crock Pot Bourbon Chicken and Rice

    Customizing this recipe for various dietary needs is easy! Here are some substitutions you can consider:

    • Vegan Option: Replace chicken thighs with tofu or tempeh, increasing the cooking time slightly until well-marinated.
    • Gluten-Free Option: Use tamari in place of soy sauce to accommodate gluten-sensitive diets.
    • Low-Calorie Option: Opt for skinless chicken breast and brown rice, and reduce brown sugar or use a sugar substitute.
    • Vegetarian Version: Include chickpeas in place of chicken, and use vegetable broth for added depth of flavor.

    These ingredient swaps contribute to the versatility of this recipe, making sure that it can fit a variety of dietary preferences.

    How to Prepare the Perfect Crock Pot Bourbon Chicken and Rice: Step-by-Step Guide

    Creating the perfect Crock Pot Bourbon Chicken and Rice is a breeze if you follow these simple steps. Here’s how to do it:

    1. Prepare the Base: In a large bowl, combine the soy sauce, brown sugar, bourbon, minced garlic, and grated ginger. Mix until the sugar is dissolved.

    2. Add the Chicken: Place the boneless, skinless chicken thighs in the bottom of your crock pot. Ensure they are spread out evenly to absorb all the flavors.

    3. Pour the Sauce: Pour the prepared sauce mixture over the chicken. Ensure that it fully covers the chicken for optimal flavor infusion.

    4. Add the Rice: Spread 1 cup of rice evenly over the chicken. Do not stir. This allows the rice to absorb the liquids while cooking, which is essential for achieving that perfect consistency.

    5. Add Water: Pour in 2 cups of water or chicken broth. This extra liquid is crucial for cooking the rice properly.

    6. Season: Add salt and pepper to taste, based on your preference.

    7. Cook: Cover the crock pot with a lid and cook on low for 6-7 hours or on high for 3-4 hours. The longer you cook, the more tender the chicken will be.

    8. Check Doneness: Near the end of your cooking time, check that the chicken is fully cooked (internal temperature should reach 165°F or 74°C), and the rice is fluffy and fully absorbed the liquid.

    9. Serve and Garnish: Once done, fluff the rice with a fork, then serve the dish hot. Garnish with freshly chopped green onions and sesame seeds for that added flair.

    10. Enjoy! Dive into your warming bowl of Crock Pot Bourbon Chicken and Rice, and savor each bite!

    This simple yet flavorful step-by-step approach embodies the genius of crockpot recipes, allowing home cooks to create a dish bursting with flavor without the complexity of traditional cooking methods.

    Mastering Crock Pot Bourbon Chicken and Rice: Advanced Tips and Variations

    To elevate your Crock Pot Bourbon Chicken and Rice, consider these advanced tips and variations:

    • Flavor Depth: For more profound flavor, sear the chicken thighs in a pan with a little olive oil before adding them to the crock pot. This step caramelizes the chicken, providing an additional layer of richness.
    • Vegetable Add-Ins: Consider adding chopped bell peppers, diced carrots, or peas during the last hour of cooking. This not only enhances nutrition but adds vibrant colors to your dish.
    • Bourbon Alternatives: If you prefer not to use alcohol, replace bourbon with apple or pineapple juice for a sweet note without the whiskey.
    • Curry Kick: For a unique twist, add curry powder or coconut milk to the sauce for a different flavor profile. This change adds a tropical flair that complements the dish beautifully.

    These variations allow you to harness the adaptability of crockpot recipes, customizing meals to match your palate and dietary requirements.

    How to Store Crock Pot Bourbon Chicken and Rice: Best Practices

    Storing your delicious Crock Pot Bourbon Chicken and Rice properly ensures you can enjoy leftovers without a hitch:

    • Refrigeration: After cooling completely, transfer leftover chicken and rice into an airtight container. In the refrigerator, it can last for about 3-4 days.

    • Freezing: For long-term storage, portion out the dish in freezer-safe containers. It can be frozen for up to 2-3 months. Make sure to label the containers with the date and contents for easy identification.

    • Reheating: To reheat, thaw overnight in the fridge if frozen. You can microwave individual portions or reheat in the crock pot on low heat until warmed through. Adding a bit of water can help maintain moistness during reheating.

    Following these storage practices ensures that you enjoy every last bite of your amazing crockpot recipes without any waste.

    Nutritional Value of Crock Pot Bourbon Chicken and Rice

    A crucial part of any recipe revolves around its nutritional value. Here’s a breakdown of the approximate nutrition per serving of Crock Pot Bourbon Chicken and Rice (based on 6 servings):

    • Calories: 320
    • Total Fat: 10g
    • Saturated Fat: 3g
    • Cholesterol: 85mg
    • Sodium: 800mg
    • Total Carbohydrates: 35g
    • Dietary Fiber: 2g
    • Sugars: 6g
    • Protein: 25g

    This nutritional information is essential for diet-conscious individuals, helping them to make informed choices. With a perfect balance of protein, fats, and carbohydrates, this recipe stands out amongst crockpot recipes as a healthy meal option.

    FAQs: Frequently Asked Questions About Crock Pot Bourbon Chicken and Rice

    1. Can I use frozen chicken in this recipe?

    Yes, you can use frozen chicken, but be aware that this may increase the overall cooking time by 1-2 hours. Ensure that the chicken reaches a safe internal temperature of 165°F (74°C).

    2. What can I substitute if I don’t have bourbon?

    If you prefer not to use bourbon, apple juice, or chicken broth can be suitable substitutes that still provide a pleasant flavor.

    3. Can I make this dish vegan?

    Absolutely! Replace the chicken with firm tofu or chickpeas and follow the same instructions for preparing the sauce. The flavor will still be delicious!

    4. Can I cook it on high if I’m short on time?

    Definitely! If you’re short on time, you can cook it on high for about 3-4 hours instead of low for 6-7 hours. Just ensure to check the doneness of the chicken.

    5. How do I know when the chicken is done?

    The chicken is fully cooked when it reaches an internal temperature of 165°F (74°C). For best results, use a meat thermometer for accuracy.

    In conclusion, Crock Pot Bourbon Chicken and Rice is not just a dish; it’s an experience that uplifts your dinner routine with ease, flavor, and adaptability. With its nurturing ingredients and straightforward preparation, it’s a recipe that’s sure to become a favorite in every home there. Grab your crock pot and enjoy this tropical delight today!