Tag: chicken

  • Best-Ever Blueberry Thyme Chicken

    Best-Ever Blueberry Thyme Chicken

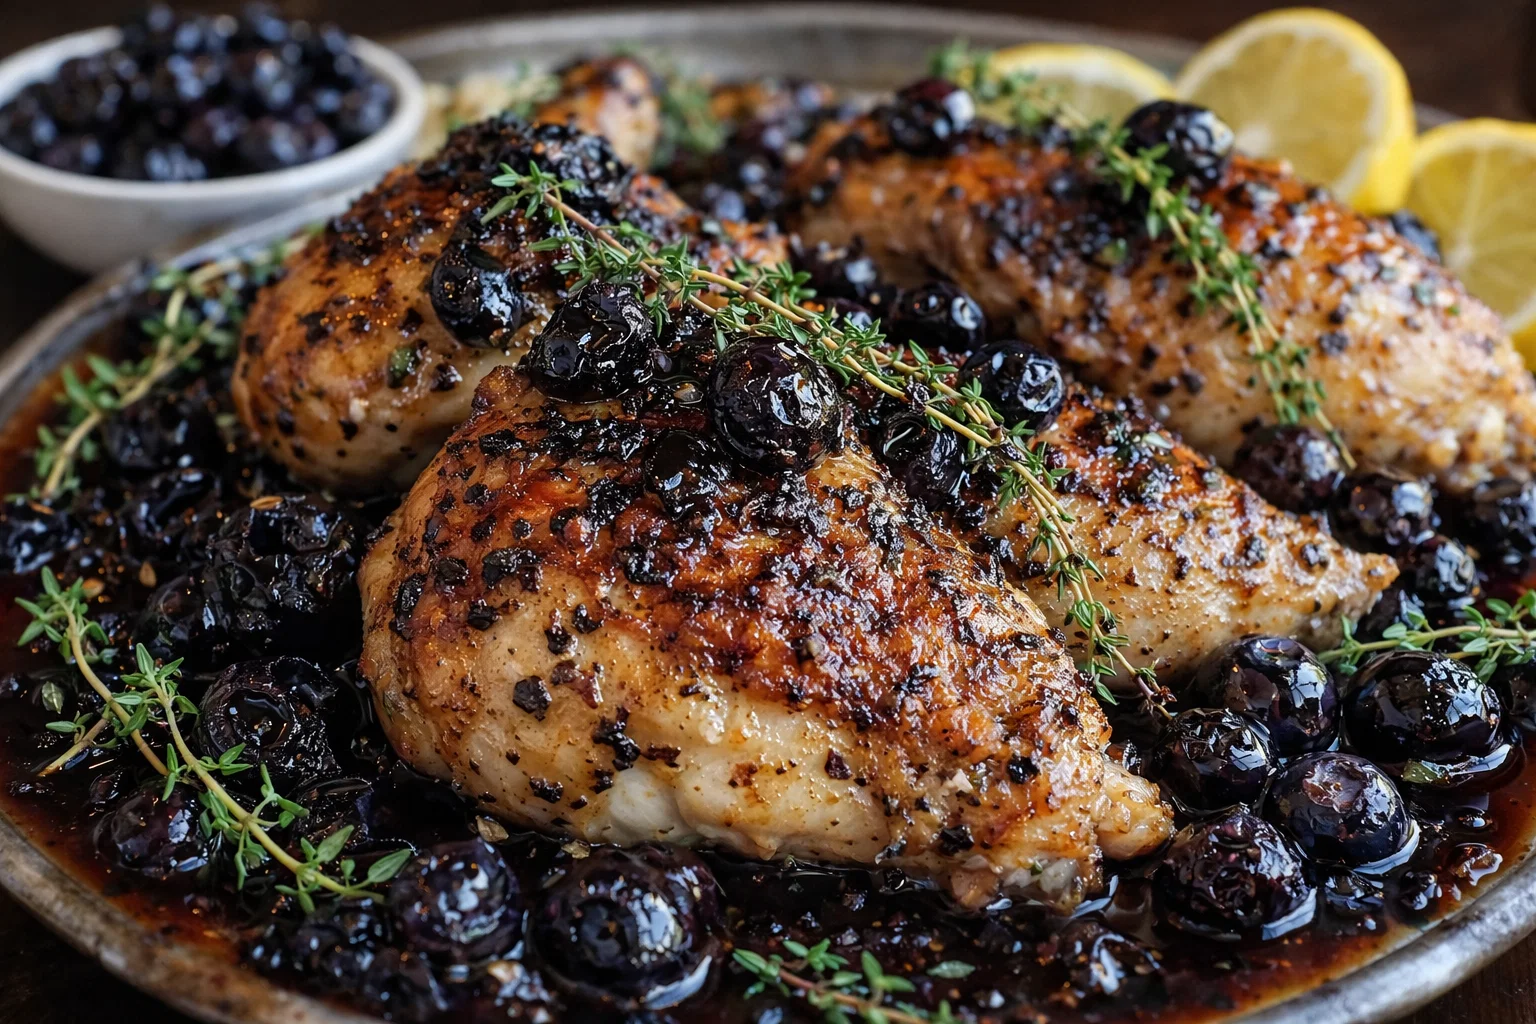
    Best-Ever Blueberry Thyme Chicken: A Tropical Delight

    Introduction to Best-Ever Blueberry Thyme Chicken

    Welcome to a culinary experience that combines succulent chicken with the vibrant flavors of blueberries and fresh thyme! This Best-Ever Blueberry Thyme Chicken recipe is not just a feast for the taste buds; it’s also a celebration of simplicity, health, and versatility. Perfect for home cooks, busy parents, food enthusiasts, and everyone in between, this dish stands out in the realm of chicken recipes for its harmonious blend of sweet and savory flavors.

    Imagine the juicy chicken breast marinated in a delightful mix of fresh thyme and ripe blueberries, creating an incredible depth of flavor that tantalizes the senses. This dish is incredibly simple to make, making it an excellent option for any weeknight dinner or a special occasion. Moreover, it caters to varying dietary needs, providing a gluten-free and low-calorie option. Packed with lean protein and antioxidants from the blueberries, this recipe supports a healthy lifestyle while satisfying your cravings.

    Whether you’re a busy professional juggling work and meals, a newlywed looking to impress, or a student eager to whip up something delicious in the kitchen, this blueberry thyme chicken is your go-to choice. Let’s embark on a culinary adventure, and dive into the many benefits, ingredients, and cooking techniques to ensure you’ll have the best-ever dish on your table!


    Benefits and Advantages of Best-Ever Blueberry Thyme Chicken

    The Best-Ever Blueberry Thyme Chicken is more than just a delightful meal; it’s designed with an array of benefits that make it a favorite among chicken recipes.

    Ease of Preparation

    One of the most significant advantages of this dish is how straightforward it is to prepare. With minimal ingredients and simple cooking techniques, you can have a gourmet meal ready in under 30 minutes. This makes it suitable for busy parents longing for a quick yet nutritious dinner, and professionals returning from a long day at work who want to eat well without spending hours in the kitchen.

    Health Benefits

    The health benefits of this recipe are impressive. Chicken breast is a lean source of protein, making it ideal for those monitoring their calorie intake. Add to that the vibrant blueberries, rich in vitamins, fiber, and powerful antioxidants, and you have a dish that not only fills your stomach but also boosts your immunity. Furthermore, thyme is packed with vitamins and contributes to digestive health, making this combination not just a treat for the palate but also beneficial for overall wellness.

    Versatile Recipe

    Whether you’re following a gluten-free diet or looking for low-calorie options, this blueberry thyme chicken is adaptable. You can substitute ingredients based on what you have available or your dietary preferences, making it suitable for vegan or vegetarian diets by replacing chicken with tofu or seitan. There’s something here for everyone, making it a wonderful addition to your collection of chicken recipes.

    As you prepare this delightful dish, you’ll notice that the aroma of fresh thyme pairs beautifully with the sweetness of the berries, creating an irresistible invitation to dine. Think of this recipe as a canvas—customize it to your tastes, and watch as it becomes a family favorite.


    Ingredients Overview

    Essential Ingredients for Best-Ever Blueberry Thyme Chicken

    To create the Best-Ever Blueberry Thyme Chicken, you will need the following ingredients:

    1. Chicken Breasts (4 pieces, boneless and skinless) – Lean protein source.

    2. Fresh Blueberries (1 cup) – Adds natural sweetness and antioxidants.

    3. Fresh Thyme (2 tablespoons, chopped) – Brings a fragrant herbal note.

    4. Olive Oil (2 tablespoons) – Healthy fat for marination and cooking.

    5. Garlic (2 cloves, minced) – Enhances flavor with its savory taste.

    6. Honey or Maple Syrup (2 tablespoons) – Optional for extra sweetness (use maple syrup for vegan version).

    7. Salt and Pepper (to taste) – Basic seasoning for enhancing flavors.

    8. Lemon Juice (juice of 1 lemon) – Adds acidity, balancing the sweetness of blueberries.

    9. Red Pepper Flakes (optional, ¼ teaspoon) – Provides subtle heat for a refreshing kick.

    Dietary Substitutions to Customize Your Best-Ever Blueberry Thyme Chicken

    Catering to various dietary needs? Consider these easy substitutions:

    • Vegan Option: Replace chicken with tofu, tempeh, or chickpeas. Marinate in the same blueberry-thyme mixture for delicious flavor.

    • Gluten-Free: This recipe is naturally gluten-free, but ensure that any additional sauces or condiments you use are gluten-free as well.

    • Low-Calorie: Use chicken breast for a leaner option or substitute half the chicken with zucchini slices to reduce calorie intake while still enjoying a flavorsome meal.

    • Sugar-Free: For a sugar-free version, skip the honey or syrup, and rely on the natural sweetness of the blueberries alone.

    By using these substitutions, you can easily accommodate diverse dietary preferences and ensure that everyone can enjoy your Best-Ever Blueberry Thyme Chicken!


    How to Prepare the Perfect Best-Ever Blueberry Thyme Chicken: Step-by-Step Guide

    Now that you’ve gathered your ingredients and made necessary substitutions, it’s time to prepare this amazing dish. Here is a step-by-step guide on how to create the Best-Ever Blueberry Thyme Chicken:

    1. Prepare the Marinade:
      In a medium-sized bowl, combine the olive oil, minced garlic, fresh thyme, honey or maple syrup, lemon juice, salt, and pepper. Whisk the ingredients together until well-blended.

    2. Marinate the Chicken:
      Place the chicken breasts in a large resealable plastic bag or a shallow dish. Pour the marinade over the chicken, ensuring it’s well coated. Seal the bag or cover the dish and refrigerate for at least 30 minutes to allow the flavors to infuse. For best results, marinate for 2-4 hours.

    3. Preheat the Oven or Grill:
      If you’re baking, preheat your oven to 375°F (190°C). Alternatively, if you prefer grilling, preheat the grill to medium-high heat.

    4. Combine Blueberries:
      While the chicken is marinating, prepare the blueberries. In a small pot over medium heat, combine the blueberries and a splash of water (just enough to prevent sticking). Cook until the berries start to burst and release their juices, about 5-7 minutes. Set aside.

    5. Cook the Chicken:
      If baking:

    6. Place the marinated chicken on a baking sheet lined with parchment paper.
    7. Bake in the preheated oven for 20-25 minutes, or until the internal temperature reaches 165°F (74°C).

    If grilling:
    – Place the marinated chicken breasts on the grill, cooking for approximately 6-7 minutes on each side, or until fully cooked.

    1. Add Blueberry Sauce:
      Once the chicken is cooked, drizzle the warm blueberry sauce over the top. If you’d like, also sprinkle some fresh thyme leaves for an alluring touch.

    2. Serve and Enjoy:
      Plate your blueberry thyme chicken with a side of your choice—think quinoa, roasted vegetables, or a fresh green salad. Enjoy the delightful medley of flavors!

    With these simple steps, you’re well on your way to impressing your family and friends with this stunning dish. Don’t hesitate to adapt the recipe further by incorporating your favorite flavors or side dishes—a true hallmark of wonderful chicken recipes!


    Mastering Best-Ever Blueberry Thyme Chicken: Advanced Tips and Variations

    While the Best-Ever Blueberry Thyme Chicken is fantastic as is, here are some advanced tips and variations to enhance your culinary masterpiece:

    1. Flavor Depth: Consider adding a splash of balsamic vinegar to the marinade for acidity and tang. It beautifully complements the sweetness of the blueberries and could elevate your dish.

    2. Herb Infusion: Besides thyme, experiment with other fresh herbs such as rosemary or basil to bring a unique flavor profile to your chicken.

    3. Fruit Variations: Replace blueberries with other berries like raspberries or strawberries for a different twist on this recipe.

    4. Cooking Techniques: Try cooking the chicken sous vide for perfectly tender results, allowing the chicken to absorb all the flavors of the marinade.

    5. Serve with Style: Create a visually appealing dish by garnishing with additional fresh berries and herbs when serving. It not only looks impressive but adds layers of flavor.

    6. Adding Greens: For added nutrition, toss in some spinach or arugula to the blueberry sauce just before serving to wilt the greens. This creates a vibrant and healthful complement.

    By indulging in these variations, you can master the art of preparing blueberry thyme chicken and impress anyone who joins you for dinner!


    How to Store Best-Ever Blueberry Thyme Chicken: Best Practices

    Storing leftovers from your Best-Ever Blueberry Thyme Chicken is straightforward, allowing for delicious meals long after the initial cooking.

    Refrigeration

    • Allow the chicken to cool to room temperature before placing it in an airtight container.
    • Refrigerate leftovers within two hours of cooking. Stored this way, your blueberry thyme chicken will stay fresh for up to 3-4 days.

    Freezing

    • If you want to preserve the dish for a longer period, consider freezing it. Wrap the chicken in plastic wrap and then place it in a freezer-safe container or bag.
    • Properly stored, your chicken can last in the freezer for up to 3 months.

    Reheating

    • For best results, thaw frozen chicken in the refrigerator overnight before reheating.
    • Reheat in the oven for about 15 minutes at 350°F (175°C) or in the microwave until heated through. Don’t forget to top with fresh blueberries or thyme before serving for an extra touch of freshness!

    Proper storage practices ensure that the savory flavors and health benefits of your blueberry thyme chicken remain intact, letting you enjoy this dish time and time again.


    Nutritional Value of Best-Ever Blueberry Thyme Chicken

    Understanding the nutritional value of your meals is key, especially when enjoying chicken recipes like this one. Here’s a breakdown of what each serving of Best-Ever Blueberry Thyme Chicken offers:

    • Calories: Approximately 285 per serving
    • Protein: 30g
    • Fat: 12g (with healthy fats from olive oil)
    • Carbohydrates: 12g (mainly from blueberries)
    • Fiber: 3g
    • Sugar: 5g
    • Vitamin C: 20% of Daily Value
    • Iron: 10% of Daily Value

    This dish is an excellent option for those seeking a low-calorie and high-protein meal. The combination of chicken with the nutritional bounty of blueberries and herbs aids in providing essential nutrients while keeping the calorie count to a minimum.

    Aside from its nutritional merits, this recipe is sure to please your palate while keeping you in line with your dietary goals—a win-win!


    FAQs: Frequently Asked Questions About Best-Ever Blueberry Thyme Chicken

    Can I use frozen blueberries in this recipe?

    Yes! Frozen blueberries work well for this recipe. Just be sure to thaw them and drain excess moisture to prevent a watery sauce.

    What can I serve with blueberry thyme chicken?

    Serve it with roasted vegetables, quinoa, or a refreshing green salad. The chicken pairs well with a variety of sides for a balanced meal.

    How can I make this dish spicy?

    For those who enjoy a kick, consider adding red pepper flakes or a dash of cayenne pepper to the marinade. This will give your chicken a lovely spicy twist.

    Is this recipe suitable for meal prep?

    Absolutely! The blueberry thyme chicken is perfect for meal prepping. Cook a batch on the weekend and portion it for healthy lunches throughout the week.

    How can I adjust the sweetness of the dish?

    You can easily control sweetness by adding more or less honey or maple syrup to the marinade. Alternatively, you could skip it altogether since the blueberries themselves provide a natural sweetness.

    With these frequently asked questions, we hope you’re armed with all the information you need to create the Best-Ever Blueberry Thyme Chicken with confidence!


    By embracing this recipe, you’ll not only explore new flavors but also introduce a healthy and adaptable dish into your culinary repertoire. Dive in and enjoy the process of cooking, and don’t forget to share your delicious creations with family and friends. Happy cooking!

  • Creamy Chicken Orzo With Spinach

    Creamy Chicken Orzo With Spinach

    Creamy Chicken Orzo With Spinach: A Tropical Delight

    Introduction to Creamy Chicken Orzo With Spinach

    Are you looking for a delicious and nutritious meal that fits seamlessly into a busy lifestyle? Look no further than Creamy Chicken Orzo With Spinach! This recipe embodies the essence of comfort food while being packed with essential nutrients, making it a stellar addition to your collection of chicken recipes. With creamy, dreamy textures complemented by wholesome spinach, this dish will not only please your taste buds but also support your health goals.

    This creamy chicken dish is versatile and can be tailored to suit various dietary preferences. Whether you are a busy parent juggling meal prep, a student navigating a hectic schedule, or simply someone trying to eat better, this recipe has you covered. It’s simple, allowing anyone to recreate it without a fuss, and it highlights ingredients that are both healthful and satisfying. Plus, its gluten-free and low-calorie adaptations mean that everyone can enjoy this recipe guilt-free.

    With minimal cooking time and straightforward preparation, your family will be sitting down to enjoy a delightful meal in no time. Imagine indulging in a rich, creamy orzo dish while sneaking in a hearty dose of spinach—a perfect blend of taste and health. Join us in discovering this tropical delight that can transport you from your kitchen to a sun-soaked paradise, captivating your senses with each bite!

    Benefits and Advantages of Creamy Chicken Orzo With Spinach

    When it comes to choosing the right chicken recipes, simplicity is key, and Creamy Chicken Orzo With Spinach checks all the boxes. Let’s explore some of the standout benefits that make this dish a must-try!

    1. Ease of Preparation

    This recipe is designed for home cooks of all levels. With just one pot required and straightforward steps, you can whip up this dish in under 30 minutes. Perfect for busy weeknights or a quick lunch, it ensures that you maximize your time in the kitchen while still serving an impressive meal. Even novice cooks can master this recipe without feeling overwhelmed.

    2. Health Benefits

    Spinach is a power-packed ingredient rich in vitamins and minerals, including Vitamin A, Vitamin C, and iron. It’s an excellent choice for anyone wanting to boost their health while indulging in comfort food. Additionally, orzo provides carbohydrates for energy, making this dish well-balanced. By incorporating lean chicken breast, you’ll enjoy a healthy dose of protein to support muscle growth and overall health.

    3. Dietary Versatility

    One of the best features of this recipe is its adaptability. It can be easily modified to cater to different dietary restrictions, making it inclusive for various eaters. For instance, by using gluten-free orzo or adding plant-based chicken, you can create a vegan-friendly version that retains the dish’s core flavors. This recipe serves as a canvas, allowing you to play with ingredients based on personal preferences or dietary guidelines.

    4. Family-Friendly Dish

    When it comes to chicken recipes, pleasing everyone at the table can sometimes be a challenge. This creamy chicken orzo dish is naturally appealing to both kids and adults alike. Its comforting texture and delicious flavor are often beloved by even the pickiest of eaters, making it an ideal family meal.

    5. Perfect for Meal Prep

    With its ability to store well, this dish is perfect for meal prep enthusiasts. Cook a larger batch at the start of the week, store it in portioned containers, and you’ll have nutritious meals to enjoy all week long. The flavors continue to develop even after a day in the fridge, ensuring your leftovers are just as delightful as the first serving.

    In summary, the benefits of making Creamy Chicken Orzo With Spinach extend beyond just a meal; they encompass health, variety, and ease of preparation. Whether your goal is to explore new chicken recipes or ensure everyone in your family enjoys a wholesome dish, this recipe is sure to satisfy.

    Ingredients Overview

    Essential Ingredients for Creamy Chicken Orzo With Spinach

    Here is a detailed list of ingredients you’ll need:

    • 1 lb chicken breast (boneless and skinless)
    • The lean protein source that makes this dish hearty.

    • 1 cup orzo pasta

    • The base of the dish that adds satisfying texture.

    • 3 cups fresh spinach

    • Vital for its nutrients and vibrant color.

    • 1 medium onion, chopped

    • Adds depth of flavor.

    • 3 cloves garlic, minced

    • Offers aromatic essence and robust flavor.

    • 2 cups chicken broth (low-sodium)

    • The cooking liquid, enhancing the orzo with flavor.

    • 1 cup heavy cream (or coconut cream for a vegan option)

    • For a creamy consistency that brings richness to the dish.

    • 1 tsp dried oregano

    • Imparts a pleasant aromatic quality.

    • Salt and pepper, to taste

    • Essential for seasoning.

    • Olive oil for sautéing

    • Adds healthy fats and flavor.

    Special Diet Options:

    • For gluten-free: Use gluten-free orzo or substitute with quinoa.
    • For vegan: Replace chicken with firm tofu, use vegetable broth, and coconut cream instead of heavy cream.

    Dietary Substitutions to Customize Your Creamy Chicken Orzo With Spinach

    Ingredient Swaps

    • Chicken: Replace with tofu or chickpeas for a vegetarian option.

    • Orzo: Swap with rice or quinoa for alternative grains.

    • Spinach: Kale or Swiss chard can work as substitutes if spinach isn’t available.

    • Heavy Cream: Use Greek yogurt or silken tofu blended with a bit of broth for a lighter creamy alternative.

    • Broth: Use vegetable broth instead of chicken broth for a vegan-friendly version.

    Flavor Boosts

    • Consider adding some crushed red pepper flakes for a spicy kick.
    • Squeeze fresh lemon juice to brighten the flavors before serving.
    • Incorporate sun-dried tomatoes for an added layer of flavor.

    By making these simple substitutions, you can tailor the Creamy Chicken Orzo With Spinach to fit your dietary needs or personal preferences while preserving the dish’s character and charm. As one of the go-to chicken recipes, this dish proves to be as flexible as it is delicious!

    How to Prepare the Perfect Creamy Chicken Orzo With Spinach: Step-by-Step Guide

    Ready to create your Creamy Chicken Orzo With Spinach? Follow this easy step-by-step guide, and in no time, you’ll have a soothing meal to enjoy. Let’s dive right into the cooking process!

    1. Prepare the Ingredients:
      Gather and measure all ingredients. Chop the onion and garlic, and cut the chicken breast into bite-sized pieces.

    2. Sauté the Chicken:
      In a large pot, heat 2 tablespoons of olive oil over medium heat. Add the chopped chicken breast to the pot, season with salt and pepper, and sauté until golden brown, about 5-7 minutes.

    3. Cook the Vegetables:
      Add the chopped onion and minced garlic to the pot. Sauté for 2-3 minutes until the onion becomes translucent.

    4. Add Orzo and Broth:
      Stir in the orzo, followed by the chicken broth and dried oregano. Bring to a boil, then reduce the heat to a simmer.

    5. Simmer Until Cooked:
      Cover the pot and simmer the mixture for approximately 10-12 minutes, or until the orzo is tender and most of the broth has been absorbed. Stir occasionally to prevent sticking.

    6. Incorporate the Spinach:
      Once the orzo is cooked, stir in the fresh spinach. Cook for another 2-3 minutes, until the spinach is wilted.

    7. Add Cream:
      Remove the pot from heat and stir in the heavy cream or coconut cream, mixing until fully integrated. Adjust seasoning with additional salt and pepper as desired.

    8. Serve and Enjoy:
      Serve the dish warm, garnished with a sprinkle of fresh herbs or Parmesan cheese if desired.

    With each step, feel free to modify the recipe according to your dietary preferences, ensuring everyone at your table can indulge in this delightful creamy orzo.

    Mastering Creamy Chicken Orzo With Spinach: Advanced Tips and Variations

    To take your Creamy Chicken Orzo With Spinach game to the next level, consider the following tips and variations!

    1. Herb Variations

    While dried oregano adds a wonderful flavor, experimenting with fresh herbs like basil or parsley also lends freshness to the dish. Add fresh herbs in the last few minutes of cooking to preserve their bright flavors.

    2. Cheese Variations

    Many love cheese in their creamy dishes, so adding a few tablespoons of grated Parmesan cheese at the end can create an extra layer of richness. Alternatively, sprinkle feta cheese on top before serving for a tangy twist.

    3. Add More Veggies

    To make your dish even heartier and nutritious, feel free to incorporate other vegetables such as bell peppers, carrots, or peas. Sauté them along with the onion for added texture and flavors.

    4. Try Different Proteins

    For variety, you can substitute the chicken with shredded rotisserie chicken, shrimps, or even cooked sausage. Each protein gives a delightful twist to the dish, turning it into a new culinary adventure.

    5. Spice it Up

    If you’re a fan of spicy food, adding some cayenne pepper or similar seasoning can elevate the dish into a fiery delight.

    Incorporating these variations will not only keep the recipe fresh but also allow you to experiment with flavors as you learn more about cooking delicious chicken recipes.

    How to Store Creamy Chicken Orzo With Spinach: Best Practices

    Storing leftovers properly is crucial to maintaining the quality and flavor of your Creamy Chicken Orzo With Spinach. Follow these guidelines to keep this dish fresh and tasty:

    1. Refrigeration

    Allow the dish to cool to room temperature before transferring it into an airtight container. It can be stored in the refrigerator for about 3-4 days.

    2. Freezing

    If you want to freeze this creamy dish, it’s best to do so before adding the cream. Store the cooked orzo with chicken and spinach in a freezer-safe container for up to three months. When you’re ready to enjoy it, thaw overnight in the fridge and reheat with the cream added fresh.

    3. Reheating

    Reheat your leftovers in the microwave or on the stovetop. If it seems too thick, don’t hesitate to stir in a little additional chicken broth or water to loosen it up. Be careful not to overheat, as it might dry out.

    By following these storage recommendations, you can enjoy your Creamy Chicken Orzo With Spinach even after the initial cooking session, making it one of the most convenient chicken recipes to prepare for busy weeks ahead!

    Nutritional Value of Creamy Chicken Orzo With Spinach

    Eating well-balanced meals is essential for maintaining a healthy lifestyle. Here’s a general breakdown of the nutritional value of a serving (approximately 1.5 cups) of Creamy Chicken Orzo With Spinach:

    • Calories: Approximately 450 kcal
    • Total Fat: 15g
    • Saturated Fat: 8g
    • Cholesterol: 70mg
    • Sodium: 400mg (depends on salted broth)
    • Total Carbohydrates: 45g
    • Dietary Fiber: 2g
    • Sugars: 3g
    • Protein: 35g

    Health Insights

    • Protein-Packed: Each serving offers a robust protein dose, crucial for muscle repair and growth.
    • Low-Calorie Options: For a lighter version, consider using less cream and more vegetables, which can reduce calories per serving significantly.
    • Vitamins and Minerals: The spinach provides a wealth of essential nutrients that promote healthy skin, immunity, and overall well-being.

    Always check ingredient brands for specific nutritional information, as variations can occur based on what you include in your recipe.

    Overall, this creamy chicken dish not only satisfies your taste buds but also keeps your nutritional needs in check, solidifying its standing in your favorite chicken recipes.

    FAQs: Frequently Asked Questions About Creamy Chicken Orzo With Spinach

    1. Can I make this recipe ahead of time?

    Yes! You can prepare the dish in advance, making it perfect for meal prep. Store it in the refrigerator for up to 3-4 days, or freeze it before adding the cream for longer-term storage.

    2. What can I use instead of chicken?

    For a vegetarian option, you can replace the chicken with tofu, chickpeas, or another plant-based protein that will complement the creamy orzo.

    3. Is orzo gluten-free?

    Traditional orzo is made from wheat flour, making it unsuitable for those with celiac disease or gluten intolerances. However, gluten-free orzo is available in many grocery stores, allowing you to enjoy this dish without worry.

    4. How can I make this recipe spicier?

    To give the dish a kick, include some red pepper flakes, cayenne pepper, or even a dash of hot sauce during cooking.

    5. Can I add more veggies to this dish?

    Absolutely! Feel free to add chopped bell peppers, zucchini, or carrots for additional nutrition and texture. Sauté them with the onion for the best results.

    6. What’s the best way to reheat leftovers?

    Reheat in the microwave or over the stovetop, adding a splash of chicken broth or water if it appears too thick. Take care not to overheat to maintain its creamy texture.

    With these answers and tips, you’re set to tackle any questions that might arise while preparing this beloved dish. Don’t hesitate to explore and make this recipe your own, as Creamy Chicken Orzo With Spinach serves as a fantastic choice within the realm of comforting chicken recipes!

    In conclusion, Creamy Chicken Orzo With Spinach is more than just a dish; it’s an invitation to enjoy wholesome ingredients, creativity in the kitchen, and a cozy meal with loved ones. Easy to make and customizable, this recipe is undoubtedly a keeper for busy people looking to enjoy delicious and nutritious meals. So grab your ingredients and embrace the joy of cooking!

  • Spicy Brazilian Coconut Chicken

    Spicy Brazilian Coconut Chicken

    Spicy Brazilian Coconut Chicken: A Tropical Delight

    Introduction to Spicy Brazilian Coconut Chicken

    Welcome to the world of Spicy Brazilian Coconut Chicken, a dish that encapsulates the vibrant flavors of Brazil right in your kitchen! This exotic recipe not only excites your taste buds but also fits various dietary needs—making it a perfect fit for all cooks, from home chefs to busy parents. Packed with the goodness of chicken, coconut milk, and a mix of spices, this dish is incredibly simple to prepare yet sophisticated enough to impress your guests.

    What sets this recipe apart from other chicken recipes is its unique blend of spicy and creamy elements, which provides a mouthwatering flavor profile. Ideal for a quick dinner or a special gathering, you don’t need to be a culinary expert to create this masterpiece. Plus, it’s gluten-free and can be easily adapted for those seeking vegetarian options. Whether you’re a student cooking for the first time or a food enthusiast trying to explore global cuisines, this recipe is sure to inspire you.

    Health-wise, chicken is an excellent source of lean protein, and when combined with nutrient-rich coconut milk, you’re not just indulging in a flavorful meal; you’re nourishing your body too. So if you’re ready to embark on a cooking adventure, let’s dive into this incredible recipe that will transport you to a tropical paradise.

    Benefits and Advantages of Spicy Brazilian Coconut Chicken

    Ease of Preparation

    One of the most attractive features of Spicy Brazilian Coconut Chicken is its straightforward preparation. This chicken recipe requires just a few essential ingredients, many of which you may already have at home. Whether you are short on time or simply looking for a dish that doesn’t demand hours of prep, this one fits the bill perfectly. The simplicity of the cooking method allows even novice cooks to achieve flavorful results without feeling overwhelmed.

    Health Benefits

    This dish is not only easy to make but also nutritious and satisfying. Chicken is known for being a low-fat, high-protein food option, making it a great choice for health-conscious individuals. The addition of coconut milk not only adds a creamy texture but also provides medium-chain triglycerides (MCTs), which can be beneficial for energy and metabolism. Furthermore, the spices used in this recipe, such as cayenne pepper and turmeric, contain anti-inflammatory properties, further enhancing the health benefits of this meal.

    Versatility

    Another significant advantage of this dish is its versatility. You can easily modify it to meet various dietary preferences and restrictions. If you’re vegan, you can substitute chicken with tofu or vegetables. Just make sure to select a plant-based coconut milk to keep it dairy-free and rich. On the other hand, if you have gluten sensitivities, worry not—this recipe naturally avoids gluten ingredients, making it suitable for everyone.

    Whether you’re preparing a family dinner, a cozy date night, or meal prepping for the week, Spicy Brazilian Coconut Chicken stands out among other chicken recipes. So, gather your ingredients and let’s get cooking!

    Ingredients Overview

    Essential Ingredients for Spicy Brazilian Coconut Chicken

    Here’s everything you need to make the perfect Spicy Brazilian Coconut Chicken. Each ingredient is selected for its flavor, nutritional value, and ability to complement the others harmoniously.

    • Chicken thighs (4 pieces, boneless and skinless): Chicken thighs are juicier and more flavorful than breasts, giving your dish a richer taste. (For a vegan substitute, use firm tofu—approximately 14 ounces, pressed and cubed.)

    • Coconut milk (1 can, full-fat): This is the heart of the recipe, providing a creamy base and a slight sweetness that balances the spice. (For a lighter option, use light coconut milk.)

    • Red chili peppers (2, diced): For those who love heat, fresh chili peppers elevate the spice level of the dish. Adjust to your taste.

    • Garlic (4 cloves, minced): Adds depth and aroma, enhancing the overall flavor profile.

    • Onion (1 large, diced): Sautéing onions is a common technique to create a flavorful foundation for stews and sauces.

    • Ginger (2 inches, grated): A fantastic complement to the coconut, it adds a touch of warmth and spiciness.

    • Turmeric powder (1 teaspoon): Not only for color, but turmeric also contributes anti-inflammatory benefits to your dish.

    • Cumin (1 teaspoon): Ground cumin adds a warm, earthy note that pairs well with the other spices.

    • Salt (to taste): Essential for enhancing the flavors of all the ingredients.

    • Olive oil (2 tablespoons): Used for sautéing the chicken and vegetables, providing healthy fats.

    • Fresh cilantro for garnishing (optional): Adds a fresh, vibrant touch to the finished dish.

    Dietary Substitutions to Customize Your Spicy Brazilian Coconut Chicken

    Making this Spicy Brazilian Coconut Chicken dish inclusive for everyone can easily be done with a few substitutions:

    1. Chicken Replacement: As mentioned before, for a vegan alternative, substitute chicken with tofu or chickpeas. Use 14 ounces of firm tofu or 1 can of drained chickpeas.

    2. Coconut Milk Options: Those looking to reduce calories can substitute light coconut milk for the full-fat version while maintaining creaminess. Coconut cream is also another option for an even richer flavor.

    3. Gluten-free Options: The recipe is already gluten-free, but make sure any additional sauces or sides are checked for gluten content.

    4. Spice Level: Adjust the number of red chili peppers according to your personal heat preference—remove the seeds for a milder taste or add additional spices if you’re looking for a fiery kick.

    5. Herb Variations: If coriander isn’t to your taste, you can use fresh parsley or omit it altogether.

    With these changes, you can easily cater this dish to suit nearly any dietary requirement!

    How to Prepare the Perfect Spicy Brazilian Coconut Chicken: Step-by-Step Guide

    Now that you have all your ingredients ready, let’s walk through the preparation of this delectable Spicy Brazilian Coconut Chicken.

    1. Prepare the Base: In a large skillet, heat 2 tablespoons of olive oil over medium heat.

    2. Sauté the Onions and Garlic: Add 1 large diced onion and 4 minced garlic cloves to the skillet. Sauté until the onions become translucent, about 3-4 minutes.

    3. Add the Chicken: Place 4 boneless chicken thighs in the skillet. Season with salt to taste and sauté them until they are browned on both sides (about 5-7 minutes).

    4. Incorporate Spices: Sprinkle in 1 teaspoon of turmeric and 1 teaspoon of cumin. Stir to coat the chicken thoroughly, allowing the spices to toast for about 1-2 minutes.

    5. Add Coconut Milk: Pour in 1 can of full-fat coconut milk along with 2 diced red chili peppers. Stir well to combine.

    6. Simmer the Mixture: Bring the mixture to a gentle simmer. Cover the pan and let it cook for about 15-20 minutes, or until the chicken reaches an internal temperature of 165°F (75°C).

    7. Check for Seasoning: Taste the sauce and adjust the seasoning as needed with more salt or additional spices.

    8. Serve: Once done, remove the skillet from heat. Optionally, garnish with freshly chopped cilantro before serving.

    9. Pairing Suggestions: Serve your Spicy Brazilian Coconut Chicken over steamed white rice, quinoa, or cauliflower rice for a healthier option.

    Feel free to modify these steps according to your personal taste and dietary needs, ensuring that every bite is as delightful as you would like it to be!

    Mastering Spicy Brazilian Coconut Chicken: Advanced Tips and Variations

    For those looking to elevate their cooking skills or experiment a bit further, here are some advanced tips and variations to take your Spicy Brazilian Coconut Chicken to the next level:

    • Infuse Other Flavors: Consider adding a tablespoon of lime juice for a zesty kick. You can mix this in just before serving for a fresh touch.

    • Vegetable Additions: To turn this recipe into a full meal packed with nutrition, include vegetables like bell peppers, spinach, or snap peas. Sauté them along with the onions.

    • Slow Cooker Method: For extra convenience, try a slow cooker version. Simply add the browned chicken and all other ingredients to the slow cooker, cover, and cook on low for 6-8 hours.

    • Make it a Soup: If you prefer a soupier consistency, add more coconut milk or chicken broth. This makes for a deliciously spicy coconut soup that’s perfect on cooler days.

    • Garnish Creatively: While cilantro is an excellent garnish, grated fresh coconut or crispy fried onions can also add texture and flavor.

    By experimenting with these variations and tips, you’ll find even more ways to enjoy and perfect your Spicy Brazilian Coconut Chicken!

    How to Store Spicy Brazilian Coconut Chicken: Best Practices

    Storing your leftovers correctly can make a world of difference in maintaining the flavor and texture of your Spicy Brazilian Coconut Chicken. Follow these guidelines for proper storage:

    1. Refrigeration: Allow the chicken to cool down to room temperature before transferring it to an airtight container. Store it in the refrigerator for up to 3-4 days.

    2. Freezing: If you want to keep it for a longer period, transfer the cooled chicken into a freezer-safe container. It can safely be frozen for about 3-4 months. When ready to eat, simply thaw in the refrigerator overnight before reheating.

    3. Reheating: To reheat, you can either microwave it in short intervals, stirring in between, or warm it on the stovetop. If the sauce has thickened, feel free to add a splash of coconut milk or chicken broth to loosen it.

    By following these storage tips, you can enjoy your Spicy Brazilian Coconut Chicken days or weeks later without sacrificing quality!

    Nutritional Value of Spicy Brazilian Coconut Chicken

    Understanding the nutritional value of your meals is crucial, especially for those monitoring their dietary intake. Below is the approximate nutritional breakdown for Spicy Brazilian Coconut Chicken based on a serving size of one chicken thigh with sauce (without rice):

    • Calories: 320
    • Protein: 24g
    • Fat: 22g (of which saturated fat is 14g)
    • Carbohydrates: 10g
    • Fiber: 2g
    • Sugar: 3g
    • Sodium: 500mg (depending on the amount of salt added)

    This dish provides a balanced macronutrient profile thanks to the combination of lean poultry and healthy fats from coconut milk, making it an excellent choice for those looking to maintain a healthy lifestyle.

    Keep in mind, if you adjust ingredient quantities, the nutritional content will vary, so always recalculate based on your specific ingredients.

    FAQs: Frequently Asked Questions About Spicy Brazilian Coconut Chicken

    1. Can I use chicken breasts instead of thighs?

    Absolutely! Chicken breasts can be used, but they might become drier compared to thighs due to their lower fat content. Adjust the cooking time accordingly to ensure they remain tender.

    2. Is this recipe suitable for meal prep?

    Yes! Spicy Brazilian Coconut Chicken is perfect for meal prepping. Just make a larger batch, store in single-serving containers, and reheat throughout the week.

    3. Can I make this dish vegetarian?

    Certainly! Replace chicken with tofu, chickpeas, or a mix of sturdy vegetables like cauliflower and sweet potatoes to create a lovely vegetarian version.

    4. How spicy is this dish?

    The spice level is adjustable based on your preference. You can reduce the number of chili peppers or omit them altogether.

    5. What sides pair well with this dish?

    This dish pairs wonderfully with steamed white rice, brown rice, quinoa, or even naan bread to soak up the flavorful sauce.

    6. Can I freeze leftovers?

    Yes, you may freeze leftovers for up to 3-4 months in an airtight container. Just remember to thaw it in the refrigerator before reheating.

    7. How can I ensure my coconut chicken doesn’t curdle?

    To prevent curdling, avoid cooking over direct high heat once you’ve added the coconut milk. Instead, allow it to simmer gently.

    By addressing these questions, you can create a seamless cooking experience with your Spicy Brazilian Coconut Chicken.


    This comprehensive, easy-to-follow recipe is not only a culinary delight but also a nutritional powerhouse that can cater to everyone’s dietary needs. So what are you waiting for? It’s time to gather those ingredients and make an unforgettable meal that brings the tropical flavors of Brazil to your table! Enjoy your cooking adventure with this enticing chicken recipe!

  • Thai Chicken Bites

    Thai Chicken Bites

    Thai Chicken Bites: A Tropical Delight

    Introduction to Thai Chicken Bites

    If you’re searching for simple yet flavorful chicken recipes, look no further than Thai Chicken Bites! These delightful morsels pack a punch of exotic flavors and offer a wonderful balance between being both low calorie and satisfying. Easy to make, these bites are ideal for busy weeknights or as a show-stopping appetizer at your next gathering. The combination of tender chicken, zesty herbs, and a hint of spice makes for a dish that is not only healthy but also pleasing to the palate.

    What makes this recipe particularly special is its versatility. Whether you’re a vegan seeking substitutions or someone on a gluten-free diet, Thai Chicken Bites can be tailored to fit your dietary needs. High in protein yet low in carbs, they provide an excellent nutrient boost for everyone—from busy professionals to enthusiastic home cooks. Moreover, it’s a great way to introduce flavors from Southeast Asia into your kitchen without overly complicated techniques or hard-to-find ingredients. These bites are sure to inspire kitchen creativity while keeping health at the forefront.

    Let’s dive deeper into why these chicken recipes shine and how you can create your own successful dish!

    Benefits and Advantages of Thai Chicken Bites

    One of the best aspects of Thai Chicken Bites is their simplicity. With just a few ingredients and minimal preparation time, these little treats can come together quickly. Even busy parents juggling a million tasks can whip this up in no time, making it the perfect choice for dinner. Plus, they can be enjoyed by anyone—from health-conscious individuals seeking lower-calorie meals to foodies looking to indulge in rich flavors.

    Health Benefits

    Thai Chicken Bites not only satiate your taste buds but also contribute to a balanced diet. Chicken is an excellent source of lean protein, which is essential for muscle repair and growth. When coupled with vibrant vegetables and fresh herbs, these bites become a powerhouse of vitamins and minerals. Herbs like basil and cilantro provide antioxidant benefits, while ingredients like ginger and garlic can boost your immune system.

    Furthermore, these treats are easily adaptable. If you’re looking for a gluten-free option, simply substitute soy sauce with tamari. For a vegan alternative, replacing chicken with tofu or chickpeas can yield equally satisfying results. The breadth of dietary options ensures that no one has to miss out on the deliciousness of these bites.

    Last but not least, the vibrant flavors of Thailand elevate these chicken recipes beyond everyday meals. The ease of preparation means that you can recreate a piece of your travels or introduce new culinary experiences to your dining table without much fuss!

    Ingredients Overview

    Essential Ingredients for Thai Chicken Bites

    Here’s a detailed list of all the ingredients you’ll need for crafting these tantalizing Thai Chicken Bites:

    • 1 pound boneless, skinless chicken breast: Lean protein that serves as the main ingredient.
    • 2 tablespoons soy sauce (or tamari for gluten-free version): Adds umami flavor.
    • 1 tablespoon fish sauce (optional for depth): Complements the other flavors wonderfully.
    • 1 tablespoon lime juice: Brightens the dish with acidity.
    • 2 cloves garlic, minced: Offers a punch of flavor.
    • 1 teaspoon fresh ginger, grated: Provides a spicy, aromatic flavor.
    • 1 tablespoon brown sugar: Balances the salty and sour elements.
    • 1 tablespoon cornstarch or arrowroot powder: Helps create a crispy coating.
    • Fresh cilantro or basil for garnish: For a refreshing finish.
    • Oil for cooking (vegetable or coconut): Necessary for frying or sautéing.

    This recipe is designed to cater to various dietary preferences, as the chicken can easily be replaced with tofu, tempeh, or chickpeas for vegans. Moreover, ensuring that the sauces used are gluten-free makes this dish accessible to individuals with sensitivities.

    Dietary Substitutions to Customize Your Thai Chicken Bites

    Being adaptable is one of the fantastic features of Thai Chicken Bites. Here are some suggested substitutions to customize your recipe to suit dietary needs:

    • Vegetarian/Vegan: Replace chicken with firm tofu, tempeh, or a combination of chickpeas and vegetables.
    • Gluten-Free: Use tamari instead of soy sauce. For the coating, make sure to use a gluten-free cornstarch or flour mix.
    • Lower Calorie: Use skinless chicken thighs instead of breasts for added flavor without excessive calories. You may also opt for an air-frying method instead of frying.
    • Spice Adjustments: For a mild flavor, omit the ginger or use less. Conversely, if you prefer a bit more heat, add red pepper flakes or diced chilies into the mix.

    These swaps not only accommodate different dietary preferences but also keep the essence of the dish while accommodating individual tastes. Crafting your own version can elevate the culinary experience and ensure that everyone at the table is satisfied!

    How to Prepare the Perfect Thai Chicken Bites: Step-by-Step Guide

    Ready to dive into the kitchen? Let’s walk through a straightforward step-by-step guide for making these amazing Thai Chicken Bites. Follow these instructions closely for optimal results!

    1. Prepare the Base: Begin by cutting the chicken breast into bite-sized cubes (about 1-inch pieces). Place them in a medium bowl. If you’re using tofu, ensure it’s pressed and cubed to achieve a perfect texture.

    2. Mix Marinade Ingredients: In another bowl, combine the soy sauce (or tamari), fish sauce (if using), lime juice, minced garlic, grated ginger, and brown sugar. Stir until the sugar is fully dissolved.

    3. Marinate the Chicken: Pour the marinade over the chicken pieces. Make sure every piece is thoroughly coated. Cover the bowl and let it marinate for at least 30 minutes in the refrigerator. This step allows the flavors to meld beautifully.

    4. Coat the Chicken Bites: After marinating, remove the chicken from the refrigerator. Sprinkle the cornstarch over the chicken and toss to coat evenly. This will give the chicken a crispy texture once cooked.

    5. Heat the Oil: In a large skillet or frying pan, heat about 2-3 tablespoons of oil over medium-high heat. Make sure the oil is hot enough for frying to ensure a golden-brown exterior.

    6. Cook the Chicken: Once the oil is hot, carefully add the chicken pieces to the pan in a single layer. Avoid overcrowding; you may need to cook them in batches. Sauté for about 3-4 minutes on each side, or until the chicken is golden brown and cooked through.

    7. Garnish and Serve: Once cooked, transfer the chicken bites to a paper towel-lined plate to absorb excess oil. Garnish with freshly chopped cilantro, and serve warm with lime wedges for an extra zing.

    These steps are straightforward and easy to follow, catering to various preparation skills. You can also encourage your family or friends to join you in this culinary adventure, making it a fun and interactive experience!

    Mastering Thai Chicken Bites: Advanced Tips and Variations

    To elevate your cooking game, consider these advanced tips and flavor variations to make your Thai Chicken Bites even more exciting:

    • Add Crunch: For extra texture, consider adding finely chopped cashews or peanuts in the final garnish. The crunch will contrast beautifully with the tender chicken.
    • Herb Enhancements: Incorporate other herbs such as Thai basil or mint for a refreshing twist. These will highlight the tropical theme while enhancing flavors.
    • Onion and Peppers: Sweet bell peppers or onions can be sautéed along with the chicken, adding color and additional flavor without much additional effort.
    • Dipping Sauces: Serve your Thai Chicken Bites with a side of peanut sauce or sweet chili sauce to enhance the flavor and give your guests a fun way to enjoy the bites.
    • Make It a Meal: Serve the chicken bites over rice, quinoa, or lettuce wrap for a complete meal instead of just an appetizer.

    These tips serve to inspire experimentation and creativity in the kitchen, allowing your Thai Chicken Bites to become a signature dish that you can call your own!

    How to Store Thai Chicken Bites: Best Practices

    Proper storage of your Thai Chicken Bites can extend their deliciousness for later enjoyment. Here are some best practices:

    • Refrigeration: Allow any leftover bites to cool completely before storing them in an airtight container in the refrigerator. Properly stored, they can last for up to 3 days.
    • Freezing: If you prefer to make these bites in advance, place them in a single layer on a baking sheet to freeze them individually before transferring to a freezer-safe bag. They can be frozen for up to 3 months.
    • Reheating: To reheat, simply place them in a skillet over medium heat until warmed through. Alternatively, an air fryer can provide a crispy texture that’s almost as good as fresh!

    Storing and reheating your Thai Chicken Bites is easy, ensuring you can enjoy them at your convenience without sacrificing quality.

    Nutritional Value of Thai Chicken Bites

    Thai Chicken Bites are not only delicious but also nutritious. Here’s a breakdown of the nutritional value per serving (based on a standard serving size of 4 bites):

    • Calories: Approximately 200-250 kcal
    • Protein: Approximately 25-30g
    • Total Fat: 8-12g (primarily from cooking oil)
    • Carbohydrates: 8-10g
    • Fiber: 1-2g
    • Sugar: 2-5g

    This nutritional profile highlights the high protein content and relatively low calorie count, making Thai Chicken Bites a fantastic option for anyone watching their diet.

    With their vibrant flavors and satisfying texture, they’re a fulfilling choice for any meal. Plus, substituting ingredients can further enhance the nutritional content, catering to your individual health needs!

    FAQs: Frequently Asked Questions About Thai Chicken Bites

    Here are some common questions related to Thai Chicken Bites, along with concise answers to help clarify any uncertainties you may have:

    1. Can I make Thai Chicken Bites ahead of time?

    Yes! You can prepare the marinade and marinate the chicken a day in advance for deeper flavor. Just store in the fridge until you’re ready to cook.

    2. What can I serve with Thai Chicken Bites?

    These bites pair well with jasmine rice, quinoa, or fresh lettuce leaves. You can also serve a side of fresh veggies or a salad for a comprehensive meal.

    3. Are Thai Chicken Bites spicy?

    The spiciness level is primarily determined by the ginger and optional chili flakes. Adjust these ingredients to suit your preference for heat.

    4. Can I make these bites in an air fryer?

    Absolutely! Air frying is an excellent alternative to pan frying as it uses less oil while still achieving a crispy texture. Preheat the air fryer and cook at 375°F for about 10-12 minutes.

    5. Is there a gluten-free version available?

    Yes! Simply replace soy sauce with tamari, and ensure that all ingredients, particularly processed ones, are gluten-free.

    These FAQs aim to address any doubts and encourage kitchen experimentation, inviting everyone to create their unique version of Thai Chicken Bites!


    In conclusion, Thai Chicken Bites embody a delightful harmony of taste and health, making them an ideal choice for anyone looking to explore delectable chicken recipes. With their ease, versatility, and adaptability, these bites can effortlessly complement any dietary need. So gather your ingredients, follow the simple steps, and enjoy a taste of Thailand right at home! Happy cooking!

  • Turkish Chicken with Creamy White Sauce

    Turkish Chicken with Creamy White Sauce

    Turkish Chicken with Creamy White Sauce: A Tropical Delight

    Introduction to Turkish Chicken with Creamy White Sauce

    Welcome to a culinary adventure that takes you to the vibrant streets of Turkey with our delightful Turkish Chicken with Creamy White Sauce. This dish is not just about taste; it’s a symphony of flavors that brings together aromatic spices and creamy textures in a way that will have your taste buds dancing. Ideal for busy parents, students, and anyone who craves a hearty meal without spending hours in the kitchen, this recipe is simplicity in action.

    This dish is also versatile; it adapts well to various dietary preferences such as gluten-free, low-calorie, and even vegan diets. Whether you are a working professional seeking quick dinner ideas or a newlywed wanting to impress your partner, this creamy chicken recipe stands out in the crowded world of chicken recipes. The best part? It’s packed with nutrients, ensuring that every bite contributes to your health and wellness goals.

    Indulging in Turkish Chicken with Creamy White Sauce means treating yourself to a meal that’s rich in flavor and subtle enough to cater to your dietary needs. Let’s dive deeper into the many benefits, ingredients, and preparation methods that make this dish a must-try for anyone looking to explore new chicken recipes.

    Benefits and Advantages of Turkish Chicken with Creamy White Sauce

    There are countless reasons to fall in love with Turkish Chicken with Creamy White Sauce. First and foremost, this dish shines when it comes to ease of preparation. In just under an hour, you can bring a flavorful meal to your table, making it perfect for nights when you want something delicious but don’t have much time. With busy weeknights and chaotic schedules, it’s comforting to have a recipe that streamlines the cooking process.

    Health benefits are another significant advantage. Chicken is a lean protein source that helps build and repair body tissues. Coupled with the nutritious ingredients in the creamy white sauce—such as yogurt and herbs—this dish becomes not only flavorful but also packed with essential nutrients. Think calcium, probiotics, and vitamins that support your immune system and overall health.

    The cultural aspect of this recipe also adds to its charm. It’s a beautiful representation of Turkish cuisine, showcasing the herbs, spices, and cooking techniques famous in the region. The creamy white sauce elevates the dish, making it satisfying while accommodating various tastes. If you’re a traveler or a food enthusiast, this dish can transport you to a bustling Turkish market with every forkful.

    Variations to cater to different tastes are abundant, providing you the opportunity to tailor the recipe to meet the preferences of your family or guests. Enhance your cooking repertoire and create memorable meals with this delightful chicken recipe! Simply put, the advantages of making Turkish Chicken with Creamy White Sauce are numerous—it’s a culinary experience you won’t want to miss.

    Ingredients Overview

    Essential Ingredients for Turkish Chicken with Creamy White Sauce

    To create this delectable Turkish Chicken with Creamy White Sauce, gather the following ingredients:

    • Chicken Breasts: 4 boneless, skinless chicken breasts – A lean protein option that’s perfect for a healthy meal.

    • Yogurt: 1 cup plain yogurt (substitute with Greek yogurt for a thicker sauce) – Adds creaminess and tang, packed with probiotics.

    • Heavy Cream: ½ cup – Provides richness to the sauce. Speeds up the cooking process while maintaining a creamy texture.

    • Olive Oil: 2 tablespoons – A source of healthy fat that enhances flavor and helps in sautéing the chicken.

    • Garlic: 4 cloves, minced – Infuses the dish with an aromatic, savory flavor.

    • Onion: 1 medium onion, finely chopped – Adds sweetness and depth of flavor.

    • Lemon Juice: 2 tablespoons – Brightens up the dish and adds a zesty kick.

    • Parsley: ¼ cup, chopped – A fresh herb that lends color and freshness to the sauce.

    • Spices:

    • Paprika: 1 teaspoon – A smoky flavor that complements the dish.
    • Cumin: 1 teaspoon – Adds earthiness and warmth.
    • Salt and Pepper: To taste – Essential for balancing the flavors.

    Dietary Considerations:
    Vegan Alternative: Replace chicken with tofu or chickpeas and use coconut yogurt instead of dairy yogurt for a creamy texture.
    Gluten-Free: This recipe is gluten-free as written. Ensure that any broth or sauces used separately are certified gluten-free.
    Low-Calorie Option: Use chicken thighs for a more succulent choice, or opt for skinless chicken breasts for a lighter option.

    Dietary Substitutions to Customize Your Turkish Chicken with Creamy White Sauce

    1. Protein Substitutes:
    2. For a vegetarian option, substitute chicken with tofu, chickpeas, or even seitan.
    3. For seafood lovers, shrimp could be used instead of chicken for a hearty variation.

    4. Dairy Alternatives:

    5. Use plant-based yogurts made from almond or soy instead of dairy yogurt.
    6. Replace heavy cream with coconut cream or use a blend of cashews and water for a homemade alternative.

    7. Spice Variations:

    8. Feel free to experiment with different spices like turmeric for added health benefits or chili flakes for extra heat.
    9. For a milder flavor, omit the cumin and focus on herbs like thyme or oregano.

    10. Acidity Adjustments:

    11. If lemon isn’t your preference, vinegar (such as apple cider vinegar) can also provide the needed acidity to balance the creamy sauce.

    12. Herb Substitutes:

    13. If you don’t have parsley, cilantro can be a refreshing substitute that complements the dish well.

    By customizing these ingredients, you can cater to various dietary restrictions and create a dish that suits your needs without compromising on flavor.

    How to Prepare the Perfect Turkish Chicken with Creamy White Sauce: Step-by-Step Guide

    Preparing Turkish Chicken with Creamy White Sauce is a straightforward process that even novice cooks can master. Follow these simple steps:

    1. Prepare the Chicken: Start by trimming any excess fat from the chicken breasts. Pat them dry with a paper towel and season generously with salt and pepper. This preparation helps enhance the overall flavor of the dish.

    2. Cook the Chicken: Heat olive oil in a large skillet over medium heat. Once the oil is hot, carefully add the chicken breasts. Cook each side for about 5 to 7 minutes, or until the chicken is golden brown and fully cooked through. Remove the chicken and set it aside.

    3. Sauté the Vegetables: In the same skillet, add a little more olive oil if needed. Sauté the finely chopped onions until they become translucent, which should take about 4 to 5 minutes. Add the minced garlic and continue to sauté for an additional minute, allowing the aromas to permeate the mixture.

    4. Create the Creamy Sauce: Lower the heat to medium-low. Stir in the yogurt and heavy cream, mixing well to combine with the onion and garlic. Add the lemon juice, paprika, cumin, and a bit more salt and pepper. Allow the mixture to simmer gently for about 2 to 3 minutes, stirring occasionally.

    5. Combine Chicken and Sauce: Return the chicken breasts to the skillet, then spoon the creamy sauce over the top. Cook for another 5 minutes, allowing the chicken to absorb the flavors of the sauce. This step is crucial for infusing the chicken with the rich, creamy goodness.

    6. Finish with Fresh Herbs: Just before serving, sprinkle the chopped parsley on top of the chicken and sauce. This not only adds flair to your dish but also enhances the flavor profile.

    7. Serve Warm: Plate the Turkish Chicken with Creamy White Sauce alongside a fresh salad, rice, or steamed vegetables for a balanced meal. Enjoy!

    These straightforward steps will lead you to create an unforgettable dish that adds a unique twist to your usual dinner rotation. The beauty of this recipe is that it can easily be adapted based on your dietary preferences, ensuring everyone at the table can enjoy the experience.

    Mastering Turkish Chicken with Creamy White Sauce: Advanced Tips and Variations

    To elevate your cooking experience, here are some advanced tips and variations you can explore:

    1. Marinate the Chicken: For deeper flavor, consider marinating the chicken in yogurt, lemon juice, and spices for a few hours before cooking. This process not only infuses the meat with flavor but also tenderizes it, making it even more succulent.

    2. Add Vegetables: Incorporate chopped bell peppers, spinach, or zucchini into the creamy sauce for added nutrients and color. These vegetables pair beautifully with the dish and make it even more satisfying.

    3. Experiment with Toppings: Give your dish a finishing touch by garnishing it with toasted pine nuts, crumbled feta cheese, or a drizzle of olive oil for added richness.

    4. Flavor Infusion: Add a splash of white wine to the skillet after sautéing the garlic and onions to deglaze the pan and build an even more complex flavor.

    5. Pair with Different Sides: While the creamy chicken is divine with rice or veggies, consider pairing it with crusty bread or a warm pita for a more authentic Turkish experience.

    6. Spice Level Control: Adjust the spice levels according to your preference. Add red pepper flakes for heat or reduce the amount of paprika for a milder taste.

    By integrating these advanced techniques and variations into your cooking, you can not only impress your family and friends but also make this dish your own.

    How to Store Turkish Chicken with Creamy White Sauce: Best Practices

    Once you’ve delighted in your Turkish Chicken with Creamy White Sauce, you may have leftovers that you’d like to store for future meals. Here are best practices for storing this dish:

    • Refrigeration: Allow the chicken to cool completely before placing it in an airtight container. Store in the fridge for up to 3-4 days. Make sure that you label the container with the date so that you remember when it was made.

    • Freezing: If you want to save the dish for longer periods, consider freezing it. Transfer the cooled chicken and sauce to a freezer-safe bag or container. It can be frozen for up to 3 months. For optimal quality, date it and make sure to remove as much air as possible.

    • Reheating Instructions: To reheat, thaw the chicken in the fridge overnight if frozen, or use the microwave for a quicker option. When reheating, do so on low heat on the stove and add a splash of water or chicken broth for moisture. This will help maintain the creaminess of the sauce.

    Implementing these storage strategies ensures that your flavorful creation stays fresh and delightful for future meals.

    Nutritional Value of Turkish Chicken with Creamy White Sauce

    Understanding the nutritional profile of Turkish Chicken with Creamy White Sauce is essential for diet-conscious individuals. Below is the estimated nutritional information per serving (based on a recipe serving four):

    • Calories: 400 kcal
    • Protein: 45 g
    • Fat: 20 g
    • Carbohydrates: 8 g
    • Fiber: 0 g
    • Sugars: 3 g
    • Sodium: 600 mg

    This nutritional breakdown illustrates that not only is this dish filling, but it also provides an excellent source of protein, making it ideal for those looking to build or maintain muscle mass. The healthy fats from olive oil contribute to satiety without unnecessary calories.

    Feel free to adjust your ingredients to cater to specific dietary needs, whether reducing fat content by using less cream or opting for low-sodium substitutes.

    FAQs: Frequently Asked Questions About Turkish Chicken with Creamy White Sauce

    1. Can I make this recipe ahead of time?
    Yes! You can prepare the chicken and sauce beforehand and store it in the fridge. Reheat it just before serving for a quick meal.

    2. What can I serve with Turkish Chicken with Creamy White Sauce?
    This dish pairs beautifully with rice, quinoa, or a fresh salad. You can also serve it with pita bread for a more traditional approach.

    3. Can I use frozen chicken?
    Absolutely! Just ensure it’s fully thawed before cooking. You may need to adjust cooking times for larger pieces.

    4. How can I make this dish spicier?
    To add heat, consider incorporating red pepper flakes or diced jalapeños to the sauce while it simmers.

    5. What if I don’t have all the ingredients?
    Feel free to substitute based on what you have. Tofu or chickpeas can replace chicken, and coconut yogurt can replace traditional yogurt in a vegan version.

    By addressing these common questions, you not only empower your audience but also increase confidence in preparing this delightful dish!


    With the comprehensive coverage in this article, you’re now equipped to create a mouthwatering Turkish Chicken with Creamy White Sauce that will impress and satisfy. So roll up your sleeves and enjoy a delightful culinary experience that combines health, flavor, and versatility!

  • Sweet  Savory Honey Garlic Chicken

    Sweet Savory Honey Garlic Chicken

    Sweet & Savory Honey Garlic Chicken: A Tropical Delight

    Introduction to Sweet & Savory Honey Garlic Chicken

    If you’re on the hunt for delicious chicken recipes that not only please the palate but also fit into a healthy lifestyle, look no further! Sweet & Savory Honey Garlic Chicken is the ultimate dish that strikes the perfect balance between flavor and nutrition. This recipe showcases tender chicken marinated in a delightful mixture of honey, garlic, and soy sauce, complemented with hints of citrus that evoke a tropical flare.

    What makes this recipe so appealing is its simplicity. With just a handful of ingredients, busy parents, working professionals, or even novice cooks will find it refreshingly easy to whip up. You can enjoy this dish without the unnecessary fuss while still impressing family and guests alike. Additionally, it caters to various dietary needs. With a few simple substitutions, you can make vegan, gluten-free, or low-calorie versions, making it a versatile staple for any household.

    Not only is this savory chicken delight bursting with flavor, but it’s also packed with health benefits. Each bite provides a good source of lean protein, essential for muscle health and repair, while the garlic boasts antibacterial properties. The honey provides a natural sweetness alongside antioxidants, making this recipe a wellness-enhancing option for anyone striving for healthier chicken recipes. Prepare to dive into a dish that transforms dinner into a flavorful fiesta!

    Benefits and Advantages of Sweet & Savory Honey Garlic Chicken

    When searching for delectable yet nutritious chicken recipes, Sweet & Savory Honey Garlic Chicken stands out for several compelling reasons.

    Ease of Preparation

    This recipe is effortlessly easy to prepare. It doesn’t require advanced cooking skills—perfect for a culinary novice or a busy parent juggling multiple tasks. All you need is about 30 minutes to marinate and cook the chicken, allowing you to serve a hot, home-cooked meal even on hectic nights. Simply mix the marinade, let it soak into your chicken, and cook it on the stovetop or grill. The straightforward nature of this recipe will quickly make it a go-to in your weekly meal rotation.

    Health Benefits

    Health-conscious individuals will appreciate that this recipe is not only tasty but also packed with nutrients. Chicken is an excellent source of lean protein, crucial for muscle growth and repair. Furthermore, the garlic component provides added health benefits, as it is known to enhance the immune system while also potentially lowering cholesterol levels. The use of honey instead of sugar adds natural sweetness without compromising health, making this dish a winner for diabetes-conscious individuals or those seeking to reduce processed ingredients.

    Dietary Versatility

    Another major advantage of Sweet & Savory Honey Garlic Chicken is its adaptability. Vegetarian options abound with the ability to swap chicken for tofu or tempeh, making this dish perfect for plant-based eaters. Likewise, if you or your guests have gluten sensitivities, using gluten-free soy sauce allows everyone to enjoy a flavorful meal without physical discomfort. Low-calorie options are also available; simply use skinless chicken breasts and reduce the amount of honey for a lighter version without sacrificing taste.

    In essence, Sweet & Savory Honey Garlic Chicken is not just another dish; it’s a holistic meal that fits into various lifestyle choices. Its simplicity, health benefits, and adaptability make it an indispensable recipe for anyone searching for elevated yet uncomplicated chicken dishes.

    Ingredients Overview

    Essential Ingredients for Sweet & Savory Honey Garlic Chicken

    To create this vibrant dish, you’ll need the following ingredients:

    • 2 lbs boneless, skinless chicken thighs or breasts
      Purpose: Lean protein source full of flavor and moisture.
    • 1/4 cup honey
      Purpose: Natural sweetener that adds depth to the marinade.
    • 1/4 cup soy sauce (or tamari for gluten-free)
      Purpose: Provides saltiness and umami flavor.
    • 4 cloves of garlic, minced
      Purpose: Adds robust, aromatic notes.
    • 1 tablespoon grated fresh ginger (optional)
      Purpose: Infuses additional warmth and zest.
    • 1 tablespoon sesame oil (optional)
      Purpose: Adds a nutty flavor and enhances richness.
    • Juice of 1 lime or lemon
      Purpose: Offers acidity, balancing sweetness and enriching the flavor.
    • Salt and pepper to taste
      Purpose: Enhances overall flavor profile.
    • Fresh herbs (such as cilantro or green onions)
      Purpose: For garnish, adding freshness and color when serving.

    Dietary Substitutions to Customize Your Sweet & Savory Honey Garlic Chicken

    • For a vegan option: Replace chicken with tofu, tempeh, or chickpeas. These substitutes will soak up the marinade flavors beautifully while keeping the dish plant-based.

    • For gluten-free needs: Use gluten-free soy sauce (like Tamari) in place of regular soy sauce to ensure everyone can enjoy this dish without worry.

    • Low-calorie variation: Use skinless chicken breasts and reduce the amount of honey to cut down on sugar while still delivering delicious sweetness. You can also substitute a sugar-free honey alternative such as agave or erythritol-based syrups to reduce calories further.

    • Spice it up: If you’re a fan of heat, add red pepper flakes or sriracha to the marinade for a spicy twist.

    By incorporating these substitutions, you can customize your Sweet & Savory Honey Garlic Chicken to fit your dietary requirements or preferences, ensuring that everyone can join in on the delicious experience.

    How to Prepare the Perfect Sweet & Savory Honey Garlic Chicken: Step-by-Step Guide

    Now that you have a good understanding of the recipe and its benefits, it’s time to make this delectable dish! Follow these straightforward steps to create your very own Sweet & Savory Honey Garlic Chicken.

    1. Prepare the Marinade:
      In a medium bowl, combine the honey, soy sauce, minced garlic, ginger (if using), lime or lemon juice, and sesame oil (if using). Whisk well until all ingredients are thoroughly blended.

    2. Marinate the Chicken:
      Place the chicken thighs or breasts in a zip-top bag or shallow dish. Pour the marinade over the chicken, ensuring each piece is evenly coated. Seal the bag or cover the dish, then refrigerate for at least 30 minutes, or up to 4 hours for maximum flavor.

    3. Preheat the Cooking Surface:
      Heat a skillet, grill, or grill pan over medium-high heat. You can add a small amount of oil to prevent sticking if you’re using a skillet.

    4. Cook the Chicken:
      Remove the chicken from the marinade, allowing any excess to drip off. Reserve the marinade for later use. Place the chicken in the preheated skillet or directly on the grill. Cook for about 5-7 minutes on each side, or until the internal temperature reaches 165°F (75°C) and the chicken is cooked through.

    5. Add the Reserved Marinade:
      In the last few minutes of cooking, pour the reserved marinade into the skillet or a saucepan and bring to a boil. Let it simmer for 2-3 minutes until thickened and glossy. This creates a flavorful sauce that drizzles over the chicken when serving.

    6. Finish and Garnish:
      Once the chicken is cooked, remove it from the heat and let it rest for about 5 minutes. This helps lock in the juices for a more succulent outcome. Slice or serve whole, then drizzle the thickened sauce over the top. Garnish with fresh herbs like cilantro or green onions for an added burst of flavor.

    7. Serve and Enjoy:
      This dish pairs beautifully with white rice, quinoa, or steamed vegetables. Enjoy your Sweet & Savory Honey Garlic Chicken with family or friends and watch it disappear in no time!

    In these steps, each phase nurtures the delicious blend of flavors, making it hard to resist trying the recipe again. Don’t hesitate to customize the cooking method based on what tools or equipment you have at hand.

    Mastering Sweet & Savory Honey Garlic Chicken: Advanced Tips and Variations

    To elevate your Sweet & Savory Honey Garlic Chicken experience even further, consider these advanced tips and possibilities for variations.

    • Marination Duration: For deeper flavor saturation, marinate the chicken overnight in the refrigerator. The extra time allows the flavors to permeate thoroughly, resulting in a richer dish.

    • Grilling Variation: Instead of pan-searing, you can grill the chicken on medium-high heat for a smoky flavor. Just ensure that the grill is well-greased to prevent sticking.

    • Add Vegetables: Incorporating vegetables into the cooking process can enhance nutrition and flavor. Consider tossing some bell peppers, zucchini, or broccoli onto the grill alongside the chicken. The veggies will absorb the lovely sauce and complement the protein beautifully.

    • Sweet and Sour Twist: For a little extra zing, add pineapple chunks to the marinade or grill them alongside the chicken. The natural acidity of pineapple provides a refreshing twist that contrasts wonderfully with the honey’s sweetness.

    • Garnish Creatively: Experiment with garnishes! Top your dish with toasted sesame seeds, finely sliced jalapeños, or a drizzle of sriracha to add a unique flair. You can also add a touch of lime zest for a refreshing finish.

    With these tips in your toolkit, you can easily adjust the dish to match your tastes or mood. Each variation potentially offers new avenues of flavor and enjoyment, ensuring that Sweet & Savory Honey Garlic Chicken never gets old.

    How to Store Sweet & Savory Honey Garlic Chicken: Best Practices

    Leftover Sweet & Savory Honey Garlic Chicken is a treat for the next day’s lunch—or dinner! Here’s how to store it properly.

    Refrigeration

    • Cooling Down: Allow the chicken to cool to room temperature before storing it. This helps prevent moisture accumulation in the storage container.
    • Storage Container: Place the chicken in an airtight container or wrap it tightly in plastic wrap. Storing it in small portions can help with reheating later.
    • Refrigeration Duration: Your chicken can last in the refrigerator for up to 3-4 days. Just be sure to consume it within that time for optimal freshness.

    Freezing

    • Freezing Preparation: If you wish to keep the chicken for a longer period, consider freezing it. Place cooled chicken in freezer-safe bags or containers, ensuring you remove as much air as possible.
    • Freezing Duration: Frozen Sweet & Savory Honey Garlic Chicken can be stored for up to 3 months. Label your containers or bags with the date so you can keep track of freshness.
    • Thawing: When ready to eat, thaw the chicken in the refrigerator overnight or use the microwave’s defrost setting. Cook thoroughly before consuming.

    Reheating

    • Microwave: To reheat, place chicken in a microwave-safe container, cover with a damp paper towel, and heat for 1-2 minutes or until heated through.
    • Stovetop: For a more even heat, reheat on the stovetop in a skillet over low heat. Adding a splash of water or additional marinade can revive moisture.
    • Oven: If using an oven, preheat to 350°F (175°C), place chicken in an oven-safe dish, and cover with foil for about 10-15 minutes.

    By following these storage practices, you can enjoy the same vibrant flavors of your Sweet & Savory Honey Garlic Chicken in the days following your initial meal, minimizing waste and maximizing enjoyment.

    Nutritional Value of Sweet & Savory Honey Garlic Chicken

    Understanding the nutritional components of Sweet & Savory Honey Garlic Chicken can help you make informed choices about your diet. Here’s a breakdown of the key nutritional attributes — based on servings from 2 lbs of chicken with the included ingredients:

    Nutritional Information per Serving (approximately 4 servings)

    • Calories: 325
    • Protein: 31g
    • Total Fat: 9g
    • Saturated Fat: 2g
    • Total Carbohydrates: 26g
    • Dietary Fiber: 1g
    • Sugars: 12g
    • Sodium: 650mg
    • Vitamin C: 60% of Daily Value (DV)
    • Calcium: 2% of DV
    • Iron: 10% of DV

    Health Insights

    This chicken dish provides a balanced combination of macronutrients, making it suitable for active individuals or anyone looking to maintain a healthy lifestyle. The protein content supports muscle repair and growth, while the carbohydrates give you the necessary energy to power through your day.

    The relatively low saturated fat level keeps this dish heart-healthy while the presence of garlic enriches its nutritional profile, thanks to its numerous health benefits. The honey’s natural sweetness provides some sugars that offer quick energy. However, this recipe still allows room for healthy modifications to further lower calorie counts, sugar levels, or sodium content based on individual dietary needs.

    With a dish like Sweet & Savory Honey Garlic Chicken, you empower yourself with wholesome ingredients that are as nourishing as they are delicious.

    FAQs: Frequently Asked Questions About Sweet & Savory Honey Garlic Chicken

    1. Can I use chicken breast instead of thighs?

    Absolutely! While thighs provide a juicier experience due to their higher fat content, chicken breasts work wonderfully in this recipe. Just be cautious not to overcook them to prevent dryness.

    2. How can I make this dish spicier?

    For those who enjoy heat, incorporate red pepper flakes into the marinade or serve with a side of sriracha or spicy chili sauce. You can also add sliced jalapeños during cooking for an additional kick.

    3. Is it possible to meal prep this dish?

    Yes! Sweet & Savory Honey Garlic Chicken can be meal prepped and stored in airtight containers for 3-4 days or frozen for up to 3 months. Just reheat and enjoy!

    4. What are some good side dishes to serve with this chicken?

    This dish pairs beautifully with rice, quinoa, couscous, or steamed vegetables. You can also serve it with a fresh salad to balance the flavors.

    5. What if I’m allergic to soy sauce?

    If you have soy allergies, consider using coconut aminos as a soy sauce alternative. It has a slightly sweeter and less salty flavor, making it a great substitute.

    This FAQ section addresses common questions, guiding readers towards meal success and ensuring they can adjust the recipe to better suit their preferences or dietary needs.

    With extensive details about this dish, you have everything you need to confidently prepare Sweet & Savory Honey Garlic Chicken—a beloved addition to any kitchen’s repertoire of flavorful chicken recipes! Enjoy each delectable bite, and share your creations with loved ones for a truly satisfying culinary experience.

  • Lemon Shallot Chicken

    Lemon Shallot Chicken

    Lemon Shallot Chicken: A Tropical Delight

    Introduction to Lemon Shallot Chicken

    If you’re on the hunt for tantalizing chicken recipes that can brighten up your dinner table, look no further than Lemon Shallot Chicken! This dish combines the zesty freshness of lemon with the fragrant mildness of shallots, creating a vibrant meal that’s both satisfying and healthy. Whether you’re a busy parent juggling work and family meals, a student looking for a quick dinner option, or simply a food enthusiast eager to try something new, this recipe is perfect for you.

    What makes Lemon Shallot Chicken special is its simplicity. With just a few common ingredients, you can create a delicious dish that’s ready in under an hour. Moreover, this meal is gluten-free and can be adapted to fit low-calorie or vegan diets, making it a versatile choice for anyone. Not only is it visually appealing with its bright, sunny flavors, but it also packs a nutritional punch, ensuring you’re fueling your body with wholesome ingredients.

    As we progress through this recipe, you’ll discover how easily it can fit into your busy lifestyle while still being impressive enough for gatherings. Let’s dive into the benefits of this remarkable dish!

    Benefits and Advantages of Lemon Shallot Chicken

    Lemon Shallot Chicken is more than just a dish; it’s a celebration of flavor and health in the kitchen. Here are several reasons why this recipe stands out among other chicken recipes:

    1. Easy Preparation: With straightforward steps, this recipe is designed for cooks of all experience levels. You won’t find yourself struggling with complicated techniques or hard-to-source ingredients. The simplicity of preparation means you can whip this up even on your busiest days.

    2. Health Benefits: Chicken is an excellent source of lean protein, which can aid in muscle maintenance and weight management. The addition of lemon not only adds brightness but is also packed with Vitamin C, promoting healthy immune function. Shallots, a milder variant of onions, provide essential nutrients, including antioxidants. Together, these ingredients contribute to a balanced and nourishing meal that doesn’t sacrifice taste for health.

    3. Versatility: Whether you’re cooking for one or hosting a dinner party, Lemon Shallot Chicken can easily scale to meet your needs. You can serve it alongside steamed vegetables for a light meal or pair it with whole grains for something heartier. Families with different dietary preferences can feel included, as this dish allows for easy substitutions.

    4. Kid-Friendly: The zesty flavors appeal to even the pickiest eaters, making it a fantastic addition to family meals. Plus, it’s a great way to introduce kids to cooking; they can help with mixing and seasoning while learning basic kitchen skills.

    5. Meal Prepping Made Simple: This dish is perfect for meal prep. You can prepare a batch at the beginning of the week and reheat it for quick lunches or dinners, making your week significantly easier without compromising on quality.

    As we move forward in this article, you’ll learn about the key ingredients, preparation steps, and creative variations that can help you master Lemon Shallot Chicken and incorporate it into your regular meal rotation.

    Ingredients Overview

    Essential Ingredients for Lemon Shallot Chicken

    To prepare Lemon Shallot Chicken, you will need the following essential ingredients:

    • 4 Boneless, Skinless Chicken Breasts (about 1.5 pounds): This is the lean protein base. Chicken is a great source of essential vitamins and minerals.
    • 2 Shallots, minced (approximately ½ cup): Shallots bring a delicate, slightly sweet flavor that complements the chicken.
    • 1 Large Lemon (juice and zest): The lemon provides a refreshing acidity that brightens the dish.
    • 3 Cloves Garlic, minced: Garlic adds depth and richness to the flavor profile.
    • 1/4 Cup Olive Oil: This healthy fat aids in cooking and also contributes to the flavor.
    • Salt and Pepper to taste: Essential seasonings to enhance the overall taste of the dish.
    • Fresh Parsley, chopped (optional for garnish): Adds a touch of color and freshness to the final presentation.
    • 1 Teaspoon of Dried Oregano (optional): For an additional flavor dimension if desired.

    Diet-Conscious Variations: If you prefer a vegan option, substitute the chicken with tempeh or portobello mushrooms. They will absorb the lemon and shallot flavors beautifully and remain hearty. For gluten-free options, ensure that any additional sauces or sides are certified gluten-free.

    Dietary Substitutions to Customize Your Lemon Shallot Chicken

    To cater to different needs, consider the following substitutions:

    • Protein Swap: Instead of chicken breasts, you could use thighs for a juicier option. Alternatively, try tofu cubes for a vegan choice that will soak up the flavors beautifully.
    • Low-Calorie Option: Use skinless chicken or reduce the olive oil to lower calorie content. For a lighter take, you can also grill the chicken instead of sautéing it.
    • Herb Variations: Instead of parsley, feel free to use fresh basil, cilantro, or even rosemary for added flavor diversity.
    • Lemon Alternatives: If lemon isn’t available, lime can serve as a suitable substitute. It will give the dish a different twist but retain the zingy impact.

    This versatility allows you to tailor the recipe to fit your dietary preferences or ingredient availability, helping you create delicious meals suited to your lifestyle.

    How to Prepare the Perfect Lemon Shallot Chicken: Step-by-Step Guide

    With the ingredients ready, it’s time to embark on your cooking adventure! Follow this detailed, step-by-step guide to craft the perfect Lemon Shallot Chicken.

    1. Prepare the Chicken: Start by seasoning the chicken breasts with salt, pepper, and dried oregano (if using). Let them sit for about 10 minutes to absorb the flavor.

    2. Sauté the Shallots and Garlic: In a large skillet, heat the olive oil over medium heat. Add the minced shallots and cook for about 2-3 minutes until they become translucent. Stir in the minced garlic and cook for an additional minute until fragrant. Be careful not to burn the garlic.

    3. Sear the Chicken: Push the shallots and garlic to the side of the skillet. Place the chicken breasts in the center of the pan. Sear them without moving for 4-5 minutes until golden brown.

    4. Add Lemon Juice and Zest: Flip the chicken over and pour the lemon juice and zest over the chicken in the skillet. Make sure to coat the chicken evenly. This step infuses the protein with vibrant flavors.

    5. Cook Thoroughly: Lower the heat to medium-low and cover the skillet. Allow the chicken to cook for an additional 10-12 minutes or until the internal temperature reaches 165°F (75°C). This ensures the chicken remains juicy and tender.

    6. Check for Seasoning: Taste the sauce and adjust the seasoning with more salt and pepper as desired.

    7. Finish & Serve: Once cooked, remove the skillet from heat. Transfer the chicken breasts to a serving plate. Spoon the shallot and lemon mixture over the top. Garnish with freshly chopped parsley for a touch of color.

    8. Pair Your Dish: This Lemon Shallot Chicken can be paired with a side of quinoa, brown rice, or a vibrant salad to complete the meal.

    9. Leftovers: If you have any leftovers, follow the storage section below for the best ways to keep your dish fresh.

    This step-by-step guide makes crafting this delightful meal an effortless and rewarding experience, perfect for weeknight dinners or weekend gatherings.

    Mastering Lemon Shallot Chicken: Advanced Tips and Variations

    To truly elevate your Lemon Shallot Chicken, consider these advanced tips and delicious variations:

    • Marinate for Flavor: For even more flavor, marinate your chicken in lemon juice, olive oil, and shallots for 30 minutes before cooking. This enhances the taste profile significantly.

    • Add Veggies: Incorporate vegetables such as asparagus, bell peppers, or zucchini directly into the skillet during the final cooking stages. They will absorb the lemony goodness while adding nutrition and color.

    • Oven-Baked Version: Instead of stovetop cooking, transfer the chicken and shallot mixture to a preheated oven at 375°F (190°C) for about 20-25 minutes. This hands-off approach works wonderfully for those busy nights.

    • Spice It Up: If you enjoy a bit of heat, add a pinch of red pepper flakes while sautéing the garlic and shallots.

    • Sauce Variation: Make the dish creamier by adding a splash of heavy cream or coconut milk toward the end of cooking. This will yield a rich lemon sauce perfect for drizzling over rice or pasta.

    These advanced techniques and variations bring creativity and customization to your Lemon Shallot Chicken, allowing you to make it your own while catering to diverse tastes and preferences.

    How to Store Lemon Shallot Chicken: Best Practices

    Storing Lemon Shallot Chicken is straightforward and ensures that you can enjoy the flavors well beyond the initial meal:

    • Refrigeration: Allow any leftovers to cool to room temperature. Store them in an airtight container in the fridge for up to 3-4 days. Properly sealed, this dish remains delicious for several days and allows for easy reheating.

    • Freezing: If you want to keep the Lemon Shallot Chicken for a longer time, freeze it. Wrap the cooled chicken tightly in plastic wrap, then place it in a freezer-safe container or bag. You can freeze it for up to 3 months. To reheat, thaw in the refrigerator overnight before warming it up in the oven or skillet.

    • Reheating: When you’re ready to enjoy leftovers, reheat the chicken in the microwave or on the stovetop over low heat, adding a splash of chicken broth or water to create steam and prevent dryness.

    Following these storage tips ensures that your Lemon Shallot Chicken retains its delicious flavor and texture, making meal prep easy and enjoyable.

    Nutritional Value of Lemon Shallot Chicken

    Here’s a quick breakdown of the approximate nutritional value per serving (based on this recipe serving four):

    • Calories: 330
    • Total Fat: 15g
    • Saturated Fat: 2g
    • Cholesterol: 100mg
    • Sodium: 500mg
    • Total Carbohydrates: 5g
    • Dietary Fiber: 1g
    • Sugars: 1g
    • Protein: 45g

    This recipe offers a healthy balance of macronutrients, focusing on lean protein, healthy fats, and minimal carbohydrates. Adjustments can be made based on dietary needs—whether reducing oils for lower fat content or using more vegetables for added fiber.

    For those interested in specific dietary requirements, always adjust seasonings or ingredient brands to meet your individual health goals, ensuring you get the most out of this flavorful dish without compromising any dietary restrictions.

    FAQs: Frequently Asked Questions About Lemon Shallot Chicken

    Q: Can I use chicken thighs instead of breasts?
    A: Absolutely! Chicken thighs will add more moisture and flavor to the dish. Just be aware that they may require slightly longer cooking time.

    Q: Is this recipe suitable for meal prepping?
    A: Yes! Lemon Shallot Chicken is excellent for meal prep. Just store the leftovers in an airtight container, and they’ll keep well in the fridge for 3-4 days.

    Q: How can I make this dish vegan?
    A: You can substitute the chicken with tempeh or portobello mushrooms. Follow the same cooking methods to ensure they’ll absorb the delicious sauces.

    Q: What sides pair well with Lemon Shallot Chicken?
    A: This dish goes well with quinoa, brown rice, or a light salad. You can also serve it over pasta for a more hearty meal.

    Q: How can I adjust the recipe for more servings?
    A: Simply multiply the ingredients by the number of servings desired. The cooking time may vary slightly based on the thickness of chicken pieces and the size of your cooking vessel.

    Q: Can I make this dish in the oven?
    A: Yes! You can bake the chicken at 375°F (190°C) for approximately 25-30 minutes, depending on the thickness of your chicken.

    This approachable recipe, paired with frequently asked questions, offers the guidance novice cooks need while also motivating culinary enthusiasts to discover more ways to enjoy this delightful dish.


    Lemon Shallot Chicken is a fantastic addition to your culinary repertoire, appealing to various tastes and dietary needs. Simple to prepare and bursting with flavor, it’s a balanced meal that will leave a lasting impression on your dinner guests and family alike. Happy cooking!

  • Brown Sugar Cajun Wings

    Brown Sugar Cajun Wings

    Brown Sugar Cajun Wings: A Tropical Delight

    Introduction to Brown Sugar Cajun Wings

    Welcome to the mouthwatering world of Brown Sugar Cajun Wings, where savory goodness meets a touch of sweetness! This irresistible chicken recipe is designed for everyone—from busy parents looking for a quick dinner solution to students needing a satisfying snack between classes. Packed with the bold flavors of Cajun spices and the rich depth of brown sugar, these wings offer a delightful culinary experience that is simple to create and universally loved.

    These wings are not only delicious but also cater to a variety of dietary needs! With easy adaptations, they can be made gluten-free or even vegan, allowing everyone to join in on the feast. The balance of sweetness from the brown sugar and the heat from the Cajun seasoning creates an irresistible flavor profile that is perfect for game days, family gatherings, or a cozy dinner at home.

    So, gather your ingredients, roll up your sleeves, and let’s transform ordinary chicken into extraordinary wings. Complement your love for cooking with this sensational chicken recipe that promises to become a staple in your kitchen!

    Benefits and Advantages of Brown Sugar Cajun Wings

    Why should Brown Sugar Cajun Wings be your go-to recipe for any occasion? Here are some compelling reasons to give this recipe a try:

    1. Ease of Preparation: This dish stands out due to its simplicity. With minimal prep time and straightforward steps, busy home cooks can whip up these wings in no time. Not to mention, marinating the wings ahead of time enhances the flavors, making them a perfect choice for meal prep.

    2. Health Benefits: While chicken wings can sometimes get a bad rap, this recipe allows for healthier preparation. By opting for baking instead of frying and controlling the amount of sugar used, you can indulge guilt-free. Additionally, chicken is an excellent source of protein, making these wings a filling option that keeps you energized.

    3. Flavor Explosion: The combination of brown sugar and Cajun seasoning creates a sweet-and-spicy sensation that delights the taste buds. This unique blend makes the wings versatile enough for various occasions—from casual gatherings to more formal events.

    4. Customization for All Diets: If you are health-conscious or have specific dietary requirements, this recipe is easily adaptable. With gluten-free flour substitutions and suggestions for lowering sugar content, this dish accommodates everyone at the table.

    5. Versatile Serving Options: Whether you serve them as an appetizer, main dish, or snack on game day, these wings fit right into any menu. They pair wonderfully with a variety of sides, from fresh salads to hearty grains, ensuring you have a balanced meal.

    With benefits like these, it’s no wonder that Brown Sugar Cajun Wings are becoming a popular addition to many home cooks’ chicken recipes repertoire.

    Ingredients Overview

    Essential Ingredients for Brown Sugar Cajun Wings

    To create the perfect Brown Sugar Cajun Wings, you’ll need the following ingredients:

    • 2 lbs Chicken Wings: Choose fresh or thawed wings for the best texture and flavor.
    • 1/4 cup Brown Sugar: This ingredient adds a rich sweetness that balances the spice.
    • 2 tbsp Cajun Seasoning: The backbone of this recipe—feel free to adjust the amount based on your heat preference.
    • 1 tsp Garlic Powder: For an additional layer of flavor.
    • 1 tsp Onion Powder: Complements the spices beautifully.
    • 1 tsp Salt: Enhances the overall taste.
    • 1/2 tsp Black Pepper: A hint of warmth and additional spice.
    • 1 tbsp Olive Oil (or vegan substitute): Helps with crisping the wings in the oven.
    • Optional: Fresh parsley for garnish.

    These ingredients combine to form the base of an unforgettable chicken recipe. If you have dietary preferences, consider the following:

    • For Gluten-Free Options: Ensure your Cajun seasoning and any additional sauces are gluten-free.
    • Low-Calorie Adjustments: You can reduce the amount of brown sugar and use a sugar substitute for fewer calories.
    • Vegan Adaptation: Substitute chicken wings with cauliflower florets coated in the same seasoning.

    Dietary Substitutions to Customize Your Brown Sugar Cajun Wings

    Incorporating dietary substitutions to fit different needs is easy with this recipe. Here are a few suggestions:

    • For a Spicier Kick: Increase the amount of Cajun seasoning or add cayenne pepper to the mix. This will elevate the heat level, giving you a fiery version of these wings.
    • Low Sugar Variation: Swap brown sugar for coconut sugar or use Monk fruit sweetener for a lower-calorie option.
    • Plant-Based Version: If you want to create vegan Brown Sugar Cajun Wings, substitute the chicken wings with plant-based chicken, tempeh, or even crispy tofu. The cooking time may vary, so keep an eye on texture and doneness.

    Using these substitutions not only allows for creative twists but also makes these wings accommodating for your guests’ dietary needs.

    How to Prepare the Perfect Brown Sugar Cajun Wings: Step-by-Step Guide

    Creating the perfect Brown Sugar Cajun Wings is easier than you might think! Follow this step-by-step guide for delicious results.

    1. Prepare the Wings:
    2. Begin by rinsing the chicken wings under cold water and patting them dry using paper towels. Removing excess moisture helps them crisp up nicely during cooking.

    3. Marinate the Wings:

    4. In a large mixing bowl, combine the brown sugar, Cajun seasoning, garlic powder, onion powder, salt, black pepper, and olive oil. Mix well to form a paste. Add the chicken wings to the bowl and ensure they are all evenly coated in the marinade. Cover and refrigerate for at least 30 minutes, or even overnight for maximum flavor.

    5. Preheat the Oven:

    6. When you are ready to bake, preheat your oven to 400°F (200°C). This temperature allows the wings to cook thoroughly while becoming crispy.

    7. Prepare the Baking Sheet:

    8. Line a baking sheet with aluminum foil or parchment paper for easy cleanup. Place a wire rack on top if available—this promotes even cooking by allowing hot air to circulate around the wings.

    9. Arrange the Wings:

    10. Remove the wings from the marinade and shake off any excess marinade. Arrange them in a single layer on the prepared baking sheet or wire rack. Make sure they aren’t crowded; this ensures even cooking.

    11. Bake the Wings:

    12. Place the baking sheet in the oven and bake for about 40-45 minutes. For extra crispiness, flip the wings halfway through cooking. Make sure they are cooked to an internal temperature of at least 165°F (74°C).

    13. Optional: Broil for Extra Crispiness:

    14. If you prefer even crispier wings, switch your oven to broil for the last 3-5 minutes of baking. Keep a close eye on them to prevent burning.

    15. Garnish and Serve:

    16. Once fully cooked, remove the wings from the oven and let them rest for a few minutes. Garnish with fresh parsley for a touch of color and flavor. Serve hot with ranch or blue cheese dressing on the side, along with celery and carrots.

    Enjoy your homemade Brown Sugar Cajun Wings as a standout feature in your collection of chicken recipes. Share with friends and family, or savor them as a delicious treat!

    Mastering Brown Sugar Cajun Wings: Advanced Tips and Variations

    To elevate your Brown Sugar Cajun Wings experience, consider these expert tips and variations:

    • Try Different Cooking Methods:
    • While baking is a healthier cooking option, you can also grill or air fry your wings for a different texture and flavor. Grilling adds a smoky taste, while air frying yields crispy results without much oil.

    • Experiment With Flavors:

    • Don’t hesitate to play around with the seasoning. For a tropical twist, add pineapple juice to the marinade or sprinkle some lime juice before serving. If you enjoy barbecue flavors, consider mixing teriyaki sauce with the brown sugar for a unique taste.

    • Sauce Them Up:

    • After cooking, toss the wings in your favorite hot sauce or BBQ sauce for extra flavor. This technique allows for endless variations, from spicy to sweet and tangy.

    • Party Platter Ideas:

    • Serve your wings with a variety of dipping sauces such as spicy ranch, garlic aioli, or a sweet chili sauce. Pair with sides like coleslaw, potato wedges, or a fresh garden salad for a complete meal.

    These tips not only enhance the taste of your wings but also ensure everyone can enjoy them in their own unique way.

    How to Store Brown Sugar Cajun Wings: Best Practices

    Once you’ve enjoyed your Brown Sugar Cajun Wings, proper storage will allow you to savor the leftovers. Here’s how to effectively store, freeze, and reheat them:

    1. Refrigeration:
    2. Allow the wings to cool completely at room temperature. Then place them in an airtight container and store in the refrigerator. They will stay fresh for up to 3-4 days.

    3. Freezing:

    4. If you want to save the wings for a longer period, freezing is an excellent option. Place the cooled wings in a freezer-safe bag or container, ensuring to remove as much air as possible. They can be frozen for up to 2-3 months.

    5. Reheating:

    6. When you’re ready to enjoy the leftover wings, preheat your oven to 350°F (175°C). Arrange the wings on a baking sheet and cover with aluminum foil to retain moisture. Reheat for about 15-20 minutes or until heated through. You can also use the microwave, but be aware that this may lead to a less crispy texture.

    By following these storage tips, your Brown Sugar Cajun Wings will taste just as delicious during their second appearance as they did on the first!

    Nutritional Value of Brown Sugar Cajun Wings

    For those counting calories or managing their diets, knowing the nutritional value of your chicken recipes is essential. Here’s an approximate breakdown for one serving (about 4-5 wings, not including added sauces):

    • Calories: 350
    • Protein: 30g
    • Total Fat: 20g
    • Saturated Fat: 5g
    • Cholesterol: 95mg
    • Carbohydrates: 12g
    • Sugars: 8g
    • Fiber: 1g
    • Sodium: 600mg

    Please note that these values can vary based on the specific ingredients used, preparation methods, and any additional sauces you may apply.

    To create a leaner version, consider reducing the amount of brown sugar and using skinless chicken wings, which will help reduce both calorie and fat content while still providing delicious flavor.

    FAQs: Frequently Asked Questions About Brown Sugar Cajun Wings

    1. Can I make these wings ahead of time?
    Absolutely! You can marinate the wings a day in advance and then bake them when you’re ready to serve. This shortens cooking time, making it easier for meal prepping.

    2. What can I substitute for Cajun seasoning?
    You can create your own version using a blend of paprika, cayenne pepper, garlic powder, onion powder, and black pepper. Feel free to adjust the spices to suit your taste.

    3. Are these wings suitable for children?
    While the spices can be adjusted to suit a milder palate, many children love the sweet flavor of brown sugar. Consider reducing the Cajun seasoning if your children prefer less heat.

    4. Can I use frozen wings?
    While fresh wings yield the best results, you can use frozen ones. Just make sure to thaw them completely and adjust cooking time as needed—frozen wings may take a bit longer to cook through.

    5. What can I serve with Brown Sugar Cajun Wings?
    These wings pair perfectly with fresh salads, coleslaw, or classic sides like baked potato fries or corn on the cob. Dipping sauces add an extra layer of flavor, so don’t hesitate to get creative!

    With the insights provided in this article, you’re well-equipped to create your own delicious batch of Brown Sugar Cajun Wings. This recipe not only satisfies cravings but also unites friends and family around the table—what more could you ask for in a chicken recipe? Try it tonight and experience a delightful culinary journey!

  • Crispy Fried Chicken Wings

    Crispy Fried Chicken Wings

    Crispy Fried Chicken Wings: A Tropical Delight

    Introduction to Crispy Fried Chicken Wings

    Welcome to the world of delicious chicken recipes! If you’re a fan of crispy, flavorful chicken wings that tantalize your taste buds, you’re in for a treat with this recipe. Crispy Fried Chicken Wings are not just a favorite at parties or game days but also an easy dish to whip up for any casual gathering or family dinner. The mouthwatering combination of crunchy skin and juicy meat makes this dish irresistible.

    But it gets better! This crispy fried chicken wings recipe is simple enough for busy parents and students, yet elegant enough for newlyweds and food enthusiasts alike. It’s a versatile offering that can cater to various dietary needs. You can even create a gluten-free or low-calorie version to keep health-conscious individuals smiling.

    In this article, we’ll break down everything you need to know about preparing your own crispy fried chicken wings. We’ll explore the benefits of this dish, provide an easy-to-follow recipe, and share tips on variations and storage. So, let’s get ready to inspire your culinary adventures with some of the best chicken recipes out there!

    Benefits and Advantages of Crispy Fried Chicken Wings

    Crispy Fried Chicken Wings stand out amongst the myriad of chicken recipes for a variety of reasons. First and foremost, they are incredibly easy to prepare. With relatively few ingredients and straightforward steps, you’ll find yourself enjoying homemade wings in no time. Whether you’re a novice cook or someone who has mastered the art of cuisine, the simplicity of this recipe makes it accessible for everyone.

    Moreover, these wings can be customized to cater to various dietary preferences. They can be made gluten-free by choosing the right flour or even swapped for a plant-based option to make them vegan, appealing to health-conscious individuals and those with specific dietary restrictions. By providing a sense of joy and satisfaction, this dish becomes a guilty pleasure that doesn’t have to weigh heavily on your conscience.

    Another significant advantage is versatility. With simple ingredient substitutions, you can easily adapt the recipe to create flavors that suit your palate. For example, experimentation with marinades or spices can make each version of your crispy fried chicken wings distinctly unique.

    On top of that, they are quite nutritious when made from quality ingredients. Chicken is an excellent source of protein, essential for muscle recovery and growth. Moreover, when baked or air-fried, the wings can be lower in calories, making this dish fit seamlessly into diet-conscious meal plans.

    To summarize, Crispy Fried Chicken Wings offer simplicity, customizability, nutrition, and mouthwatering flavor, earning them a well-deserved spot in your collection of chicken recipes.

    Ingredients Overview

    Essential Ingredients for Crispy Fried Chicken Wings

    To prepare the perfect Crispy Fried Chicken Wings, gather the following essential ingredients:

    • 2 pounds of chicken wings: Choose fresh or frozen wings based on your preference.
    • 1 cup all-purpose flour: This traditional choice provides a crunchy coating. For a gluten-free option, substitute with almond flour or a gluten-free flour blend.
    • 1 teaspoon baking powder: This ingredient will help achieve extra crispiness.
    • 1 teaspoon salt: Enhances flavor. Adjust based on your taste and dietary restrictions.
    • 1 teaspoon black pepper: Adds subtle heat.
    • 1 teaspoon paprika: Optional, but offers a beautiful color and flavor.
    • 1/2 teaspoon garlic powder: For an aromatic kick.
    • 1/2 teaspoon onion powder: Adds depth of flavor.
    • Oil for frying: Canola, vegetable, or peanut oil work well. For a healthier alternative, consider using an air fryer instead.

    These basic ingredients will set the stage for creating your crispy wings. However, feel free to play with spices or marinades to infuse your wings with exciting flavors or to address dietary preferences.

    Dietary Substitutions to Customize Your Crispy Fried Chicken Wings

    One of the greatest aspects of this recipe is its adaptability. Here’s how you can customize the ingredients based on dietary needs:

    • Vegan Option: For a plant-based version, replace chicken wings with cauliflower florets or battered tofu cubes and use a non-dairy milk (like almond or oat milk) instead of the egg wash.
    • Low-Calorie Option: Use skinless chicken wings and opt for an air fryer. You can still achieve crispy wings without deep frying.
    • Gluten-Free Option: As mentioned, almond flour or a gluten-free flour blend can substitute the all-purpose flour without sacrificing texture.

    Feel free to combine these dietary substitutions based on your guests’ preferences or your personal needs. Each variation can result in equally delicious outcomes that prove to be a feast for all.

    How to Prepare the Perfect Crispy Fried Chicken Wings: Step-by-Step Guide

    Prepare for a culinary adventure with these step-by-step instructions for making the ultimate Crispy Fried Chicken Wings!

    1. Prepare the Chicken Wings:
    2. Pat dry the chicken wings with paper towels to remove excess moisture. This will help them crisp up better during frying.

    3. Season the Flour Mixture:

    4. In a large mixing bowl, combine the flour, baking powder, salt, pepper, paprika, garlic powder, and onion powder. Whisk the ingredients well to ensure they’re evenly mixed.

    5. Coat the Chicken Wings:

    6. Dredge the chicken wings in the flour mixture, making sure each wing is fully coated. Shake off any excess flour to prevent clumping.

    7. Heat the Oil:

    8. In a large frying pan, pour enough oil to cover the bottom (about 1 inch deep) and heat it over medium-high heat. If you’re using an air fryer, skip this step!

    9. Fry the Chicken Wings:

    10. Once the oil is hot (around 350°F or 175°C), carefully place the wings into the pan, ensuring not to overcrowd it. Fry the wings in batches if necessary. Fry until golden brown, approximately 8-10 minutes on each side.

    11. Drain Excess Oil:

    12. Once done frying, use tongs to remove the wings and place them on a plate lined with paper towels to drain excess oil.

    13. Serve or Toss in Sauce:

    14. At this point, you can either serve the crispy wings plain or toss them in your favorite sauce (think buffalo, barbecue, or honey garlic) before serving.

    15. Enjoy with Dips:

    16. Pair your crispy fried chicken wings with sides and dips like ranch dressing, blue cheese, celery sticks, or carrot sticks for that classic experience.

    These sequential steps demonstrate how simple it is to recreate this delicious dish. Ensure to adjust cooking times or methods based on dietary modifications as necessary!

    Mastering Crispy Fried Chicken Wings: Advanced Tips and Variations

    Ready to take your crispy fried chicken wings to the next level? Here are some advanced tips and delicious variations to enhance your culinary experience.

    • Breading Techniques:
    • For an extra crunchy coating, consider a double-dip method. After the first coating, dip the wings in a mixture of beaten eggs (or plant-based alternative), followed by another coat of the flour mixture. This technique creates a thicker, crunchier breading.

    • Flavor Infusion:

    • Marinate your chicken wings for a few hours or overnight in a mixture of buttermilk, hot sauce, and spices. This adds depth of flavor and helps keep the chicken tender.

    • Experiment with Sauces:

    • Consider trying different flavors beyond classic buffalo. Sweet Thai chili, lemon pepper, or even a garlic parmesan sauce can make your wings truly unique.

    • Air Fryer Method:

    • Enjoy the crunch without the guilt by using an air fryer. Brush the wings lightly with oil and cook at about 375°F (190°C) for 25-30 minutes, flipping halfway through.

    These tips offer just a glimpse of how to master the art of crispy fried chicken wings and keep your guests amazed.

    How to Store Crispy Fried Chicken Wings: Best Practices

    Storing your Crispy Fried Chicken Wings properly is essential to maintain their texture and flavor. Here’s how to do it correctly:

    • Refrigeration: Allow the wings to cool completely before placing them in an airtight container. Refrigerate them for up to 3 days. If stored correctly, they can retain their taste and freshness.

    • Freezing: For longer storage, freeze your wings in a single layer on a baking sheet. Once frozen, transfer them to a freezer-safe bag or container. They can last up to 3 months in the freezer.

    • Reheating: For the best results, reheat your wings in the oven at 350°F (175°C) for about 10-15 minutes. This method helps to retain the crispiness that you desire.

    Following these storage tips ensures that your crispy fried chicken wings remain delightful, whether you’re saving leftovers or prepping for future meals.

    Nutritional Value of Crispy Fried Chicken Wings

    Understanding the nutritional profile of your food is crucial, especially when diving into delectable chicken recipes. Let’s break down the nutritional value of a serving (approximately 4 wings) of Crispy Fried Chicken Wings:

    • Calories: Approximately 400 calories
    • Protein: Around 30g
    • Fat: Roughly 28g (including saturated fat)
    • Carbohydrates: Approximately 17g
    • Fiber: 1g
    • Cholesterol: About 80mg
    • Sodium: 600mg (varies based on seasoning)

    This nutritional insight provides a brief overview of what you will be consuming. For those concerned about calories or fat content, remember that substitutions can make this dish fit into healthier eating habits without sacrificing flavor!

    FAQs: Frequently Asked Questions About Crispy Fried Chicken Wings

    Q1: Can I bake these chicken wings instead of frying?
    Yes! For a healthier option, bake the wings at 400°F (200°C) for approximately 40-45 minutes, flipping halfway through until they are golden and crispy.

    Q2: What are some good dipping sauces for wings?
    Classic dips include ranch, blue cheese, or any of your favorite sauces such as honey mustard, sriracha, or sweet chili.

    Q3: How can I make these wings vegan?
    Try using cauliflower or tofu instead of chicken wings, and coat them with the same seasoned flour mixture before frying or baking.

    Q4: How do I know when my wings are cooked?
    Wings should be golden brown and reach an internal temperature of 165°F (74°C). A meat thermometer is a handy tool to ensure proper cooking.

    Q5: Can I store leftover wings?
    Absolutely! Allow them to cool before placing in an airtight container for up to 3 days in the refrigerator or for 3 months in the freezer.

    These FAQs cover essential queries that many viewers may have. Answering these questions demonstrates that you are aware of your audience’s needs and concerns regarding chicken recipes.

    In conclusion, these Crispy Fried Chicken Wings not only tempt your senses with their delightful crunch and flavors but also cater to a variety of dietary preferences. It’s time to roll up your sleeves and begin your culinary adventure! Enjoy making these tasty wings and sharing them with friends and family. Happy cooking!

  • Healthy Honey Lime Chicken with Mango Salsa

    Healthy Honey Lime Chicken with Mango Salsa

    Healthy Honey Lime Chicken with Mango Salsa: A Tropical Delight

    Introduction to Healthy Honey Lime Chicken with Mango Salsa

    Are you looking for healthy dinner recipes that are not only nutritious but also packed with flavor? Look no further! This Healthy Honey Lime Chicken with Mango Salsa will become your go-to dish for weeknight meals, summer barbecues, or intimate gatherings.

    This vibrant recipe features succulent chicken marinated in a zesty blend of honey and lime, perfectly complemented by a fresh and fruity mango salsa. Not only is it simple to prepare, but it accommodates various dietary preferences, making it a versatile choice for all. The balance of protein and healthy fats ensures this dish leaves you satisfied and energized.

    Whether you’re a busy parent wanting to whip up something quick for dinner, a student who needs a nutritious meal prep option, or someone on a health journey, this recipe has you covered. Plus, it’s gluten-free and can easily be modified to fit vegan diets by substituting chicken with grilled tofu or chickpeas. Ready to embark on a tropical culinary adventure? Let’s dive into this delicious dish!

    Benefits and Advantages of Healthy Honey Lime Chicken with Mango Salsa

    One of the standout features of this Healthy Honey Lime Chicken with Mango Salsa is its simplicity. With just a few wholesome ingredients, you can create a dish that dazzles the palate and nourishes the body. The star of this recipe is chicken breast, a lean protein that supports muscle growth and helps keep you feeling full.

    The sweet and tangy marinade crafted from honey and lime juice not only enhances the flavor of the chicken but also adds nutritional benefits. Honey is a natural sweetener filled with antioxidants, while lime juice delivers a dose of vitamin C, which is essential for boosting your immune system.

    Accompanying this dish is mango salsa, a colorful combination of ripe mangoes, red onion, cilantro, and jalapeño. This refreshing salsa isn’t just a pretty garnish; it is rich in vitamins A and C and provides a boost of fiber. The added crunch and flavor profile give the dish depth, making it endlessly appealing.

    Another advantage of this recipe is its adaptability. You can easily modify it based on your dietary preferences or ingredients you have on hand. Whether you are following a low-carb, gluten-free, or even plant-based diet, this meal aligns with various eating plans while ensuring you enjoy all the flavors.

    In summary, Healthy Honey Lime Chicken with Mango Salsa is the perfect blend of taste and nutrition, making it a top choice among healthy dinner recipes. It’s fast, flexible, and above all, incredibly satisfying!

    Ingredients Overview

    Essential Ingredients for Healthy Honey Lime Chicken with Mango Salsa

    Here’s everything you need to make this delightful dish. Check out the measurements and purpose of each ingredient:

    For the Chicken Marinade

    • 2 lbs of boneless, skinless chicken breasts – A lean source of protein that cooks quickly and stays juicy.
    • 1/4 cup honey (or agave syrup for a vegan option) – This natural sweetener caramelizes during cooking, adding a delicious glaze.
    • Juice of 2 limes – Provides acidity that brightens the dish and enhances flavors.
    • 2 cloves of garlic, minced – Adds depth and a savory note to the marinade.
    • 1 teaspoon cumin – Gives a warm, earthy flavor, enhancing the overall complexity.
    • Salt and pepper to taste – Essential for balancing flavors, these are traditional seasoning staples.

    For the Mango Salsa

    • 2 ripe mangoes, diced – The star of the salsa, offering sweetness and texture.
    • 1/2 red onion, finely chopped – Provides sharpness that contrasts beautifully with the mango.
    • 1 jalapeño, seeded and minced (optional) – Adds a kick, though you can leave it out for a milder salsa.
    • 1/4 cup fresh cilantro, chopped – Brings an aromatic freshness, which brightens the profile.
    • Juice of 1 lime – Ties together the salsa, enhancing the tropical essence.

    Dietary Substitutions to Customize Your Healthy Honey Lime Chicken with Mango Salsa

    Here are some easy substitutions you can make to suit various dietary preferences:

    • To make it vegan: Swap out chicken for grilled tofu, tempeh, or chickpeas. Marinate them in the same mixture for a delightfully satisfying plant-based option.
    • Low-carb version: Use zucchini noodles or cauliflower rice instead of serving over traditional rice, keeping the dish lighter and more in line with low-carb diets.
    • Gluten-free: This recipe is inherently gluten-free as long as you select gluten-free sauces and sweeteners.
    • For added health benefits: Sprinkle chia seeds or flaxseeds into the mango salsa for an extra burst of omega-3 fatty acids and fiber.

    These substitutions allow you to cater to your guests’ preferences or your own dietary choices without sacrificing flavor.

    How to Prepare the Perfect Healthy Honey Lime Chicken with Mango Salsa: Step-by-Step Guide

    Follow these easy and straightforward steps to create your healthy honey lime chicken with mango salsa. This recipe is divided into clear sections for ease.

    1. Prepare the Marinade

    In a bowl, combine the honey, lime juice, minced garlic, cumin, salt, and pepper. Whisk until well combined.

    2. Marinate the Chicken

    Place the chicken breasts in a resealable plastic bag or a shallow dish. Pour the marinade over the chicken, ensuring it’s well coated. Seal the bag or cover the dish and refrigerate for at least 30 minutes, or up to 6 hours for maximum flavor.

    3. Prepare the Mango Salsa

    While the chicken marinates, prepare the mango salsa. In a separate bowl, combine the diced mangoes, red onion, jalapeño, cilantro, and lime juice. Toss gently to combine. Set aside to allow flavors to meld.

    4. Preheat the Grill or Oven

    If you’re grilling the chicken, preheat your grill to medium-high heat. If you opt for baking, preheat your oven to 375°F (190°C).

    5. Cook the Chicken

    • For Grilling: Remove the chicken from the marinade and discard the leftover marinade. Grill the chicken for approximately 6-7 minutes per side, or until the internal temperature reaches 165°F (75°C).
    • For Baking: Transfer the chicken to a baking dish. Bake for 25-30 minutes, or until cooked through, checking that the internal temperature reaches 165°F (75°C).

    6. Rest the Chicken

    Once cooked, remove the chicken from the grill or oven and let it rest for about 5 minutes. This allows the juices to redistribute.

    7. Serve with Mango Salsa

    Slice the chicken and serve it on a platter topped with the fresh mango salsa. This dish pairs wonderfully with brown rice, quinoa, or a fresh green salad.

    8. Enjoy

    Dig in and savor your Healthy Honey Lime Chicken with Mango Salsa. Enjoy knowing you’ve prepared a refreshing and nutritious dish that’s perfect for any occasion!

    This step-by-step guide makes it easy to prepare healthy dinner recipes in no time!

    Mastering Healthy Honey Lime Chicken with Mango Salsa: Advanced Tips and Variations

    To ensure your Healthy Honey Lime Chicken with Mango Salsa turns out perfectly every time, here are some advanced tips and variations to consider:

    Tips for Success

    1. Quality Ingredients: Use ripe, high-quality mangoes for the salsa. Their sweetness will elevate the dish to a new level.
    2. Adjust Spice Levels: If you enjoy more heat, add additional jalapeños or even a dash of cayenne pepper to the marinade.
    3. Food Thermometer: To guarantee perfectly cooked chicken, invest in a meat thermometer to monitor the internal temperature.

    Variations to Try

    • Add Additional Veggies: Incorporate diced bell peppers or cucumbers into the mango salsa for added crunch and nutrition.
    • Herb Infusion: Instead of cilantro, try basil or mint for an entirely different flavor profile that pairs well with chicken.
    • Tropical Twist: Swap mango for pineapple or peach for a fruity variation.
    • Grilled Peppers: Grill bell peppers or zucchini alongside the chicken for a well-rounded meal with vibrant colors.

    These tips and variations allow you to customize your dish, making it a staple in your collection of healthy dinner recipes!

    How to Store Healthy Honey Lime Chicken with Mango Salsa: Best Practices

    Proper storage ensures that your Healthy Honey Lime Chicken with Mango Salsa maintains its flavor and texture. Here’s how to do it:

    Refrigeration

    Store any leftover chicken and mango salsa separately in airtight containers. In the refrigerator, they can last for up to 3 days. It’s essential to keep them in separate containers to prevent the salsa from making the chicken soggy.

    Freezing

    If you want to enjoy this dish later, you can freeze the chicken. Place the cooked chicken in a freezer-safe bag or container, ensuring excess air is removed. It can last in the freezer for up to 3 months. However, it’s best to freeze without the salsa, as it’s best enjoyed fresh.

    Reheating

    When you’re ready to indulge again, thaw the chicken in the refrigerator overnight. Reheat it in the oven at 350°F (175°C) until warmed through, or in a skillet over low heat. For the mango salsa, mix in a bit of lime juice before serving for a fresh flavor boost.

    With proper storage, you’ll have healthy meals ready to go anytime, adding convenience to your collection of healthy dinner recipes!

    Nutritional Value of Healthy Honey Lime Chicken with Mango Salsa

    Nutritional information can be crucial for health-conscious individuals. Here’s a breakdown of the nutritional value for one serving (4 oz) of Healthy Honey Lime Chicken with Mango Salsa, based on using chicken breast and mango salsa without additional sides:

    • Calories: 250
    • Protein: 30g
    • Carbohydrates: 20g
    • Fats: 8g (mostly healthy fats from the olive oil, if used, in salsa)
    • Fiber: 2g
    • Sugar: 10g (from honey and mango)
    • Sodium: 250mg

    Health Benefits Summary

    • High Protein: Supports muscle recovery and growth.
    • Healthy Carbs: Provides energy and supports digestive health.
    • Vitamins and Minerals: Rich in vitamins A and C, promoting overall health.

    This dish not only tastes good but also aligns well with healthy dinner recipes by providing balanced nutrition, perfect for maintaining an active and healthy lifestyle.

    FAQs: Frequently Asked Questions About Healthy Honey Lime Chicken with Mango Salsa

    1. Can I prepare the marinade the night before?
    Absolutely! Marinating the chicken overnight can enhance the flavors even more. Just be mindful not to marinate for too long, as the acidity from the lime juice can start to break down the chicken.

    2. Is the recipe suitable for meal prep?
    Yes, this recipe is perfect for meal prep! You can store the cooked chicken and mango salsa in individual containers for easy grab-and-go lunches or dinners throughout the week.

    3. Can I use frozen mango for the salsa?
    Yes, if fresh mango is not available, you can use frozen mango. Just thaw it before chopping and mixing with the other salsa ingredients.

    4. What should I serve with this dish?
    This dish pairs well with various sides, such as brown rice, quinoa, or a fresh salad. Feel free to get creative based on your personal preferences!

    5. How can I ensure my chicken stays moist?
    Marinating and allowing the chicken to rest after cooking are great ways to maintain moisture. Additionally, cooking the chicken to the proper internal temperature (165°F / 75°C) ensures it remains juicy.

    Transform your dinner experience with Healthy Honey Lime Chicken with Mango Salsa, a dish that brings the flavors of the tropics to your table. Embracing the benefits of vibrant ingredients, health-conscious preparation, and endless customization possibilities, this recipe is a must-try for all culinary enthusiasts. Embrace this delightful addition to your roster of healthy dinner recipes and enjoy every bite!