Category: salad

  • Cucumber Caesar Salad

    Cucumber Caesar Salad

    Cucumber Caesar Salad: A Tropical Delight

    Introduction to Cucumber Caesar Salad

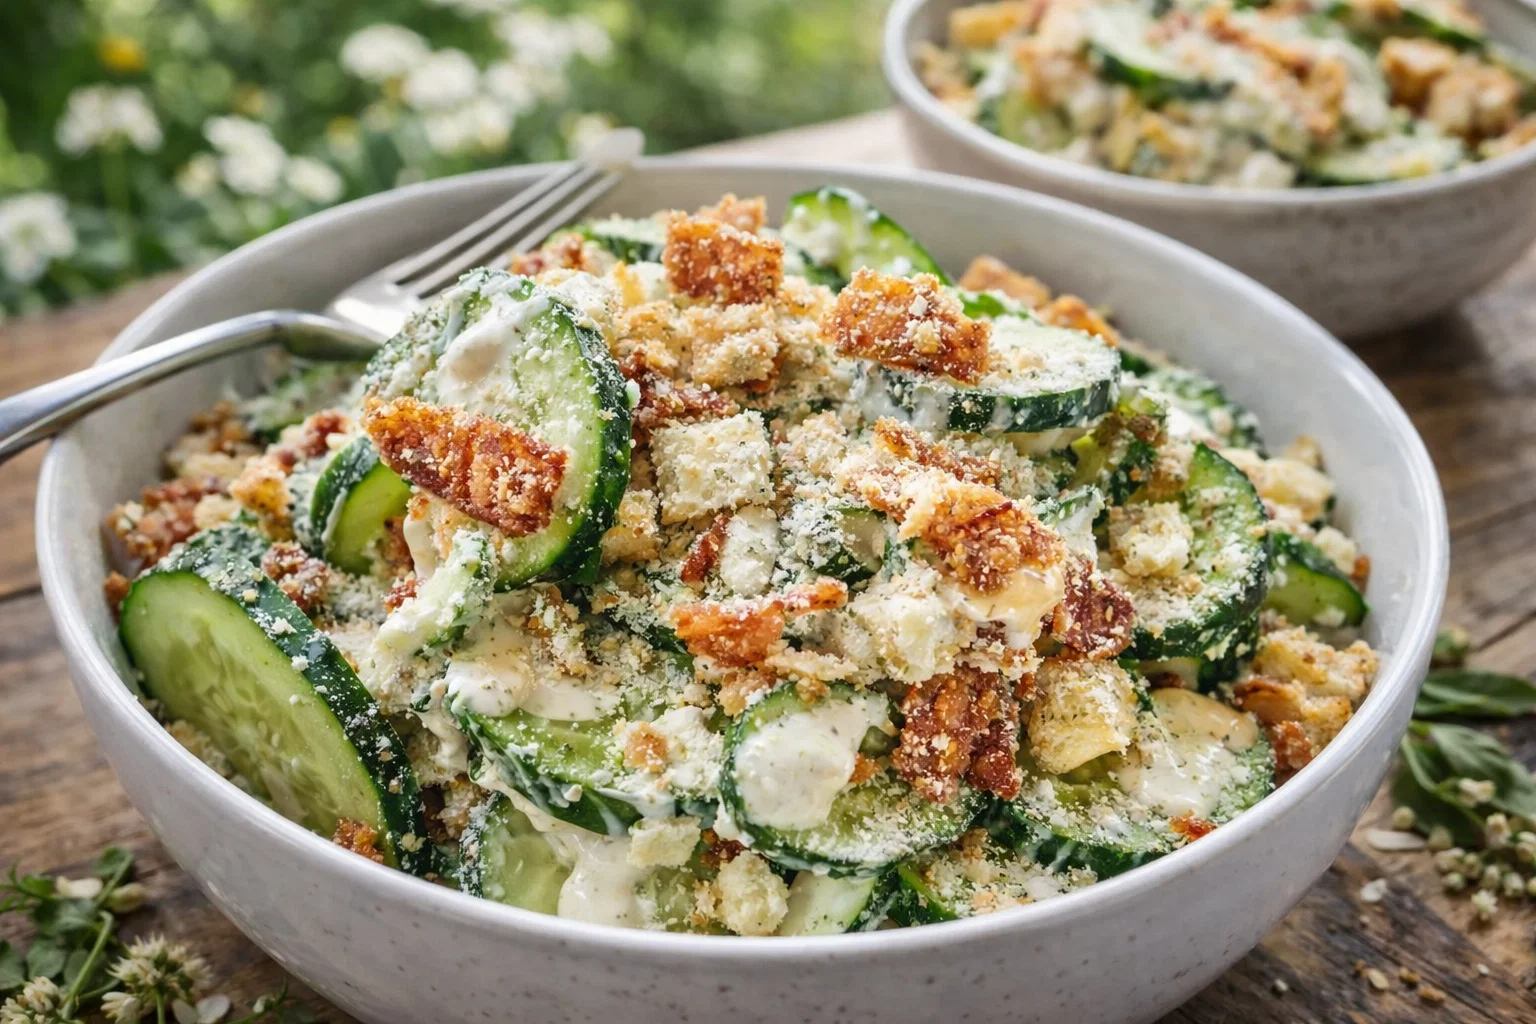
    Imagine indulging in a refreshing and vibrant cucumber salad that brings the classic Caesar dish into a healthier, lighter version! The Cucumber Caesar Salad is a delightful fusion that pairs crisp cucumbers with the rich flavors of traditional Caesar dressing, all while being incredibly simple to make. This dish stands out not only for its tantalizing flavors but also for its health benefits, making it ideal for various dietary needs.

    The beauty of this cucumber salad lies in its versatility—it can easily be tailored to fit vegan and gluten-free lifestyles, making it perfect for busy parents seeking nutritious meals for their families or food enthusiasts wanting to explore new flavors. Whether you’re a student hustling between classes, a newlywed exploring cooking together, or a busy professional who craves something quick yet satisfying, this salad is designed to inspire you.

    With cucumbers at the heart of this recipe, you can enjoy a hydrating crunch that’s low in calories yet high in vital nutrients like vitamin K and potassium. Plus, the salad is packed with dietary fiber, helping to keep you full and satisfied. Ready to dive into this tropical delight? Let’s explore the myriad benefits of Cucumber Caesar Salad.

    Benefits and Advantages of Cucumber Caesar Salad

    Cucumber Caesar Salad is not just another recipe; it’s a celebration of flavor, simplicity, and health. Here are some compelling benefits that make this cucumber salad a must-try:

    1. Simplicity of Preparation: This recipe shines in its straightforwardness. With minimal ingredients and quick procedures, you can whip it up in 20 minutes or less. Perfect for live-in situations like students or busy professionals who appreciate easy meal prep.

    2. Health Benefits: Cucumbers are renowned for their high water content, which keeps you hydrated—an essential factor, especially in warmer months. They are low in calories and can aid in weight management. Furthermore, this salad can be enriched with protein through the addition of chickpeas, grilled chicken, or tofu, safeguarding your nutritional needs while satisfying your taste buds.

    3. Dietary Suitability: Whether you’re vegan, gluten-free, or watching your calorie intake, this cucumber salad adapts wonderfully. It can further incorporate various ingredients to meet specific dietary preferences. Busy parents will find the versatility appealing as it can be a side dish to accompany any protein or served alone as a refreshing meal.

    4. Flavor Profile: Combining the cool crunch of cucumbers with a homemade or store-bought Caesar dressing yields an extraordinary flavor experience. Garnish with crunchy croutons or a sprinkle of parmesan cheese for those not adhering to strict dietary restrictions, enhancing its rich taste.

    5. Brings Joy to Gatherings: This salad is not only healthy but also visually appealing. With its vibrant colors and fresh appearance, it holds its own as an ideal dish for picnics, potlucks, or family gatherings. Its simplicity encourages home cooks to share more healthy dishes without fuss.

    Now that we’ve delved into the benefits of this Cucumber Caesar Salad, let’s look closely at the ingredients that make this flavorful dish come together.

    Ingredients Overview

    Essential Ingredients for Cucumber Caesar Salad

    Here’s a list of essential ingredients required for a truly scrumptious cucumber salad, complete with measurements and benefits:

    • 2 large cucumbers: These form the base, providing crunch, hydration, and essential nutrients. Opt for organic if possible.
    • 2 cups romaine lettuce: Offers a fresh, leafy crunch while acting as a base layer for your salad.
    • 1/2 cup parmesan cheese (optional): Adds a rich, savory depth. For a vegan option, consider nutritional yeast as a substitute for a cheesier flavor.
    • 1 cup croutons: Gives a delightful crunch; store-bought or homemade—seasoned for additional flavor; gluten-free croutons are acceptable.
    • 1/4 cup Caesar dressing: You can use store-bought or a homemade version; ensure it aligns with your dietary needs (vegan or gluten-free options available).

    Vegan Option: Replace traditional Caesar dressing with a vegan alternative, often made with tahini, cashews, or homemade avocado dressing.

    Gluten-Free Option: Use gluten-free croutons or omit them altogether for a lighter option.

    Low-Calorie Option: Skip the cheese and croutons, and add a squeeze of lemon juice for flavor!

    Dietary Substitutions to Customize Your Cucumber Caesar Salad

    To ensure everyone can enjoy your cucumber salad, consider these dietary substitutions:

    • Protein Choices: Add chickpeas, grilled chicken, or tofu for those needing a protein boost. For a plant-based diet, lentils can be a delicious and healthy substitute.
    • Dressing Alternatives: As previously mentioned, adjust the dressing according to your preferences. For a lighter option, make a yogurt-based dressing or a vinaigrette with olive oil, vinegar, and spices for distinct flavors.
    • Cheese Substitutes: Swap parmesan with vegan cheese or omit it completely if avoiding dairy. Nutritional yeast can provide a cheesy flavor without added calories.

    Now that you know the crucial ingredients and substitutions for Cucumber Caesar Salad, let’s progress to preparing this delightful dish step-by-step.

    How to Prepare the Perfect Cucumber Caesar Salad: Step-by-Step Guide

    Step 1: Prepare the Base

    1. Wash the Cucumbers: Rinse the cucumbers under cool running water to ensure they’re clean. Pat them dry with a kitchen towel.

    2. Slice the Cucumbers: Cut the cucumbers into thin rounds or half-moons, depending on your preference. A sharper knife helps maintain a clean cut and enhances presentation.

    3. Chop the Romaine Lettuce: Tear the romaine lettuce into bite-sized pieces. Ensure it’s dry to prevent a soggy salad.

    Step 2: Mix Ingredients

    1. Combine the Greens: In a large salad bowl, combine the sliced cucumbers and chopped romaine. If you’re adding any additional ingredients like chickpeas or grilled chicken, toss them in at this stage.

    2. Add Cheese and Croutons: Sprinkle your parmesan cheese or nutritional yeast onto the salad, followed by the croutons, ensuring even distribution. Adjust quantities based on dietary needs.

    Step 3: Dress the Salad

    1. Pour the Dressing: Drizzle the Caesar dressing over the assembled salad. Start with ¼ cup and adjust according to taste. Toss gently to coat the ingredients evenly.

    Step 4: Serve and Enjoy

    1. Garnish for Flavor: For added flair, sprinkle extra parmesan, croutons, or fresh herbs like parsley or basil on top.

    2. Chill or Serve Immediately: Let the salad chill in the refrigerator for about 10-15 minutes for enhanced flavors, or serve immediately to enjoy the fresh, crunchy textures.

    Step 5: Store Leftovers (If Any)

    1. Refrigerate Leftovers: If you have any leftover salad, store it in an airtight container in the refrigerator. Note that croutons may become soggy over time, so store them separately if possible.

    By following these steps, you’ll create a vibrant Cucumber Caesar Salad that’s as delightful to dine on as it is easy to prepare. It’s time to master the dish with a few advanced tips and variations.

    Mastering Cucumber Caesar Salad: Advanced Tips and Variations

    Elevate your cucumber salad game with these advanced tips and delicious variations:

    • Experiment with Dressings: Try out different dressings to give a unique twist. Creamy avocado dressing or a zesty lemon vinaigrette can switch things up while keeping the salad fresh.

    • Add more Vegetables: You can customize your salad with extra vegetables like cherry tomatoes or bell peppers to boost nutritional value. This also adds vibrant colors, making the dish visually stunning.

    • Grill the Ingredients: For a smoky flavor, consider grilling the cucumbers lightly or adding grilled veggies alongside your greens. This heightens the flavor profile, perfect for summer BBQs.

    • Play with Textures: Adding sunflower seeds or sliced almonds contributes not just nutty flavor but crunch as well. This duo can provide healthy fats and additional minerals.

    With these tips in mind, you can create your own signature Cucumber Caesar Salad, making it a refreshing staple in your culinary repertoire.

    How to Store Cucumber Caesar Salad: Best Practices

    To enjoy your Cucumber Caesar Salad later, follow these best practices for storing it:

    1. Refrigeration: Store your salad in an airtight container. It’s ideal to keep the dressing separate until you are ready to serve, to prevent sogginess.

    2. Freezing: While fresh cucumbers do not freeze well, if you make a large batch of dressing, consider freezing it in portions for future use.

    3. Reheating Options: This salad is best served cold and does not require reheating. However, if you have added grilled proteins, you may need to reheat those separately.

    By following these guidelines, your cucumber salad will retain its freshness and flavor for when hunger strikes again.

    Nutritional Value of Cucumber Caesar Salad

    Knowing the nutritional profile allows you to enjoy your Cucumber Caesar Salad guilt-free. Here’s a quick breakdown of the average nutritional values (per serving, without protein):

    • Calories: Approximately 150-200 calories (depending on the dressing and cheese used)
    • Fat: 10 g
    • Saturated Fat: 3 g (if using parmesan)
    • Carbohydrates: 12 g
    • Dietary Fiber: 3 g
    • Sugars: 4 g
    • Protein: 4 g (with additional protein/cheese, this can significantly increase)
    • Vitamins and Minerals: High in Vitamin K and potassium, with good amounts of folate and Vitamin C.

    Feel free to adjust to your dietary needs by adding proteins, dairy substitutes, or low-fat dressings. This formula ensures a nutritious, satisfying option for everyone.

    FAQs: Frequently Asked Questions About Cucumber Caesar Salad

    1. Can I make Cucumber Caesar Salad in advance?

    Absolutely! You can prepare the salad components ahead of time. Just keep the dressing separate until you are ready to serve for optimal freshness.

    2. Is Cucumber Caesar Salad suitable for vegans?

    Yes! You can easily make it vegan by using a plant-based Caesar dressing and omitting any cheese.

    3. How can I make this salad gluten-free?

    To make a gluten-free cucumber salad, simply use gluten-free croutons or omit them. A variety of gluten-free dressings are also available on the market to suit your tastes.

    4. What can I substitute for the Caesar dressing?

    You can try a simple olive oil and vinegar dressing or a homemade yogurt-based dressing with lemon juice for a healthier option.

    5. How long can I store leftovers in the fridge?

    Stored in an airtight container, your Cucumber Caesar Salad can last about 1 to 2 days in the refrigerator. However, it’s best eaten fresh due to the risk of sogginess.

    These FAQs cover the most common inquiries about Cucumber Caesar Salad. Feel free to experiment and adapt this recipe to create your unique version!


    Now that you’re armed with the information and steps to create the perfect Cucumber Caesar Salad, it’s time to bring this refreshing dish to life. Grab your ingredients and let your culinary creativity flow. Whether it’s a simple weeknight dinner or an inviting side dish for your next gathering, this salad is guaranteed to impress all who taste it! Enjoy!

  • Roasted Brussels Sprouts with Maple Glaze

    Roasted Brussels Sprouts with Maple Glaze

    Roasted Brussels Sprouts with Maple Glaze: A Tropical Delight

    Introduction to Roasted Brussels Sprouts with Maple Glaze

    If you’re on the lookout for healthy dinner recipes that offer a burst of flavor without sacrificing nutrition, this Roasted Brussels Sprouts with Maple Glaze is the perfect dish for you! Not only is it incredibly simple to prepare, but it’s also vegan, gluten-free, and packed with health benefits. These delightful little sprouts are transformed from humble veggies into a scrumptious complement to any meal, thanks to a luscious maple glaze that adds a sweet depth of flavor.

    Brussels sprouts are often overlooked, but their unique taste and texture make them a favorite in many households. When roasted, they become tender and caramelized, creating a satisfying bite that everyone will love. This recipe serves as an excellent choice, whether you’re a busy parent looking for a quick side or a food enthusiast seeking to impress guests at dinner parties. The versatility of this dish allows it to shine alongside various main courses, making it suitable for any occasion—from weeknight dinners to festive gatherings.

    Additionally, Brussels sprouts boast an array of health benefits. They are low in calories, high in fiber, and loaded with essential vitamins and minerals. Plus, with the addition of maple syrup, this recipe stays mindful of taste while prioritizing nutritional value, making it one of the standout healthy dinner recipes you can easily whip up. Let’s dive into the details of this mouthwatering dish and explore how to create it in your kitchen.

    Benefits and Advantages of Roasted Brussels Sprouts with Maple Glaze

    Roasted Brussels Sprouts with Maple Glaze is not only a delicious addition to your meal planning; it is also incredibly advantageous for numerous reasons. First and foremost, the ease of preparation makes this recipe a winner for home cooks of all skill levels. With just a handful of ingredients and minimal cooking time, even the busiest individuals can enjoy a hearty and nutritious dinner.

    From a health perspective, Brussels sprouts are nutrient powerhouses. They contain vitamins C and K, folate, and antioxidants, providing numerous health benefits such as improved immune function and stronger bones. The maple glaze, while delicious, doesn’t contribute excessive sugar when used in moderation. Instead, it allows for a hint of sweetness that’s far healthier than sugary alternatives often found in other recipes.

    Moreover, this dish is immensely versatile! It fits seamlessly into various diets, including vegan and gluten-free lifestyles. Whether you’re serving it to family members who are health-conscious, guests with specific dietary requirements, or simply looking to elevate your culinary repertoire, Roasted Brussels Sprouts with Maple Glaze stands out as a welcoming option.

    As an added bonus, these Brussels sprouts make for excellent leftovers, too, inviting you to enjoy them as a quick snack or a side on a busy evening. Incorporating this recipe into your collection elevates not only your meal offerings but also your confidence in crafting healthy dinner recipes that appeal to both palate and health.

    Ingredients Overview

    Essential Ingredients for Roasted Brussels Sprouts with Maple Glaze

    To create your delicious Roasted Brussels Sprouts with Maple Glaze, you will need the following ingredients:

    • Brussels Sprouts: 1 pound (trimmed and halved). These little green gems are essential for the dish’s base, providing flavor and nutrition.
    • Maple Syrup: 2-3 tablespoons. This serves as the star flavor enhancer, adding sweetness without being overly processed.
    • Olive Oil: 2 tablespoons. A healthier fat for roasting, it aids in the caramelization process while keeping the sprouts moist.
    • Salt: ½ teaspoon (more to taste). Essential for enhancing flavor.
    • Black Pepper: ¼ teaspoon (to taste). Recommended for a bit of heat that pairs well with sweet maple.
    • Balsamic Vinegar: Optional, for additional depth of flavor. It can be drizzled over the finished dish.

    Dietary Options: This recipe is inherently vegan and gluten-free, making it suitable for a wide range of dietary preferences.

    Dietary Substitutions to Customize Your Roasted Brussels Sprouts with Maple Glaze

    Here are some ideas to cater to various dietary restrictions or personal preferences:

    • Maple Syrup Alternatives: If you’re looking for lower-calorie options, consider using agave nectar or a sugar-free maple syrup substitute. Both will still provide sweetness while aligning with your dietary goals.

    • Olive Oil Alternatives: For those who need to avoid olive oil, avocado oil or coconut oil serve as excellent substitutes that maintain the roasting quality.

    • Add-ins: Enhance the dish by incorporating nuts, such as pecans or walnuts, for a crunchy texture or even sprinkle some feta cheese (if dairy is acceptable in your diet) for an added flavor boost.

    These substitutions ensure that you can tailor Roasted Brussels Sprouts with Maple Glaze to fit any dietary need while still enjoying a healthy and flavorful dish.

    How to Prepare the Perfect Roasted Brussels Sprouts with Maple Glaze: Step-by-Step Guide

    Follow these detailed steps to create your Roasted Brussels Sprouts with Maple Glaze, ensuring that you achieve a beautifully caramelized exterior and tender yet flavorful interior.

    1. Preheat the Oven: First, preheat your oven to 425°F (220°C). A high temperature is key for achieving that crispy texture that complements the dish.

    2. Prepare the Brussels Sprouts: Rinse the Brussels sprouts under cold water and trim off the stems. Halve each sprout lengthwise for even cooking. If you come across any outer leaves that look wilted, feel free to remove them as well.

    3. Season the Sprouts: In a large mixing bowl, combine the halved Brussels sprouts with olive oil, salt, and black pepper. Toss until they are evenly coated, ensuring every sprout gets the love it deserves!

    4. Prep the Baking Pan: Line a large baking sheet with parchment paper to prevent sticking and ensure easy cleanup. Spread the Brussels sprouts in a single layer on the baking sheet, making sure not to overcrowd them, as this allows for optimal roasting.

    5. Roast the Sprouts: Place the baking sheet in the preheated oven. Roast for about 20-25 minutes, flipping halfway through. Look for a nice golden-brown color and crispy edges.

    6. Prepare the Maple Glaze: While the Brussels sprouts are roasting, prepare the maple glaze by whisking maple syrup and balsamic vinegar (if using) together in a small bowl.

    7. Glaze the Sprouts: Once the Brussels sprouts are nicely roasted, remove them from the oven. Drizzle the maple glaze over the sprouts and toss gently to coat evenly.

    8. Final Roasting: Return the glazed sprouts to the oven and roast for an additional 5-10 minutes, allowing the glaze to caramelize slightly and infuse the sprouts with flavor.

    9. Serve: Once done, remove from the oven and allow to cool slightly before serving. Enjoy them warm as a delectable side or even as a main dish!

    This step-by-step guide leads you to a delightful culinary experience where healthy dinner recipes transform into gourmet meals.

    Mastering Roasted Brussels Sprouts with Maple Glaze: Advanced Tips and Variations

    To ensure you master the art of preparing Roasted Brussels Sprouts with Maple Glaze, consider the following tips and variations:

    • Watch Your Oven Temperature: Keep an eye on your oven temperature, as every oven can be different. If you notice the sprouts browning too quickly, feel free to reduce the heat.

    • Experiment with Spices: Throw in some garlic powder or crushed red pepper for an exciting flavor twist. Adding a pinch of smoked paprika can also provide a delightful smokiness reminiscent of outdoor barbeque flavors.

    • Make it a Complete Meal: Turn this dish into a complete meal by adding cooked quinoa or farro to the roasted Brussels sprouts. This adds bulk and makes for a filling vegetarian or vegan dish.

    • Try Different Sweeteners: While maple syrup is a fantastic choice, consider experimenting with honey (if not vegan) or agave nectar for different flavor profiles.

    • Serving Suggestions: These Brussels sprouts pair wonderfully with roasted sweet potatoes or as a vibrant side to a protein-rich main like grilled chicken or tofu.

    By incorporating these advanced tips and variations, you can elevate your Roasted Brussels Sprouts with Maple Glaze, keeping your meals fresh and exciting.

    How to Store Roasted Brussels Sprouts with Maple Glaze: Best Practices

    Storing your Roasted Brussels Sprouts with Maple Glaze properly ensures their freshness and flavor for later enjoyment. Here are some best practices:

    • Refrigeration: Allow the roasted sprouts to cool completely before transferring them to an airtight container. Stored this way, they will last in the refrigerator for up to 3 days. Simply reheat them in the oven or microwave before serving.

    • Freezing: If you wish to prepare these ahead of time, you can freeze the roasted sprouts. Spread them in a single layer on a baking sheet and freeze until solid. Once frozen, transfer to a freezer-safe bag or container. They can be stored in the freezer for up to 2 months.

    • Reheating: To reheat, preheat the oven to 350°F (175°C) and spread the frozen or refrigerated sprouts on a baking sheet. Roast for 10-15 minutes or until warmed through. This method helps to maintain their crispy texture, enhancing the overall experience of these healthy dinner recipes.

    By following these storage guidelines, you can enjoy your Roasted Brussels Sprouts with Maple Glaze whenever the craving strikes!

    Nutritional Value of Roasted Brussels Sprouts with Maple Glaze

    The Roasted Brussels Sprouts with Maple Glaze is not just a treat for the taste buds; it’s also a highly nutritious option. Here’s a breakdown of the nutritional value per serving (approximately 1 cup):

    • Calories: 120
    • Fat: 5g (mostly heart-healthy fats from olive oil)
    • Carbohydrates: 18g
    • Fiber: 7g (great for digestion)
    • Protein: 4g
    • Vitamins & Minerals:
    • Vitamin C: 124% of Daily Value (DV)
    • Vitamin K: 180% of DV
    • Folic Acid: 15% of DV

    This dish is an excellent choice for those looking to maintain a balanced diet. As a part of your collection of healthy dinner recipes, Roasted Brussels Sprouts with Maple Glaze offers both satisfaction and vital nutrients, making your meal wholesome and enjoyable.

    FAQs: Frequently Asked Questions About Roasted Brussels Sprouts with Maple Glaze

    Can I make this recipe in advance?

    Absolutely! Prepare the Brussels sprouts and roast them in advance. You can then store them in the refrigerator or freezer for later enjoyment, making them a convenient side for busy weeknights.

    How do I know when the Brussels sprouts are done?

    Look for sprouts that are deep golden brown on the outside with tender leaves when pierced with a fork. They should have a nice crispness to them.

    Can I use frozen Brussels sprouts instead of fresh?

    While fresh Brussels sprouts are recommended for the best flavor and texture, you can use frozen ones if necessary. Just be sure to thaw them completely and pat dry before roasting, as excess moisture can affect crispiness.

    What can I substitute for maple syrup?

    If you want to substitute maple syrup, consider using agave nectar for a similar sweetness level. For a sugar-free option, look for monk fruit sweetener or a sugar-free maple syrup.

    Can I add other vegetables to this recipe?

    Definitely! Feel free to toss in root vegetables like carrots, sweet potatoes, or parsnips. These can also be roasted together, allowing the flavors to meld beautifully.

    With these FAQs addressed, you can confidently embrace the process of making Roasted Brussels Sprouts with Maple Glaze, enhancing your cooking repertoire with healthy dinner recipes that are both delicious and nourishing.


    By enjoying this delightful dish, you not only elevate your dining experience, but you also invest in your health. With all the wonderful benefits, and the ease of preparation, Recreating Roasted Brussels Sprouts with Maple Glaze will surely become a regular part of your healthy dinner recipes! Happy cooking!

  • Crunchy Chicken Salad Cucumber Roll Ups

    Crunchy Chicken Salad Cucumber Roll Ups

    Crunchy Chicken Salad Cucumber Roll Ups: A Tropical Delight

    Introduction to Crunchy Chicken Salad Cucumber Roll Ups

    Are you someone who loves exploring new chicken recipes that are not only easy to prepare but also packed with nutrients? If so, you’re in for a treat with our Crunchy Chicken Salad Cucumber Roll Ups! This recipe is perfect for anyone looking for a refreshing, light, and nutritious meal or snack that’s surprisingly simple to make.

    These roll-ups combine the delightful crunch of fresh cucumbers with a flavorful chicken salad mixture that can be customized to suit various taste preferences and dietary restrictions. Whether you’re a busy parent, a student cramming for exams, or a working professional on the go, these roll-ups are a fantastic choice. They require minimal cooking, allowing you to whip them up in no time, making them ideal for lunchboxes or quick dinners.

    Moreover, they’re gluten-free and can be made dairy-free or low-calorie without compromising on taste. They also serve as an excellent way to sneak in some extra veggies. By wrapping the chicken salad in cucumber, you not only enjoy a satisfying crunch but also boost hydration and nutrient intake. So, let’s dive into the world of Crunchy Chicken Salad Cucumber Roll-Ups—your next go-to dish for health-conscious eating and culinary delight!

    Benefits and Advantages of Crunchy Chicken Salad Cucumber Roll Ups

    The Crunchy Chicken Salad Cucumber Roll Ups are designed to cater to everyone’s needs, making them a standout in the realm of chicken recipes. Here are some benefits that make this recipe particularly effective:

    1. Quick and Easy Preparation: Life can get hectic, but with this recipe, you’ll spend less time cooking and more enjoying the delicious results. The cucumber serves as an instant vessel for the scrumptious chicken salad, eliminating the need for time-consuming traditional wraps or bread.

    2. Nutrient-Rich and Health Benefits: Cucumbers are low in calories and high in water content, making them a hydrating choice. They provide an excellent source of vitamins K and C while adding a refreshing crunch to your meal. The chicken salad itself can be packed with proteins, healthy fats, and fiber, depending on the ingredients you choose. This combination helps to keep you full and satisfied, without the guilt.

    3. Versatile and Customizable: One of the key attributes of these roll-ups is their versatility. You can mix and match various ingredients to cater to vegetarians, gluten-free diets, and even those watching their calorie intake. This means you can adapt the recipe to suit anyone’s dietary needs.

    4. Perfect for a Variety of Occasions: These roll-ups are stunning when served at parties, picnics, or casual get-togethers. Their vibrant appearance makes them an attractive option on any appetizer table. They also pack beautifully for school lunches, work snacks, or a light dinner option.

    5. Kid-Friendly: If you’re a parent, you know how challenging it can be to get kids interested in healthy foods. The fun shapes and flavors of the Crunchy Chicken Salad Cucumber Roll Ups can entice even the pickiest eaters to enjoy their veggies and lean proteins.

    In summary, the Crunchy Chicken Salad Cucumber Roll Ups are an easy and delicious way to pack in nutrients while satisfying diverse dietary preferences. Whether you’re enjoying these at home or on-the-go, they will prove to be a delightful addition to your chicken recipe collection!

    Ingredients Overview

    Essential Ingredients for Crunchy Chicken Salad Cucumber Roll Ups

    To prepare your Crunchy Chicken Salad Cucumber Roll Ups, you’ll need the following ingredients:

    • 2 large cucumbers (This serves as the wrap; choose firm, fresh cucumbers for maximum crunch.)
    • 2 cups cooked chicken breast (Diced or shredded; you can use rotisserie chicken for convenience.)
    • ½ cup Greek yogurt (A healthier alternative to mayonnaise; you can opt for dairy-free yogurt to cater to dietary needs.)
    • 1 tablespoon Dijon mustard (Adds a sharp flavor that balances well with the creaminess of yogurt.)
    • 1 cup celery (Chopped; contributes to the crunch and is low in calories.)
    • ½ cup red bell pepper (Diced; for a rainbow of colors and added vitamins.)
    • 1 tablespoon fresh parsley or dill (Chopped; for a burst of freshness.)
    • Salt and pepper, to taste

    Diet-conscious Options:

    • For a vegan option, you can substitute chicken with chickpeas or tofu and use vegan yogurt.
    • For a gluten-free version, all ingredients listed are already gluten-free, making these roll-ups suitable for those with gluten sensitivity.

    Dietary Substitutions to Customize Your Crunchy Chicken Salad Cucumber Roll Ups

    1. Chicken Alternatives: For a vegetarian dish, replace the chicken with chickpeas, shredded carrots, or even quinoa. These substitutes maintain the dish’s texture while providing different nutritional benefits.

    2. Yogurt Variants: Feel free to swap Greek yogurt with other alternatives like cottage cheese or a vegan yogurt option if you want a dairy-free recipe.

    3. Nut and Seed Add-Ins: If you want to boost the healthy fats, consider adding chopped almonds or sunflower seeds into the chicken salad mix. Not only does this add nutritional value, but it also enhances the crunch factor.

    4. Low-Calorie Options: If you’re aiming for a lower-calorie version, opt out of the mustard or reduce the portion of yogurt, and load up on more vegetables.

    In this way, the recipe is highly adaptable, enabling you to create a personalized variation that accommodates different dietary requirements while keeping the taste exciting and satisfying.

    How to Prepare the Perfect Crunchy Chicken Salad Cucumber Roll Ups: Step-by-Step Guide

    Let’s get started! Follow these easy steps to create your delightful Crunchy Chicken Salad Cucumber Roll Ups:

    1. Prepare the Base: Begin by washing your cucumbers thoroughly under running water. Pat them dry with a clean towel. Trim both ends off each cucumber and slice them lengthwise into thin strips (approximately ¼ inch thick). Aim for slices that can hold the filling without breaking, adjusting the thickness as necessary.

    2. Mix Ingredients: In a medium mixing bowl, combine the cooked chicken breast, Greek yogurt, Dijon mustard, chopped celery, and red bell pepper. Stir until the mixture is evenly combined. For added flavor, incorporate your choice of fresh herbs like parsley or dill.

    3. Season: Season the chicken salad mixture with salt and pepper as per your taste. Remember, flavoring this mixture is crucial as it will dominate the overall taste of the roll-ups.

    4. Assemble the Roll Ups: Take a cucumber slice and place a spoonful of the chicken salad mixture on one end. Using your fingers, gently roll the cucumber slice around the filling, similar to a burrito. Ensure the filling is secured within the cucumber.

    5. Repeat: Continue the process for the remaining cucumber slices, creating as many roll-ups as desired.

    6. Chill (Optional): If you prefer a cooler dish, place your assembled roll-ups in the refrigerator for about 15 minutes before serving. This allows the flavors to meld and enhances the crunchiness of the cucumbers.

    7. Slice and Serve: Once chilled (or if you prefer them fresh), slice each roll-up into bite-sized pieces for easier serving. Arrange them artfully on a plate and garnish with more fresh herbs if desired.

    8. Enjoy: Dig into your Crunchy Chicken Salad Cucumber Roll Ups! Relish the delightful combination of textures and flavors, perfect for any occasion.

    These steps ensure that your chicken recipes not only taste amazing but also make for a beautiful presentation—ideal for impressing guests or enjoying a simple meal at home.

    Mastering Crunchy Chicken Salad Cucumber Roll Ups: Advanced Tips and Variations

    Getting comfortable with the Crunchy Chicken Salad Cucumber Roll Ups opens the door to numerous variations and enhancements. Here are some advanced tips and ideas:

    1. Alternative Proteins: Beyond chicken and chickpeas, consider using tuna or crab meat for a seafood twist to your roll-ups. This adds a savory flavor that pairs beautifully with the cucumber’s freshness.

    2. Spice It Up: If you enjoy a bit of heat, try adding chopped jalapeños or a sprinkle of cayenne pepper to give your chicken salad a spicy kick. Consider using flavored Greek yogurts like lemon or garlic to further enhance the flavor profiles.

    3. Texture Enhancements: To elevate the crunch, you can throw in chopped nuts or crispy onions into the chicken salad mix. These ingredients will provide contrasting textures in every bite.

    4. Use of Herbs: Experiment with various fresh herbs like cilantro or green onions to shift the flavor profile. They can add an aromatic touch that brightens the dish.

    5. Color Variation: If you’re entertaining, using a variety of bell peppers—green, yellow, and orange—can create a gorgeous spectrum of colors in your roll-ups, making them visually appealing.

    6. Dipping Sauce: For an exciting element, prepare a dipping sauce! A simple mixture of soy sauce and honey or a spicy aioli can serve as a delightful dip for added flavor.

    By implementing these advanced tips and experimenting with variations, you not only master the original recipe but also unlock a myriad of possibilities within the category of chicken recipes!

    How to Store Crunchy Chicken Salad Cucumber Roll Ups: Best Practices

    Storing your Crunchy Chicken Salad Cucumber Roll Ups requires some care to maintain the freshness and crunchy texture. Here are the best practices for storage:

    1. Refrigeration: If you plan to store the roll-ups for later, place them in an airtight container in the refrigerator. They can typically last for about 1-2 days when properly sealed. However, it’s best to consume them within the first day for optimal taste and texture.

    2. Separating Ingredients: If you want to prepare the components in advance, consider storing the chicken salad mixture separately from the cucumber slices. This way, the cucumbers remain crisp and fresh, and you can assemble the roll-ups just before serving.

    3. Freezing: While it’s not recommended to freeze cucumber slices due to their high water content, you can freeze the chicken salad filling. Store it in a freezer-safe container, and when ready to use, simply thaw it in the refrigerator before assembling your roll-ups.

    4. Reheating: If using frozen filling, gently reheat it in the microwave or on the stovetop over low heat. Once heated, you can use fresh cucumbers to wrap the chicken salad, refreshing the dish.

    By adhering to these storage guidelines, you’ll ensure that your delicious roll-ups maintain their delightful taste and crunch, making it easy for you to enjoy this recipe multiple times!

    Nutritional Value of Crunchy Chicken Salad Cucumber Roll Ups

    One of the best aspects of the Crunchy Chicken Salad Cucumber Roll Ups is their remarkable nutritional profile. Here’s a general breakdown of the nutritional value per serving (assuming you get about 8 roll-ups from the recipe):

    • Calories: Approximately 150-200
    • Protein: 20 grams (This varies with the choice of chicken or alternatives)
    • Fat: 6 grams (With Greek yogurt as a healthier fat source)
    • Carbohydrates: 10 grams (Mostly from the cucumbers and veggies)
    • Dietary Fiber: 2-3 grams (Thanks to the added vegetables)
    • Vitamin A: 10% of Daily Value (from bell peppers)
    • Vitamin C: 15% of Daily Value (from cucumbers)
    • Calcium: 5% of Daily Value (from yogurt)

    This dish aligns well with various dietary standards, including Ketogenic or Mediterranean diets, focusing on low-carbohydrate, high-protein meals. By incorporating fresh ingredients and lean protein, these roll-ups help satisfy hunger while nurturing overall health.

    FAQs: Frequently Asked Questions About Crunchy Chicken Salad Cucumber Roll Ups

    Can I make these roll-ups in advance?

    Absolutely! You can prepare the chicken salad mixture a day ahead and store it in the refrigerator. Just slice the cucumbers right before you serve to maintain their crispness.

    Is it necessary to use Greek yogurt in the recipe?

    Greek yogurt adds creaminess and protein to the chicken salad. However, you can substitute it with any yogurt of your preference or even mayonnaise. For a vegan option, use a plant-based yogurt.

    Can I use other vegetables besides cucumbers?

    Certainly! This chicken salad mixture can also be served in lettuce leaves or whole wheat wraps. Just ensure that the vegetables you choose can hold the filling without falling apart.

    How can I make a vegetarian version of this recipe?

    Simply replace the chicken with chickpeas, lentils, or quinoa, and follow the same steps. The remaining ingredients will work beautifully with these alternatives.

    What other seasonings can I add to the chicken salad?

    Enhance the flavor by adding spices such as garlic powder, onion powder, or different herbs like thyme or basil. Feel free to experiment to find your favorite combination!

    The Crunchy Chicken Salad Cucumber Roll Ups can seamlessly fit into any culinary repertoire and are sure to be a favorite for food lovers of all dietary preferences. With simplicity, health benefits, and adaptability, it’s a recipe worth bookmarking! Get ready to enjoy a fresh and flavorful dish that’s perfect for any occasion.